DeepSeek Harness Step-by-Step Tutorial: From Installation to Automation Plugins
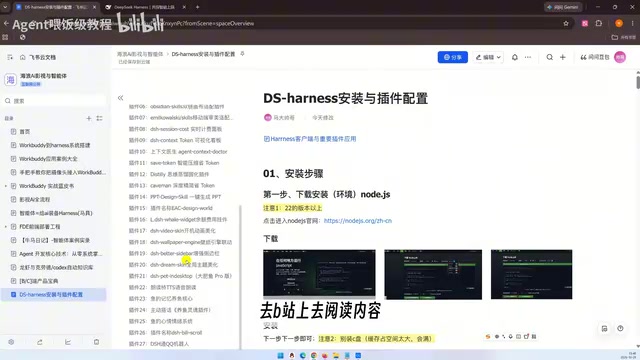
A hands-on DeepSeek Harness tutorial: set up Node.js, install the client, and master three plugin installation methods.
The article covers installing and getting started with plugins for the DeepSeek Harness client. Its core difference from the web version is the ability to read and write local folders, integrate plugins, and connect automated tasks. The tutorial stresses that Node.js must be version 20 or above and should not be installed on the C drive, verified with `node -v`; then it explains client installation and adding local folders. For plugins, it gives three paths: letting the AI install them (convenient but consumes Tokens), the plugin marketplace (beginner-friendly), and the command line (for those with a foundation), demonstrated with a vision plugin. It ends with common pitfalls and the course's future direction.
Why You Need the DeepSeek Harness Client
For a long time, DeepSeekAd's models have been known for their high cost-performance, but the official offering has remained stuck in the form of a web-based chat window. The launch of the DeepSeek Harness client changes that: it's no longer just a conversation tool, but an agent runtime environment that connects local file reading and writing, plugin integration, and task automation. According to a tutorial demonstrated by a Bilibili creator, after installing Harness, the AI can directly read the contents of local folders, modify files, or save generated files to a specified directory—operations that aren't possible in the web version.
This is also the problem this tutorial tries to solve: for beginners with no technical background, how to bypass complex configuration, first get the environment running, and then gradually understand how agents work. The entire course covers everything from installation and configuration to working modes, permission settings, plan-patching operations, and command-line operations, and finally ties the whole process together with a hands-on case study of building a small game.
Step 1: Installing the Node.js Environment
The Harness client itself is simple to install; the real prerequisite is Node.js. The tutorial author points out that many AI tools (including Claude, Codex, etc.) rely on the Node.js environment, so this step can't be skipped.
There are two details to note. The first is the version: it's recommended to choose version 20 or above, and not go below this threshold. The second is the installation path: don't install Node.js on the C drive—first, the installation itself takes up space, and second, it generates a large number of cache files that can easily fill up the system drive, so it's recommended to move it to the D drive. For the download method, the creator chose the MSI installer because it can be installed with a direct click, whereas the ZIP package requires additional extraction.
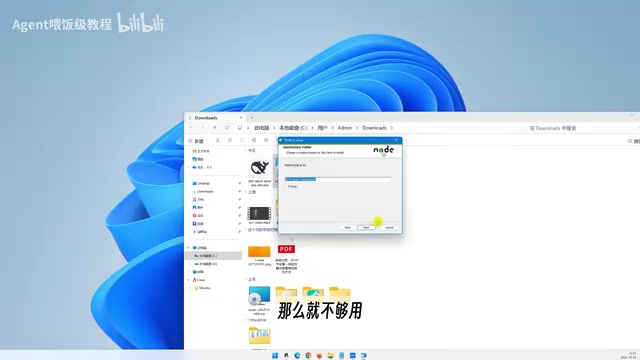
After installation is complete, verification is needed. Open the command line (if you can't find the entry point, type CMD), enter node -v, and if the returned version number is roughly 22, the environment is ready.
Node.js is a JavaScript runtime environment based on the Chrome V8 engine that lets JavaScript run directly on the operating system without a browser. A large number of modern AI development tools, command-line programs, and plugin ecosystems use Node.js as their underlying runtime environment, because its package manager npm can quickly distribute and update dependencies. The node -v mentioned in the article is Node.js's built-in version query command; the returned version number follows the format major.minor.patch, and a major version of 20 or above satisfies the requirements of most new tools. In addition, during operation, Node.js generates npm caches and module dependency files in the user directory, and the dependency size of a single project can reach hundreds of MB—this is also the practical reason for recommending against installing on the system drive.
Step 2: Installing the Harness Client
Visit Harness's download page and select the installation file for your corresponding system; likewise, it's recommended to install to the D drive. After installation is complete, open the interface—the overall layout is similar to the web-based chat window, but it adds a key capability: adding local folders. After selecting a folder, the AI can read and modify its contents, or save files into it. The interface also allows you to directly switch between several DeepSeek models.
Three Ways to Install Plugins
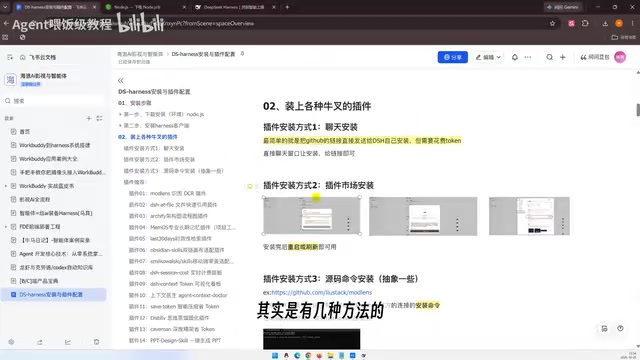
Harness is based on Codex's plugin architecture, and the real expansion of capability boundaries comes from plugin integration. The tutorial gives three paths, each with its own trade-offs.
Method 1: Let the AI install them itself
If you already know the plugin name, you can directly send the GitHub link to it in the chat window and let it install it itself. This method is the most convenient, but it consumes Tokens and credits.
Method 2: Install through the plugin marketplace
Users who don't want to spend credits can install manually in the plugin marketplace. The operation path is to click Add Plugin, enter the plugin name (for example, DSH Market), and once installed, click Launch Now; then enter the settings page and you'll see the marketplace entry. The marketplace gathers a large number of plugins, supports search and filtering, and also has recommendation slots—plugins like widgets and desktop pets can be installed with a single click.
Method 3: Command-line installation
The third method is relatively more abstract and suitable for readers with some foundation. Below the plugin homepage there's usually an option like "Install with"; copy that code and paste it into the command line to execute. The creator demonstrated the complete process using a vision plugin as an example: native DeepSeek can't recognize local images, but after installing this plugin, it can determine information such as the number of people in the image and their clothing characteristics.
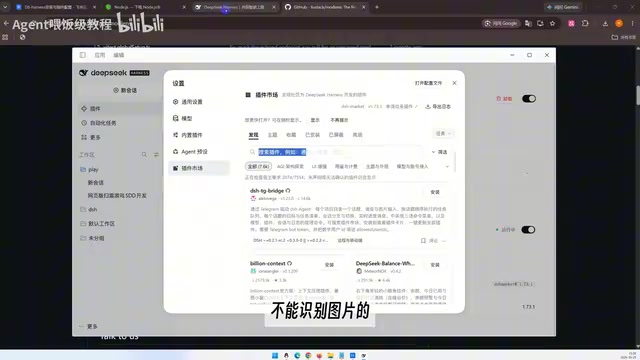
If you don't know which plugins are worth installing, you can just ask DeepSeek to recommend a list of popular and practical plugins, and then pick according to your needs.
Codex here refers to a plugin and tool integration architecture for AI agents that defines how plugins declare their own capabilities, how they're loaded by the main program, and how they interact with the model. Unlike traditional software plugins, plugins under the Codex architecture often directly expose callable functions or tool interfaces to the model, enabling the model to proactively request the execution of an operation rather than passively waiting for the user to click a menu. This design allows Harness to extend capabilities such as image recognition, web scraping, and knowledge base operations without modifying the core program. Understanding this makes it clear why the article repeatedly emphasizes that "plugins are the core value of Harness"—the client itself is just the runtime shell, and the real capability boundaries are determined by the set of installed plugins.
The command line (CMD or PowerShell on Windows) is an interface for operating the computer by entering text commands, corresponding to the click operations of a graphical interface. The article mentions "copying the code after Install with and pasting it into the command line to execute"; such commands are usually npm install or similar package management commands, which after execution automatically download plugin files from remote repositories and register them with the main program. The advantage of using command-line installation is that it's fast and doesn't consume the model's Tokens; the disadvantage is that you need to confirm the current directory is correct and the command is spelled correctly, otherwise you'll get errors about package not found or insufficient permissions. For beginners, you can start with the plugin marketplace, and try the command-line method after you're familiar with plugin names and installation locations.
How Far Can Plugins Take Harness
The scenarios listed in the tutorial span a wide range: going to Bilibili to read content and convert it to text, entering the knowledge base for management, generating videos, organizing knowledge directories, building QQ bots, and even connecting to chat software to converse with others. The common logic of these scenarios is to embed model capabilities into specific workflows and toolchains, rather than staying at the Q&A level.
For beginners, the course's organizational approach is worth referencing: first build basic understanding, then complete the preparation of the environment and client, then understand control-layer concepts such as working modes and permissions, and finally consolidate with practical cases. The author also makes it clear that this section only covers installation and the plugin entry points; subsequent courses will break down the installation methods and business uses of common plugins one by one.
A Few Common Pitfalls
- Version below the requirement: Node.js must be version 20 or above, otherwise subsequent tools may not run.
- Installed on the C drive by default: space usage and cache accumulation will slow down the system, so manually change the path during installation.
- Not verifying after installation: be sure to use
node -vto confirm the version number, to avoid being unable to troubleshoot when errors occur later. - Ignoring the plugin entry points: the core value of Harness lies in plugins, and using it only as a chat window wastes this architecture.
One-line Summary
A hands-on tutorial for the DeepSeek Harness client: configure the Node.js environment, install the client, and master three ways to install plugins.
Paragraph Summary
The article introduces the installation and plugin basics of the DeepSeek Harness client. The core difference between Harness and the web version is its ability to read and write local folders, integrate plugins, and connect automated tasks. The tutorial first emphasizes that the prerequisite Node.js must be version 20 or above and should be avoided on the C drive, and verified with node -v after installation; it then explains client installation and the operation of adding local folders. The plugin section gives three paths: letting the AI install them itself in the chat window (convenient but consumes Tokens), manual installation through the plugin marketplace (suitable for beginners), and command-line installation (suitable for those with a foundation), with a vision plugin as an example to demonstrate the effect. The article ends by listing common pitfalls and outlining the direction of subsequent courses.
Related articles

DeepSeek Harness in Detail: DIY Your Own Software Like Building with LEGO
What is DeepSeek Harness? Using the metaphor of a car assembly platform, this article explains this equipment system of freely combinable functional modules, analyzes its spatiotemporal composability technical foundation, and shows how ordinary users can DIY exclusive software that does not exist on the market at extremely low cost.

DeepSeek Harness Step-by-Step Tutorial: Master DSH and Its Plugin Ecosystem in 50 Minutes
DeepSeek Harness step-by-step install tutorial: from Node.js environment setup to client installation, covering three plugin install methods — chat, marketplace, and command line — plus practical uses of local file access and plugin extensions.

DeepSeek Open-Sources Super-agent Architecture: A Turning Point for Proactive AI
DeepSeek's open-source Super-agent architecture proposes a new proactive AI paradigm: a central Agent dispatches tasks, sub-Agents execute autonomously, and humans only decide and accept. This article analyzes the watershed between passive and proactive AI, and the implementation logic of proactive Agents in scenarios like short-video lead generation.