DeepSeek Harness Tutorial: From Installation to Plugins — Building an AI Super Agent

DeepSeek Harness tutorial: from installing Node.js to mastering the plugin ecosystem—making AI truly get work done.
The article introduces DeepSeek's Harness client, which extends model capabilities from the chat window to local files, the command line, and the plugin ecosystem. It can read and write folders, call tools, run code, and use plugins for tasks like organizing Bilibili content, generating videos, and connecting to chat apps. Installation has two steps: install Node.js (version 22+ recommended, path on D drive, verify with node -v), then install the Harness client (also avoid C drive). Plugins are key to amplifying capabilities, with three installation methods: AI self-install via GitHub link (consumes Tokens), one-click via plugin marketplace (recommended), and command-line execution. The article also covers three beginner pitfalls: low version, C drive path, and not verifying the environment.
AI Agents are turning "can chat" into "can get work done." DeepSeek's Harness client extends model capabilities from the chat window into local files, the command line, and the plugin ecosystem—it can read and modify local folders, call tools to execute commands, run code, and push the boundaries further through plugins. According to a hands-on demo by a Bilibili creator, after installing a few plugins, Harness can read content from Bilibili and save it into a knowledge base, generate videos, organize knowledge directories, and even connect to chat apps to handle conversations on your behalf. This tutorial starts from zero and thoroughly explains installation and plugins—the two things most likely to trip up beginners.
Why It's Worth Your Attention: From Chat Tool to Work Assistant
The real differentiator isn't who's better at prompting AI—it's who can get AI to autonomously break down complex tasks, call tools, execute commands, read and write files, and even have multiple Agents collaborate. The creator hits the pain point directly: when facing complex tasks, you still have to do everything step by step yourself—from organizing files to running code, from finding information to handling projects, every step requires manual involvement.
DeepSeekAd Harness is positioned exactly here. It's no longer limited to simple Q&A and content generation—it calls tools around tasks, handles files, analyzes data, executes commands, searches for information, writes and runs code, and can extend its capabilities through plugins, participating in complete workflows through Agent collaboration and task scheduling. For users already accustomed to the DeepSeek model and its cost-effectiveness, the client's arrival means these capabilities finally have an operational entry point.
Step One: Set Up the Node.js Environment
Installation has two major steps. The first is Node.js. Many AI tools are based on the Node.js environment—even before installing tools like Codex, Node.js must be set up first.
When you go to the Node.js official website to download, the page automatically adapts to your system: on Windows you get the Windows version, on Mac the Mac version. On version selection, the creator explicitly recommends version 22 or above—don't choose anything below 22. For the download package, you can pick either zip or MSI; the advantage of MSI is that you can install it directly by clicking, whereas zip requires extra extraction.
There's one key reminder during installation: change the installation path to the D drive. There are two reasons—installing to the C drive takes up space, and these types of tools generate many temporary files that can easily fill up the C drive.
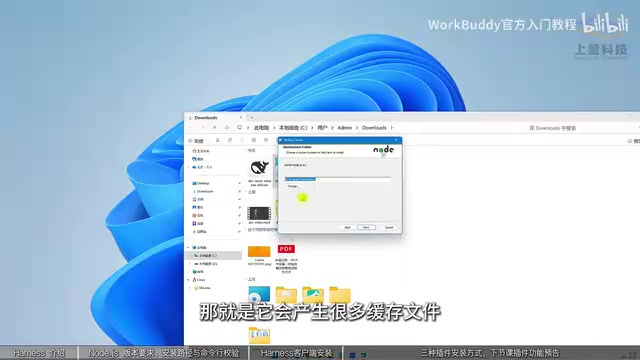
After installation, you must verify. Open the command line (if you can't find the entry, just type CMD), enter node -v with a space and hit Enter—if it returns a version number and the version is not lower than 20, the environment is ready.
Node.js is a JavaScript runtime based on Chrome's V8 engine that lets JavaScript run locally outside the browser, making it a foundational dependency for many command-line tools and AI clients. Node.js follows a release strategy where even-numbered versions are Long Term Support (LTS) and odd-numbered versions are Current, and 22 belongs to the newer LTS line with better stability and ecosystem compatibility, while versions below 20 may lack new APIs and cause some tools to fail during installation or startup. Changing the installation path to a non-system drive during installation not only saves C drive space but also avoids issues from system drive permission restrictions and temporary cache buildup.
Step Two: Install the Harness Client
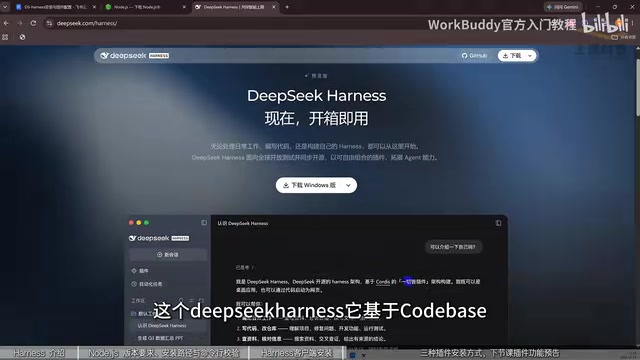
Once the environment is ready, click the link to enter the Harness download page, which lists client files for each system—Windows users should choose the Windows version. After downloading, right-click to open the installer, and again avoid placing the installation location on the C drive—change it to the D drive, click Install Now, wait for completion, click Finish, and the Harness interface opens.
The interface looks similar to the DeepSeek chat window on the web, but there's one difference the web version can't achieve: it can add local folders. After adding, Harness can read the folder's contents, modify contents, or save files into it. In the model selection area, several DeepSeek models are visible.
The Codex plugin architecture mentioned in the article refers to a client design approach that uses plugins as extension units: the core program only retains model invocation, session management, and basic tool interfaces, while capabilities like reading and writing local files, executing commands, and connecting to external services are all loaded on demand as plugins. The benefit of this approach is that the client size is controllable and capabilities are modular, and third-party developers can independently publish plugins without waiting for official updates. Plugins typically exist as independent directories or packages, declaring the tool functions they provide through manifest files, and the main program dynamically registers and calls these functions at runtime—which is why the plugin marketplace can accommodate a large number of extensions from different sources.
Plugins Are the Real Capability Amplifier
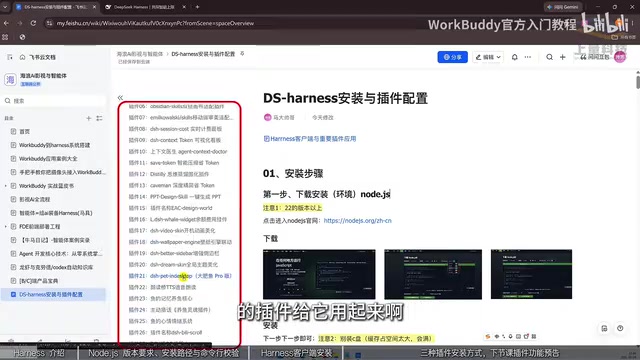
The creator repeatedly emphasizes in the video that Harness is based on the Codex plugin architecture, and its real strength lies in plugin integration. There are three ways to install plugins, each with different difficulty and cost.
Method One: Let AI Install It Yourself
The most direct way is to give it the plugin's GitHub link in the chat window once you know the plugin name, and let it install itself. The cost is consuming Tokens and credits.
Method Two: Install Through the Plugin Marketplace (Recommended)
If you don't want to spend credits, go through the plugin marketplace. Click "Add Plugin," fill in the plugin name in the popup input box—for example, enter "DSH Market"—click Install, and once the system detects it, installation begins. After it's installed, click Launch Now and you can browse the plugin marketplace. The entry is under "More" > "Settings," where the plugin marketplace you just installed will be. In the marketplace you can search for various plugins, filter by category, and there are also some official recommendation spots, such as the little whale widget and desktop pets—just click to install. The creator mentions the marketplace may have tens of thousands of plugins.
Method Three: Command-Line Installation
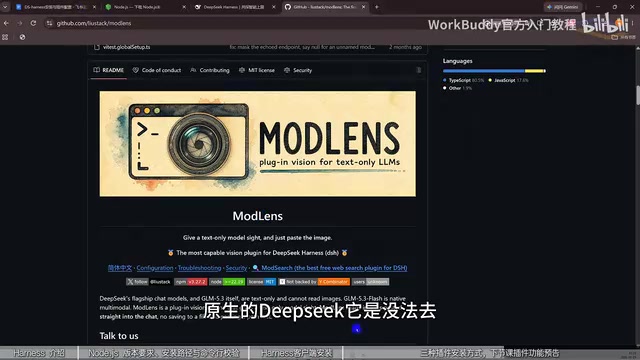
The third method is more technical. The example the creator gives is "the most powerful DeepSeek Harness external vision plugin on the internet"—native DeepSeek can't read certain local images or recognize image content, but after installing this plugin, it can identify how many people are in an image and what each person is wearing. The installation method is to find the "install with skill" option at the bottom of the plugin webpage, copy that command, paste it into the command line and execute it, then wait for installation to complete. For those unfamiliar with the command line, this method is more abstract—the first two are more worry-free.
If you don't know which plugins are available, you can just ask DeepSeek to give you a list of popular and practical plugins, then pick the ones you need.
Command-line installation is essentially executing a package manager or installation script in the terminal to download plugin code to a specified local directory and complete dependency configuration. Compared to the graphical plugin marketplace, the command-line approach can directly specify versions, source repositories, and installation parameters, making it suitable for plugins not yet listed in the marketplace and convenient for batch deployment and automation. The trade-off is that users need to understand the current working directory, environment variables, and permission concepts, and when commands fail, they need to read error messages and troubleshoot themselves. The "install with skill" mentioned in the article is a copyable command provided by the plugin author—before copying, you should confirm the source is trustworthy to avoid executing scripts of unknown origin.
Common Issues and Next Steps
Let's summarize the pitfalls beginners most easily fall into: Node.js version below 22, installation path on the C drive, and not verifying the environment after installation. Avoid all three, and you'll have the foundation for tinkering with plugins later.
At the end of the video, the creator previews that the next section will specifically cover how to install the most commonly used and useful plugins, what they do, and what role they can play in specific business scenarios. For those who want to turn AI from a chat tool into a real work assistant, getting the client and plugin marketplace running first is more valuable than repeatedly studying prompts.
One-line Summary
DeepSeek Harness tutorial: from installing Node.js to mastering the plugin ecosystem—making AI truly get work done.
Paragraph Summary
The article introduces DeepSeek's Harness client, which extends model capabilities from the chat window to local files, the command line, and the plugin ecosystem. It can read and write folders, call tools, run code, and use plugins to accomplish tasks like organizing Bilibili content, generating videos, and connecting to chat apps. Installation has two steps: first install Node.js (version 22 or above recommended, change the path to D drive, verify with node -v after installation); then install the Harness client, also avoiding the C drive. Plugins are key to amplifying capabilities, and the article provides three installation methods: letting AI self-install via GitHub link (consumes Tokens), one-click installation through the plugin marketplace (recommended), and executing installation commands via command line. The article also outlines three common beginner pitfalls: version too low, path on C drive, and not verifying the environment.
Related articles

Vibe Coding in Practice: Full-Stack Development with Claude Code + Cursor
Based on Bilibili's Vibe Coding course series, this article maps a full-stack path with Claude Code and Cursor: from setup and Git to a finance app, payments, multi-agent and hooks, OpenCode deployment, and security compliance.

DeepSeek Harness from Beginner to Pro: Deconstructing the AI Agent Foundation
What is DeepSeek Harness? This article breaks down the positioning and capabilities of this open-source AI Agent foundation, covering the complete beginner path of environment setup, model configuration, workspace selection, and plugin installation, and analyzes three common configuration thresholds for newcomers to help you build your own Agent workflow from scratch.

Master WorkBuddy in 40 Minutes: Desktop Office Agent from Beginner to Expert
Based on a 40-minute Bilibili course, this guide systematically covers WorkBuddy desktop office Agent installation, three working modes, multimodal practice, skills/experts/connectors ecosystems, memory rules, and automated scheduled tasks, plus credit consumption and pitfalls.