DeepSeek Local Deployment Tutorial: One-Click Install & Run with Ollama
Deploy DeepSeek R1 locally in three steps using Ollama—no more website lag.
This guide explains how to deploy the DeepSeek R1 large language model locally using the Ollama open-source framework. The entire process takes just three steps: install Ollama, choose the appropriate model version (7B recommended, requiring 16GB RAM + 8GB VRAM), and run a single command to complete deployment. Local deployment eliminates website lag and queuing, ensures data privacy, and can be extended with tools like Open WebUI for graphical interfaces and local knowledge base functionality.
Tired of DeepSeek's official website lagging and making you wait in queue? Local deployment is the best solution. This guide will walk you through deploying DeepSeek R1 locally using Ollama—say goodbye to network congestion and enjoy a private AI experience in just 10 minutes.
Why Deploy DeepSeek Locally?
DeepSeekAd R1, a top-tier Chinese-developed large language model, went viral across the internet during the Spring Festival. However, high-traffic access to the official website has caused slow responses and frequent disconnections, seriously impacting the user experience. Deploying DeepSeek locally offers clear advantages:
- Zero latency: No queuing—ask and get instant answers
- Data privacy: All conversation data stays local, ideal for handling sensitive information
- Offline availability: No internet dependency—use it anytime, anywhere
- Extensibility: Integrate with local knowledge bases later to build private AI applications
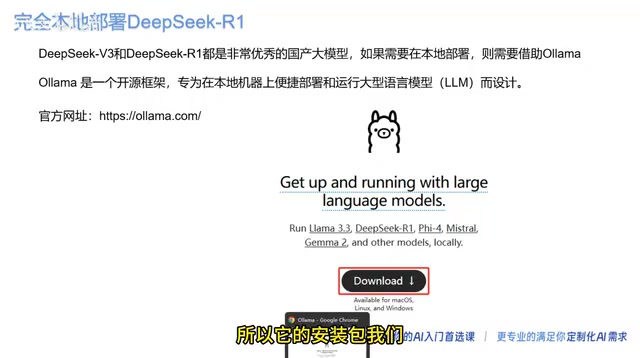
The key tool that makes all this possible is Ollama—an open-source framework designed specifically for running large language models locally, capable of downloading and launching models with a single command.
Ollama was born in late 2023, and its core value lies in packaging complex model inference environments into a single executable file. Under the hood, it's built on the llama.cpp engine, which implements efficient quantized inference in C++, enabling consumer-grade CPUs/GPUs to run large models that would otherwise require data-center-level hardware. Ollama also includes built-in model repository management, REST API services, and multi-model concurrent scheduling capabilities, making it suitable not only for personal use but also as a lightweight AI service backend for developers.
Step 1: Download and Install Ollama
Ollama's official website has a clean, minimalist interface. Simply visit the site and click the "Download" button to access the download page.
The download page offers installation packages for macOS, Linux, and Windows. Choose the version matching your operating system. Using Windows as an example, you'll get an installer with a little llama icon after downloading.
Notes on the Ollama Installation Process
After double-clicking to run the installer, you'll find that Ollama's installation process is remarkably simple—there are no configurable options. No need to choose an installation path, no components to check—just click install and wait for completion.
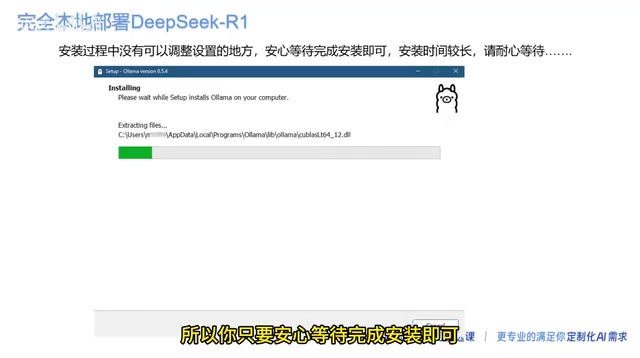
Since the Ollama program is relatively large, installation may take a bit longer—please be patient. After installation is complete, open Windows Terminal (CMD or PowerShell) and enter the following command to verify the installation:
ollama
If the terminal displays Ollama's help information and list of available commands, the installation was successful and you can proceed to the next step.
Step 2: Choose the Right DeepSeek Model Version
Back on the Ollama website, click the "Models" tab in the upper left corner to see a list of all supported models. Find and click "DeepSeek R1" to enter the model details page.
The key decision here is choosing the right parameter version. DeepSeek R1 offers multiple versions ranging from 1.5B to 671B—the larger the parameter count, the stronger the reasoning capability, but the higher the hardware requirements.
It's worth noting that all versions distributed by Ollama have undergone GGUF format quantization (typically Q4_K_M or Q8_0 precision), compressing each parameter from the original 16-bit floating point to 4-8 bits. This reduces VRAM usage by 50%–75%, while inference quality loss is typically within 5%. Taking the 7B version as an example, the original FP16 precision requires about 14GB of storage, but after quantization it only needs 4.7GB—this is fundamentally why ordinary consumer hardware can run it. The full 671B version stored in FP16 precision would require over 1TB of VRAM and still belongs exclusively to the enterprise domain.
Here's a hardware requirements reference for each version:
| Model Version | CPU | RAM | Disk Space | VRAM | Use Case |
|---|---|---|---|---|---|
| 1.5B | 4 cores+ | 8GB | 2GB | 4GB | Entry-level experience, weaker performance |
| 7B/8B | 8 cores+ | 16GB | 8GB | 8GB | Daily use, best value |
| 14B | 8 cores+ | 32GB | 14GB | 16GB | Advanced use, better results |
| 671B (full version) | High-end server | Extremely large | Extremely large | Extremely large | Enterprise-level, impractical for individuals |
For most personal users, the 7B version is recommended—it strikes a good balance between inference performance and hardware requirements, and the 4.7GB model size is within an acceptable range. If your computer has higher specs (32GB RAM + 16GB VRAM), consider the 14B version for better answer quality.
Step 3: One-Click Deployment of DeepSeek R1
After selecting your model version (using 7B as an example), the page will display the corresponding installation command.
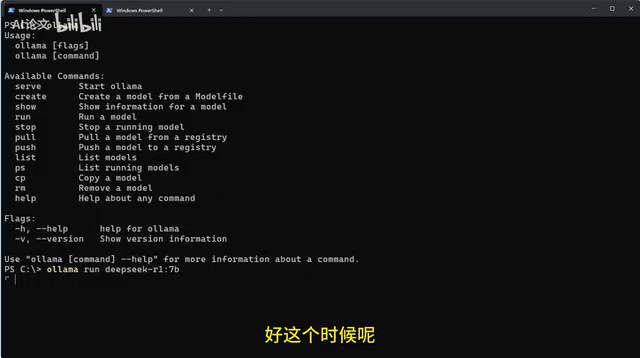
Copy the command, switch back to the terminal window, paste it, and press Enter:
ollama run deepseek-r1:7b
On first run, Ollama will automatically download the model file from the remote server. The DeepSeek R1 7B version is approximately 4.7GB total, and download time depends on your network speed. The terminal will display download progress in real-time—just wait patiently.
When the terminal displays "success"—congratulations, DeepSeek R1 has been successfully deployed locally!
Step 4: Local Chat Experience
After successful deployment, the terminal automatically enters conversation mode. You can directly type questions to interact with DeepSeek R1. For example, if you type "Who are you?", the model will first enter a thinking process, then provide its answer: it's an AI assistant developed by the Chinese company DeepSeek.
This "thinking process" is DeepSeek R1's signature feature—Chain-of-Thought reasoning. During training, R1 incorporated reinforcement learning (the GRPO algorithm), incentivizing the model to perform explicit step-by-step reasoning before outputting the final answer. These intermediate thinking steps are presented to users wrapped in <think> tags. This mechanism enables R1 to significantly outperform standard instruction-tuned models of the same parameter size on mathematical reasoning, code generation, and logical analysis tasks. Its reasoning capabilities approach the OpenAI o1 series on multiple benchmarks.
Functionally, the locally deployed DeepSeek R1 is essentially no different from the web version—it has the same deep reasoning capabilities. The differences are:
- Response speed depends on local hardware performance rather than network conditions
- The interface is currently command-line based, which is less intuitive than the web version
- No usage limits—no concurrent queuing issues
Advanced Usage: GUI and Local Knowledge Base
The command-line interaction isn't user-friendly for most people, especially when it comes to integrating local knowledge bases later. The community currently offers several open-source solutions to pair with Ollama for graphical interfaces. Common choices include:
- Open WebUI: Provides a ChatGPT-like web interface with simple deployment
- AnythingLLM: Supports local knowledge base construction with RAG (Retrieval-Augmented Generation) for private data
- Cherry Studio: A desktop AI client supporting multi-model management and switching
Among these, RAG (Retrieval-Augmented Generation) is the core technical architecture for local knowledge base solutions and is worth understanding in depth. Here's how it works: private documents are chunked and converted into vectors via an Embedding model, then stored in a local vector database (such as ChromaDB or Milvus). When a user asks a question, semantically similar document fragments are first retrieved from the vector database, then these retrieved results are injected as context into the LLM's prompt to generate an answer. This approach bypasses the LLM's knowledge cutoff date limitation without requiring model fine-tuning, and is currently the mainstream technical approach for enterprise private AI deployment. Tools like AnythingLLM have packaged this entire workflow into a no-code interface that ordinary users can easily get started with.
With these tools working together, you can build a complete private AI knowledge base system locally, enabling instant retrieval and Q&A over private data while ensuring data security and preventing leaks.
Summary
The core process for locally deploying DeepSeek R1 is very simple: Install Ollama → Choose model version → Deploy with one command. The entire process requires no programming background and no complex environment configuration. The key is choosing the right model version based on your hardware—the 7B version is perfectly adequate for mainstream configurations with 16GB RAM and 8GB VRAM.
If you're fed up with DeepSeek's website lagging and queuing, spend 10 minutes trying local deployment via Ollama and experience lag-free AI conversations.
Related articles
 Tutorials
ChatGPT Plus Subscription Guide: Are GPT-5.5, image-2, and Codex Worth the Upgrade?
A detailed look at ChatGPT Plus features — GPT-5.5, image-2, and Codex — with a Plus vs Pro comparison and a complete step-by-step subscription guide for users outside the US.
 Tutorials
Harness AI Engineering in Practice: Using Claude Code to Master Enterprise-Level E-Commerce Development
Deep dive into Harness AI Engineering: master enterprise e-commerce development with Claude Code using the Rules, Skills, Wiki, and Changes framework.
 Tutorials
Cursor + Codex Dual-IDE Collaboration: A Practical Methodology for Open-Source Project Customization
A complete methodology for open-source project customization based on real-world experience, detailing the Cursor+Codex dual-IDE workflow, seven-stage process, MVP validation, and AI source code reading techniques.