EasyClick iOS Automation Setup Guide: Complete Tutorial for USB Connection & Standalone Modes

Complete setup tutorial for EasyClick iOS automation's USB connection and standalone modes.
This article systematically covers the two core operating modes of EasyClick iOS: USB Connection Mode (for development and debugging, requiring a computer connection) and Standalone Mode (packaged as an independent IPA for long-term unattended operation). It details the setup process for each mode, including IPA signing, enabling Developer Mode, and granting required permissions, and introduces Hardware Mode as an advanced solution for bypassing automation detection.
EasyClick is a multi-platform automation scripting tool. Due to Apple's closed ecosystem, the iOS version requires a significantly more complex setup process than its Android counterpart. This article systematically covers the complete configuration workflow for the two core operating modes of the iOS version — USB Connection Mode and Standalone Mode — helping beginners get started with iOS automation script development.
Core Differences Between the Two Operating Modes
Before diving into the setup, let's clarify the two operating modes of EasyClick iOS, as they target entirely different use cases:
USB Connection Mode: Requires a computer as the control center and a data cable, with the phone always connected to the computer. This mode is ideal for the script development and debugging phase, allowing you to monitor runtime status in real-time, modify code, and quickly verify results.
Standalone Mode: Packages scripts into an independent IPA application installed on the phone, which can then run completely independently without a computer. This mode is suited for scenarios where scripts have been fully debugged and need to run unattended for extended periods.
In short, use USB Connection Mode for development and debugging, and Standalone Mode for stable long-term execution. The two are not mutually exclusive — they represent different stages of a complete workflow.
USB Connection Mode Setup Process
The entire USB Connection Mode setup can be broken down into several key steps, involving alternating operations between the computer and the phone.
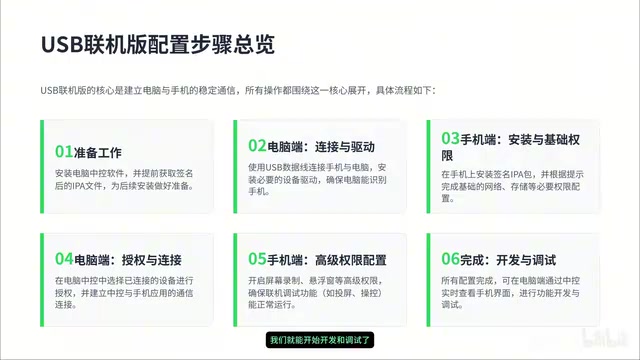
Computer-Side Preparation
- Install the latest version of the EasyClick control center software
- Prepare a signed connection-mode IPA file (all IPAs must be signed before installation — this is a fundamental iOS restriction)
- Connect the iPhone/iPad via data cable and tap "Trust This Computer" on the phone's popup dialog
- Windows users need to install Apple drivers separately (usually installing iTunes is sufficient) to ensure the computer can properly recognize the device
Phone-Side Basic Configuration
- Install the signed EasyClick connection-mode IPA
- Enable iOS Developer Mode: This is a prerequisite for all automation operations. On iOS 16 and above, go to "Settings → Privacy & Security → Developer Mode" to manually enable it
- If using a personal developer certificate for signing, you also need to trust the corresponding developer certificate under "Settings → General → VPN & Device Management"
Device Authorization & Connection
This is the most critical step in the entire process. In the computer's control center software, find the connected device and click "Activate" and "Authorize" in sequence. Then open the EasyClick APP on the phone, which will automatically establish a connection with the control center.
Verification method: When you can see the phone's real-time screen mirroring in the control center interface, the connection has been successfully established.
Granting Advanced Permissions for Automation
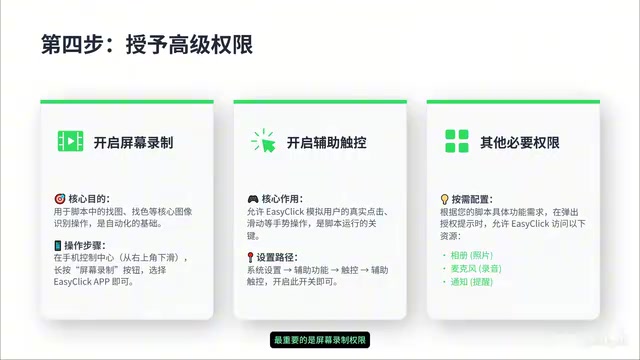
This step directly determines what functions your scripts can perform:
- Screen Recording Permission (required): This is the foundation for image recognition, color detection, and other visual identification features. Without this permission, scripts cannot capture screen content
- Assistive Touch Permission (required): Scripts need Assistive Touch to simulate real taps, swipes, and other operations
- Depending on specific script requirements, you may also need to grant network access, notification, and other permissions
Verifying Successful Configuration
After completing the setup, it's recommended to write the simplest possible test script (such as tapping a specific screen coordinate) and observe whether the phone executes the operation as expected. If everything works correctly, you're ready to begin formal iOS automation script development.
Standalone Mode Setup Process
The core concept of Standalone Mode is: first package your debugged scripts into an independent IPA application on the computer, sign it, install it on the phone, and achieve fully computer-independent operation.
Script Packaging
Strongly recommended: Debug your script to complete stability in USB Connection Mode before proceeding with packaging.
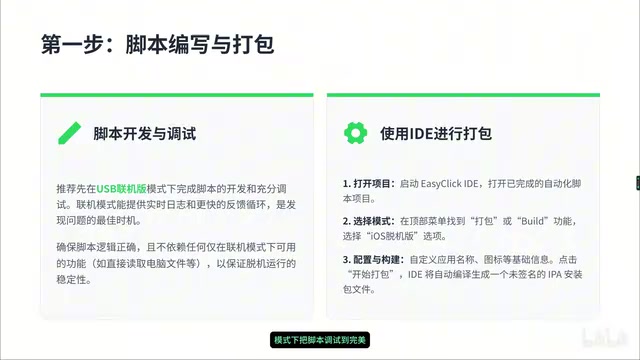
In the EasyClick IDE, find the packaging function, select "iOS Standalone Version," configure the APP name, icon, and other information, then click package to generate an IPA file. This IPA is essentially an independent iOS application containing your script logic.
IPA Signing & Installation
Sign the packaged IPA file using the same method as for the connection version. After signing, install the IPA on the phone using tools like AltStore, iMazing, or similar utilities.
After installation, you still need to complete the following configuration:
- Enable Developer Mode
- Trust the developer certificate
- Grant Screen Recording and Assistive Touch permissions
These steps are identical to the USB Connection Mode setup.
Independent Standalone Operation
Find and open the packaged APP on your phone, tap "Start Running," and the phone can now execute automation tasks independently without a computer.
Hardware Mode: An Advanced Solution to Bypass Detection
Beyond the purely software-based approach, EasyClick also supports Hardware Mode. Through external hardware devices such as Bluetooth adapters or OTG cables, it simulates real touch operations at the physical layer.
The core advantage of Hardware Mode is: operation signals come from physical hardware rather than software injection, effectively bypassing certain apps' automation detection mechanisms and producing simulated operations that more closely resemble real human behavior.
The Hardware Mode setup process mainly includes:
- Preparing the corresponding hardware device
- Flashing dedicated firmware
- Performing touch calibration
- Establishing a connection with EasyClick
Mode Selection Recommendations & Common Issues
Mode Selection for Different Scenarios
| Use Case | Recommended Mode |
|---|---|
| Script development & debugging | USB Connection Mode |
| Long-term stable unattended operation | Standalone Mode |
| Target APP has strict anti-cheat measures | Standalone Mode + Hardware Mode |
Common Issue Troubleshooting
- IPA installation failure: Check whether the signature is valid, whether the certificate has expired, and whether the device UDID has been registered to the developer account
- Device not recognized: Confirm drivers are correctly installed, the data cable supports data transfer (not a charge-only cable), and "Trust This Computer" has been tapped
- Image/color detection failure: Confirm Screen Recording permission has been properly granted and check whether the screenshot resolution matches the target device
- Taps not responding: Confirm Assistive Touch permission is enabled and verify coordinates are correct
Conclusion
iOS platform automation setup is indeed considerably more complex than Android, mainly due to Apple-specific restrictions like the IPA signing mechanism, permission granting, and Developer Mode requirements. However, as long as you follow the process step by step and understand the reason behind each step, the entire configuration process is fully manageable.
Beginners are advised to start with USB Connection Mode, become familiar with EasyClick's development workflow, and then transition to Standalone Mode — progressively mastering the complete pipeline of iOS automation script development.
Related articles
 Tech Frontiers
A Rare Quiet Day in AI: Recursive Self-Improvement Stirs Beneath the Surface
A rare quiet day in AI sees multiple sources go silent simultaneously. Behind the calm, Recursive Self-Improvement (RSI) research continues. What this means for the industry.
 Tech Frontiers
Reve 2 vs. Ideogram 4: A Deep Dive into Layout Control in AI Image Generation
A deep comparison of Reve 2 and Ideogram 4's layout control capabilities, covering technical approaches, real-world use cases, and industry trends for designers and creators.
 Tech Frontiers
In the Weights: Check Your Influence Score in the AI World
In the Weights is an AI influence search engine that quantifies your presence in the AI world with a score. Explore how it evaluates practitioners and what it means for digital identity.