How to Use Codex with DeepSeek: A Guide for Users Without a ChatGPT Account

Step-by-step guide to running Codex with DeepSeek instead of ChatGPT for users in China.
This guide walks through a complete Codex setup for users in China who lack a ChatGPT Plus account. Using the third-party Codex++ Management Tool, you can replace Codex's default GPT backend with DeepSeek or other domestic models. The process involves installing Codex without opening it, configuring DeepSeek's Base URL and API Key in the management tool, then launching Codex via the tool's restart button and logging in with your DeepSeek API Key. DeepSeek's API is fully OpenAI-compatible, and costs are minimal — ¥10 is enough for learning purposes. Users with an existing ChatGPT Plus account can skip all of this and log in directly.
For developers in China, OpenAI's Codex is both indispensable and frustratingly inaccessible. It's a powerful tool — increasingly seen as something every developer's machine will eventually need — but its native login flow requires a ChatGPT Plus account, which presents real barriers for users without an overseas account, an active subscription, or reliable access to the necessary network infrastructure. This guide is based on a hands-on tutorial originally published on Bilibili, and walks through a complete setup for running Codex with a domestic Chinese large language model (using DeepSeek as the example) in place of ChatGPT.
Why You Need to "Swap the Backend"
Codex is an OpenAI product, and natively it only supports login via a ChatGPT account — a setup that creates three compounding barriers for users in China: you need an account, you need a paid subscription, and you need a network connection that can reach OpenAI's servers. The approach covered in this tutorial is straightforward: since the login flow itself is the obstacle, replace it — and swap in a domestic model (such as DeepSeekAd or Doubao) as Codex's inference backend.
The key concept here is that Codex is essentially just a shell. The model doing the actual work is the backend. In the native setup, that backend is GPT. With a third-party management tool, you can replace it with DeepSeek. These tools don't modify Codex's core functionality — they only change how it authenticates and which model it connects to, so normal usage is unaffected.
There are two paths overall: if you already have a ChatGPT Plus account, the simplest route is to download Codex and log in directly — no extra tools needed. If you don't, this guide covers the domestic model integration approach.
OpenAI Codex (the application, distinct from the earlier code-generation API of the same name) is an AI coding assistant that lets a large language model read and write local files, execute terminal commands, and autonomously complete multi-step programming tasks in an "agent" mode. Architecturally, it's a combination of a frontend shell and a model inference backend: the frontend handles file browsing, code editing, and task management, while the backend handles language understanding and code generation. This decoupled design is precisely what makes swapping the underlying model technically feasible — as long as the backend can accept requests in OpenAI API format, any compatible model can be plugged in, including DeepSeek. DeepSeek's API is fully compatible with the OpenAI API specification, which is the foundational reason this whole approach works.
Step 1: Install Codex — But Don't Open It
Installing Codex itself is straightforward. On Windows, open the Start menu, search for the Microsoft Store, and search for Codex inside the store — it's a free download. The process is similar on Mac.
There's one critically important caveat: do not open Codex after installing it. The moment you launch it, it will prompt you to log in with a ChatGPT account — which is exactly what we're trying to bypass. Leave Codex alone after installation and move on to setting up the management tool.
Step 2: Install the Codex++ Management Tool
Enabling domestic model integration requires a third-party application called the Codex++ Management Tool. Its purpose is singular and clearly defined: configure a domestic large language model as Codex's backend. That's all we need it for.
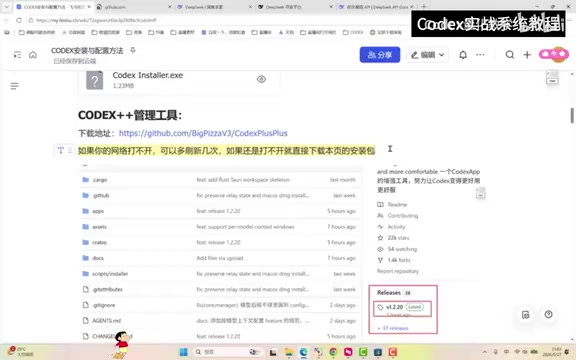
For download, the recommended approach is to visit the project's GitHub Releases page and download the appropriate version (Windows or Mac) if you can access it. If GitHub is unreachable on your network, the tutorial author has also provided installer packages via Feishu. Installation is standard — just click through the defaults.
After installation, you'll have three related programs on your system: Codex, Codex++, and the Codex++ Management Tool. Make sure you open the one called "Codex++ Management Tool" — don't mix them up.
GitHub Releases is the standard channel for open-source projects to publish official versioned builds on GitHub. Maintainers upload platform-specific installers here (such as .exe for Windows or .dmg for Mac), along with release notes and changelogs. Downloading directly from the Releases page ensures you're getting the latest unmodified version. GitHub access from mainland China can be inconsistent — if downloads fail, try a mirror acceleration site, or use the Feishu package the tutorial author prepared as an alternative. When using any third-party download, it's worth verifying the file's hash checksum to confirm integrity.
Step 3: Configure DeepSeek in the Management Tool
Once the management tool is open, the interface has quite a few options — but we only need to focus on one: "Model Providers" / "Provider Configuration" in the left panel. By default, there's typically only one entry here; we need to manually add our domestic model.
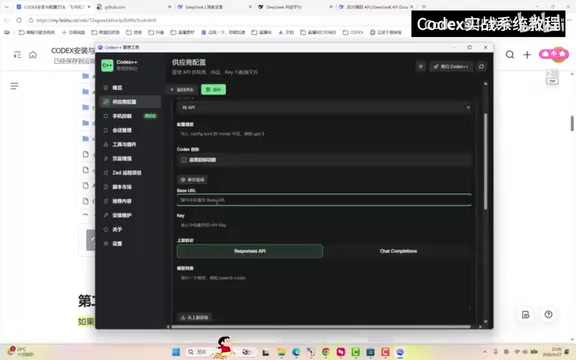
Click "Add Provider" and fill in the following:
Key Configuration Fields
- Name: Anything you want — it's just a label for your own reference, e.g. "MyDeepSeek".
- Integration Mode: Must be set to "Pure API Integration", since we're calling DeepSeek via its API.
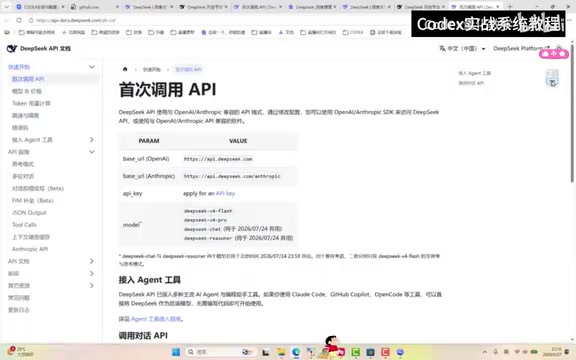
- Base URL: Enter DeepSeek's API endpoint:
api.deepseek.com. The tutorial author strongly recommends copying this rather than typing it manually to avoid errors. - API Key: Obtained from the official DeepSeek platform (covered in the next section).
- Protocol Option: Select the option on the right — this is the official default protocol.
Once filled in, click "Fetch from Upstream". The tool will use the URL and API Key you entered to test whether it can retrieve the model list. If a list of models comes back successfully, your configuration is connected. DeepSeek currently exposes several models through its API, including Pro variants — the tutorial author recommends DeepSeek V4 Pro for its quality-to-cost ratio.
After confirming the models load correctly, scroll up to find the "Save" button and save your configuration. The provider you just added will now appear in the list — hover over it on the right side and click "Use" until it shows "In Use".
Step 4: Get and Save Your DeepSeek API Key
The API Key is the part of this setup most likely to cause problems if handled carelessly. Go to the official DeepSeek website, navigate to the "API Open Platform", find "API Keys" in the left sidebar, and click "Create".
After creation, the full key string will be displayed in a popup. Here's the critical gotcha: this key is only shown once. The tutorial author emphasizes this repeatedly — copy it immediately to a file transfer assistant, a local document, or anywhere you can retrieve it again. Once you close the window, the full key is gone. You'd have to create a new one.
The API Key acts as your account's unique identifier. Codex uses it to prove that requests are coming from your DeepSeek account and to draw from your usage quota.
An API Key is a randomly generated string used to authenticate the caller's identity when making requests to a remote API and to associate usage with a billing account. It works like a "service password": every time Codex sends a request to DeepSeek's servers, it includes this key in the request header, which the server uses to identify which account to bill. Because of this, API Keys must be kept strictly confidential — anyone who obtains your key can consume your quota under your account. For security reasons, DeepSeek only displays the full key at creation time; afterward, the platform only shows a partially redacted version. If you lose it, the only remedy is to revoke the old key, create a new one, and update every configuration that used the old key.
Step 5: Top Up Your Balance and Launch Codex
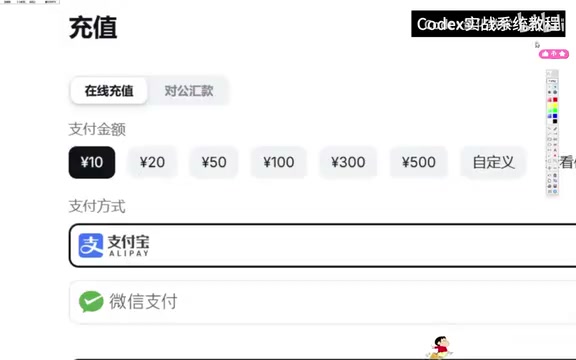
There's one more step that's easy to overlook: your account balance. Codex is just the interface — the actual token consumption happens at the model provider level. Whatever model you're using, you need to fund that account.
According to the tutorial author's experience, DeepSeek is remarkably affordable: running it "all day, every day, with tasks still running at shutdown" costs around ¥100 per month. For pure learning purposes, ¥10 should cover you through this entire tutorial and beyond.
Now for the actual launch — and another important detail: don't double-click Codex to open it directly. Instead, use the "Restart Codex++" button in the top-right corner of the Codex++ Management Tool. This is the only way to ensure your modified login configuration is applied.
Once launched, Codex will present two login options:
- "Sign in with ChatGPT" — do not select this.
- Select "Sign in with another method".
The interface will prompt you for an "OpenAI API Key" — but what you actually paste here is your DeepSeek API Key from the previous step. Paste it in and click "Continue". The first login may take a moment.
Once you're in, check the model selector in the bottom-right corner and confirm that your configured DeepSeek model is available. Manually switch to DeepSeek V4 Pro. At this point, Codex is fully configured and running on a domestic large language model.
Choosing Between the Two Approaches
To summarize, there are two ways to get into Codex:
- Direct login with a ChatGPT Plus account: The simplest path. Suitable for users outside China or those who already have an account — just select "Sign in with ChatGPT" and enter your credentials. No third-party tools required.
- Domestic model integration: The practical option for most users in China. Use the Codex++ Management Tool to configure DeepSeek or Doubao as the backend. Extremely low cost.
The tutorial author also flags a noteworthy development: the official Codex team is reportedly planning to natively support third-party model integration in a future release, which would eventually make tools like Codex++ unnecessary. Until that feature ships, the third-party tool approach described here remains the most practical route for users in China.
Note: This tutorial is based on a single source. For the third-party tools and configuration steps, always refer to the latest version of the tool's interface — UI colors and layouts may change with updates, but the core logic around "model provider configuration" remains consistent.
Related articles

Felix Rieseberg Personal Homepage
Felix Rieseberg's personal homepage sparks attention on Hacker News. This article covers the Slack engineer's technical background, the rise and fall of nativefier, and the value of a developer homepage as a tech calling card.

@ai-sdk/vue 3.0.306 Patch Release Syncs with [email protected] Update
@ai-sdk/vue 3.0.306 released, synced with [email protected]. A routine patch release for the Vercel AI SDK ecosystem with no public API changes; the Vue adapter layer stays version-aligned with the core package.

Gemini 4 Argon API Launches: The Era of Million-Token Output Begins
Google launches Gemini 4 Argon with sparse MoE architecture, up to 1M output tokens, and a 68.90% Vals Index score, available across API, AI Studio, and the Gemini app.