Local LLM Giving Off-Target Responses? A Systematic Debugging Approach: Locate First, Then Adjust

A five-step debugging workflow for local LLMs: fix task and input first, verify the chat template, then run controlled sampling experiments.
Off-target responses, role confusion, and endless repetition from a local LLM are usually caused by unclear prompts, missing context, or mismatched chat templates — not sampling parameters. This article presents a five-step workflow: define the symptom, write verifiable prompts, confirm the context was actually sent, verify the chat template matches the model's official format, and only then run controlled experiments with temperature, Top P, and repetition penalty. It also clears up common misconceptions: temperature only shapes the probability distribution, Top P cannot prevent hallucinations, and greedy decoding doesn't guarantee correctness.
After deploying a local LLM, many people run into an frustrating situation: the model responds, but never quite hits the mark. Sometimes it misses requirements, sometimes strange role markers appear, and sometimes it falls into endless repetition. The first instinct for many is to crank up the sampling parameters — which usually makes things worse.
The right approach is the opposite: locate the problem first, then make changes, one at a time. This article walks through a systematic debugging workflow: start with the task and input, then check the chat template, and only touch sampling parameters last.
Step 1: Define Exactly What "Wrong" Means
Debugging starts with defining the problem. Poor model performance generally falls into a few categories: requirements not followed, role confusion, endless repetition, or truncated output. Different symptoms point to different root causes — you can't jump to a single conclusion from one observation.
- Requirements not met → Check the task description and provided context
- Role markers appearing → Inspect the chat template and model version
- Repetition occurring → Rule out input issues before touching parameters
This is a funnel that goes from shallow to deep. Categorize the symptoms clearly before doing anything else.
Step 2: Write Prompts That Can Be "Verified"
Many off-target responses trace back to the prompt itself. A prompt that's easy to audit should cover four things: what the task is, which context to use, what format the output should follow, and how to handle missing information.
Saying "you are an expert" doesn't automatically fill in those conditions. The key is writing requirements that are actually verifiable.

For example: a fictional product description includes weight but no price. If you just ask "give me an overview," the response scope is so broad you can't tell whether the model completed the task. Change it to "extract only the weight and price, output exactly two lines, write 'not provided' for any missing values" — the requirement becomes immediately verifiable.
One caveat: writing a clear prompt only makes requirements checkable. Whether the model actually follows them still needs to be verified against the source material.
Step 3: Confirm the Context Was Actually Sent to the Model
This is the most commonly overlooked step. The fact that data is on your computer doesn't mean it was included in this particular request. Check whether chat history and attachments were actually sent, and whether the content exceeds the available context window.
A practical approach: open a new conversation with only the minimal necessary context to reproduce the issue, eliminating interference from old instructions and lengthy history. If the context is too long, take the relevant excerpt and keep track of the source. Don't expect to "recover" missing information by adjusting the temperature — if the model never received the data, no amount of parameter tuning will conjure it up.
Step 4: Check the Chat Template — Don't Just Stack More Markers
What you see as chat bubbles in the interface is actually an organized token sequence that the model receives. The chat template marks who is speaking, where turns end, and who continues next. It's not the same as your prompt: one is "what you say," the other is "how the message is handed to the model."

Important reminder: applications typically apply templates automatically. Don't manually paste in another layer of special markers — this leads to duplication or mismatches, which is exactly what causes role confusion.
In Ollama, you can use read-only commands to inspect model configuration without modifying anything — this helps you find the template, system prompt, and stop settings. LM Studio generally auto-configures templates from model metadata, but check whether it's been manually overridden. Always verify against the official usage docs for that specific model — don't copy an entire template from a different model.
Chat templates are essentially string formatting rules, and the differences between model families are significant. A few common examples: the Llama 3 family uses special tokens like <|begin_of_text|> and <|start_header_id|>user<|end_header_id|> to mark role boundaries; Mistral/Mixtral wraps user input with [INST] and [/INST]; the ChatML format (used by Qwen, Phi, and others) uses <|im_start|> and <|im_end|>. If the template doesn't match what the model was trained on — for instance, pasting ChatML markers into a model that expects Llama 3 format — those characters won't be recognized as control signals. They'll appear as plain text in the input, causing the model to "see" a bunch of strange symbols and reproduce or confuse role boundaries in its responses. This is exactly why the first step when debugging role confusion is to verify that the template currently applied by the application matches the model's official specification — not to pile on penalty parameters.
Step 5: Understand Sampling Parameters, Then Run Controlled Experiments
Only after ruling out everything above should you touch sampling parameters. First, understand what each parameter actually does.
Temperature
At each step, the model scores candidate tokens and selects the next one according to certain rules. Lowering the temperature increases the share given to the top candidate while shrinking others; raising it flattens the distribution. But positive temperature scaling does not turn the second-ranked token into the first, nor does it judge whether a fact is true or false.
Temperature acts on the logits (raw scores for each candidate token) output by the model: the logits are divided by the temperature value before being passed through softmax to produce a probability distribution. A temperature of 1.0 means no scaling; below 1.0, the distribution concentrates toward the highest score, and in the extreme case approaching 0, it becomes deterministic greedy decoding (always selecting the top-scoring token); above 1.0, the distribution flattens, giving lower-probability options a higher chance of being selected. One important point: greedy decoding is not the same as "correct" — if the model's weights lack certain knowledge, or the prompt points in the wrong direction, setting temperature to 0 just makes the wrong answer appear with higher confidence, not the right one.
Top P
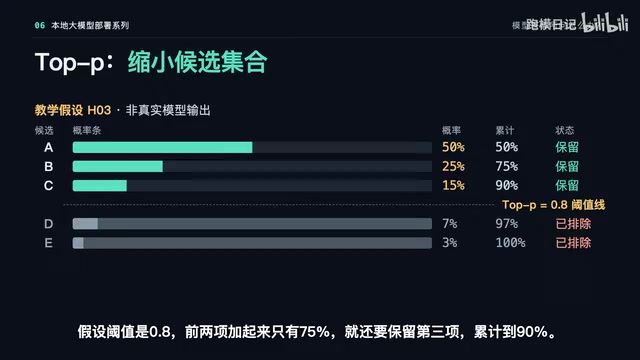
Top P doesn't pick out correct answers — it narrows the candidate pool by cumulative probability. With a threshold of 0.8, if the top two options only sum to 75%, the third is kept until the cumulative total reaches roughly 90%, and the final selection is made by redistributing probabilities across the retained candidates. It works purely on probabilities and has no knowledge of which words are factually correct, so it cannot be treated as a safeguard against hallucination.
Top P (also called Nucleus Sampling) was introduced by Holtzman et al. in their 2020 paper The Curious Case of Neural Text Degeneration, motivated by the limitations of fixed Top-K truncation. Top-K ignores the shape of the probability distribution and always retains the K highest-scoring candidates — which preserves many low-quality options when the distribution is highly concentrated, and misses reasonable options when it's flat. Top P dynamically adjusts the number of candidates retained: it accumulates probabilities from highest to lowest and stops once the threshold P is exceeded, retaining fewer candidates when the distribution is steep and more when it's flat. Both parameters can be used together; in that case, Top P first narrows the candidate set, and final sampling is then done from that set using the temperature-scaled probabilities.
Repetition Penalty
Repetition penalty reduces the likelihood of previously seen tokens being selected again, but it doesn't directly delete repeated words. Keep in mind that variable names, proper nouns, and fixed formats may legitimately need to repeat — an overly strong penalty damages normal output. Different backends use different names, formulas, and application scopes for this penalty, so don't blindly copy a number from one setup to another.
A Common Misconception
A rigorous task doesn't necessarily require temperature set to 0, and low randomness doesn't mean the answer is correct. For instance, some official documentation notes that thinking modes should avoid greedy decoding to prevent performance degradation or repetition loops. So check the recommendations for the specific model and mode first, then compare against your own task requirements.
Using Controlled Experiments to Judge Whether Parameters Actually Help
Parameter tuning shouldn't be based on gut feel. The right approach is to fix the same context and prompt, then run two requests that differ only in temperature (e.g., 0.2 and 0.7 — these are practice values, not recommended settings), use the same set of seeds for paired comparison, and save the raw results.
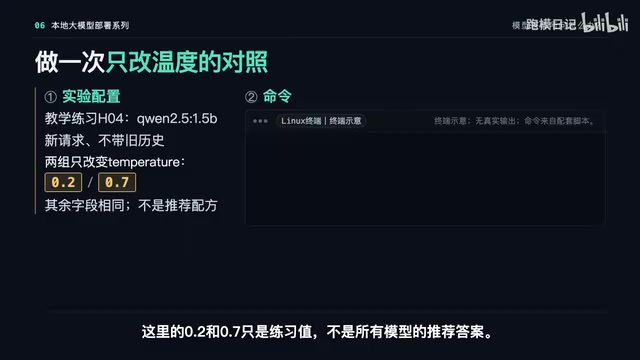
Write your evaluation criteria before judging: the weight in the source material is 420g and the price isn't provided, so every time you check whether facts are accurate, whether the format matches, and whether there's repetition, irrelevant content, or truncation. Don't declare one set of parameters "best" just because one response looks nice. Getting identical results from both runs is entirely possible.
If repeated tuning doesn't improve things, go back and check the context, template, and whether the model itself is suited for the task.
Quick-Reference Debugging Checklist
The full approach condensed into action rules:
- Requirements missed → Break down the task more clearly first
- Consistently wrong answers → Verify the source and model capabilities
- Role confusion or unexpected special markers → Check the template first, don't just add repetition penalty
- Response cuts off halfway → Check output limits and stop reasons before assuming it's hallucination
- Need to tune sampling → Start from the model's recommended baseline, change one thing at a time, log results, and always be able to roll back
The core logic is always: make sure the task and context are clear, then verify the template, and only then use controlled experiments to determine whether parameter changes actually help. The next installment will cover connecting a local model to a chat interface using Open WebUI.
Related articles

Felix Rieseberg Personal Homepage
Felix Rieseberg's personal homepage sparks attention on Hacker News. This article covers the Slack engineer's technical background, the rise and fall of nativefier, and the value of a developer homepage as a tech calling card.

@ai-sdk/vue 3.0.306 Patch Release Syncs with [email protected] Update
@ai-sdk/vue 3.0.306 released, synced with [email protected]. A routine patch release for the Vercel AI SDK ecosystem with no public API changes; the Vue adapter layer stays version-aligned with the core package.

Gemini 4 Argon API Launches: The Era of Million-Token Output Begins
Google launches Gemini 4 Argon with sparse MoE architecture, up to 1M output tokens, and a 68.90% Vals Index score, available across API, AI Studio, and the Gemini app.