MiniMax H3 Local Deployment Guide: Running an Open-Source Video Model on 8GB VRAM
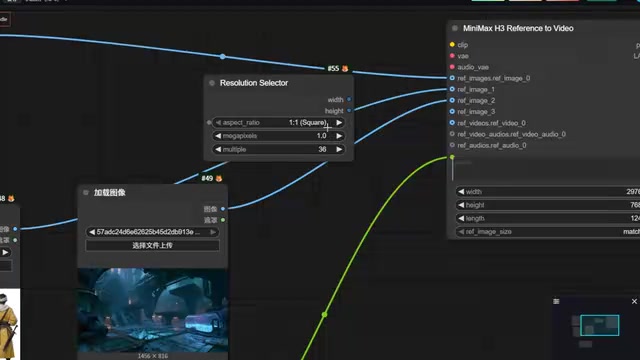
Build a full MiniMax H3 video generation pipeline in ComfyUI with only 8GB of VRAM.
This guide walks through building a local MiniMax H3 (Hailuo open-source) video generation workflow in ComfyUI, targeting 30-series entry-level GPUs with 8GB VRAM. The pipeline takes three images as input, runs through Clip encoding, UNet sampling, and dual-path VAE decoding to produce an MP4 with audio. VRAM pressure is managed via three nodes: a lowvram optimizer, chunked processing, and a memory saver. Recommended model config is int8 UNet + Clip, fp32 audio VAE, and fp16 video VAE. The sampling structure mirrors Flux workflows, making it easy to adapt for experienced users.
Open-source video generation models are rapidly closing the gap with commercial platforms. This tutorial is based on a workflow setup shared by a Bilibili creator, walking through how to build a complete pipeline in ComfyUI — from image input to video output — in a local environment. It also covers the key nodes for VRAM optimization. For users with only 8GB of VRAM on an entry-level 30-series GPU, this approach offers a genuinely viable path to local deployment.
What MiniMax H3 Can Do
MiniMax H3 (the open-source version of Hailuo) is designed for free, local image and video generation — no VPN required, and it runs entirely on your machine. The minimum requirement is a 30-series GPU. Compared to cloud platforms that charge per generation, the biggest advantage of local deployment is cost control and unlimited usage.
According to the creator's demo, this workflow supports multi-image input (a main character image + a scene image) to drive video generation, and integrates dual-channel decoding for both audio and video, producing finished clips with sound. The workflow uses a fully Chinese interface, making it particularly user-friendly for domestic users. It's worth noting that claims like "7x speedup" and "runs on 8GB VRAM" are the combined result of an accelerated model and VRAM optimization nodes — actual performance will vary depending on your hardware and parameter settings.
Workflow Input Structure: Three Images
Building the workflow starts with image inputs. The entire pipeline requires three "Load Image" nodes — two character images and one scene image. Start by creating one Load Image node, duplicate it twice, import Image 1, Image 2, and Image 3 into each respectively, then connect all three to the MiniMax H3 sampler.
For the sampler, you'll need to search for two core nodes: the MiniMax H3 control-frame node, and an F1 text-to-video reference sampler node. Once Image 1, 2, and 3 are connected to the sampler, the corresponding interfaces will automatically expand below. The sampler also has slots for reference video, audio, and sound reference — connect these if you have source material, or skip them if not. The prompt is connected separately via a "Load Text" node, making it easier to manage and customize later.
Parameterized Control of Resolution and Duration
Hardcoding width, height, and duration directly into the sampler isn't flexible. The recommended approach is to use a Resolution Selector node to control width and height independently, then connect them by matching the parameter names.
Duration control is slightly more involved and requires two tools working together: a float parameter node and a math expression converter. The float node can't connect directly — it must go through the converter first. The core logic is "frames × duration" — for example, at 24 frames per second, use the formula to calculate the total frame count for a 10-second video.
The video also provides a ready-made math expression — users who aren't math-savvy just need to change the two numbers in the expression to match their target frame rate. A practical tip: 24 fps is sufficient for standard video. Higher frame rates produce smoother motion, but they come with proportionally higher compute and VRAM costs.
Model Loading: Clip, UNet, and Dual-Path VAE
The model loading section is the core of the entire workflow. Three categories of models need to be loaded:
- Clip model: Translates prompts into semantic information the AI can understand. Search for "Clip Loader," switch from the standard Stable Diffusion category to minimax in the model list, and select the int8 version.
- UNet main model: This is the primary MiniMax H3 model. Search for the minimax_h3_int8 version using the "UNet Loader."
- VAE decoders: Importantly, you need two copies — audio and video require different versions. Select fp32 for the audio VAE and fp16 for the video VAE.
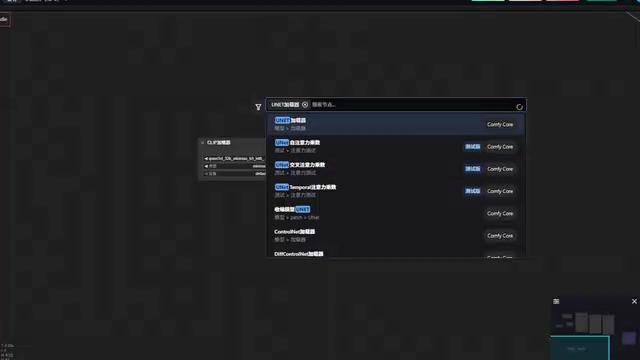
The dual-path VAE design is what enables this workflow to output video with sound — audio routes to the audio channel, video routes to the video channel, each decoded separately.
Int8 quantization is a model compression technique that reduces neural network weights from 32-bit or 16-bit floating point to 8-bit integer representation. This typically reduces model size by 50–75% with a corresponding drop in VRAM usage. The trade-off is a slight loss in numerical precision, but for perceptual tasks like video generation, the difference is rarely noticeable to the human eye. fp32 (32-bit float) offers the highest precision but consumes the most VRAM; fp16 (16-bit float) is the mainstream compromise for GPU inference today. The reason fp32 is chosen for the audio VAE is that audio is more sensitive to numerical precision — artifacts are easier for the ear to detect. fp16 for the video VAE strikes a balance between image quality and VRAM consumption. Understanding this distinction helps you make informed trade-offs when tuning parameters for your own hardware.
VRAM Optimization: The Three Essential Nodes for 8GB
For local deployment users, insufficient VRAM is the biggest bottleneck. The solution is a combination of three optimization nodes:
- VRAM optimizer: Search for the minimax h3 lowvram node. It reduces attention mechanism VRAM usage and helps manage memory allocation.
- Chunked processing node: Splits VRAM processing into multiple batches (e.g., 4 divided by 2 = 2 batches), preventing a single operation from filling VRAM all at once.
- Memory saver node: Further optimizes overall memory usage.
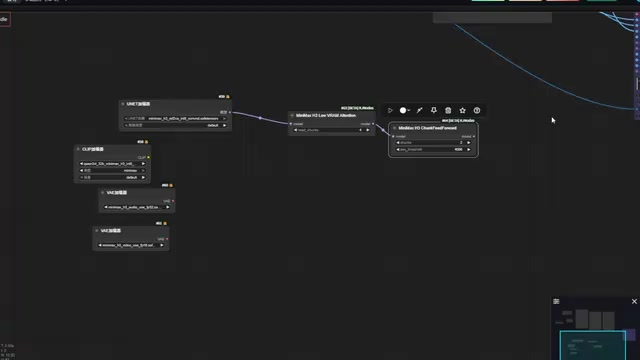
These three nodes are the technical foundation behind the "runs on 8GB VRAM" claim. The underlying principle is trading time for space — through chunking and VRAM scheduling, models that would otherwise fail to run become viable on lower-VRAM cards, at the cost of slower generation speed. This is also the general strategy for running large models locally on entry-level GPUs.
Sampling and Compositing: Completing the Full Pipeline
Once models are loaded, the data needs to flow into the sampling system. This step closely mirrors a Flux model workflow: use a "Base Guider" node to consolidate model data, then connect to the conditions provided by the MiniMax v6 sampler, followed by configuring the base scheduler, random noise (seed), K-sampler, and custom advanced sampler.
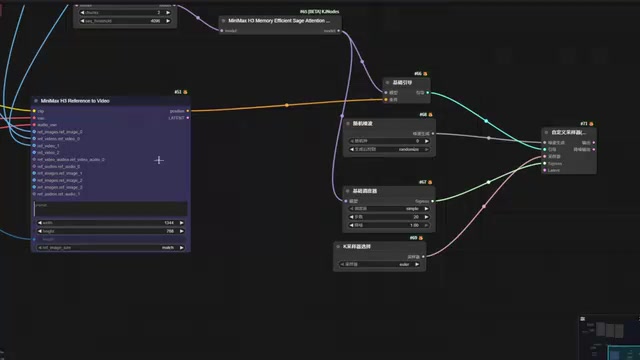
The key step is obtaining the Latent data — the internal channel through which the AI processes mixed data. Simply pull it from the Latent interface of the MiniMax video sampler. Once all data is connected, decode with the Video and Audio VAE decoders respectively, then merge everything using the "Combine to Video" node.
During compositing, make sure the frame rates align: if you set 24 fps earlier, select 24 fps here as well — mismatches will cause issues. Set the output format to standard MP4 (video/h264), and customize the filename prefix as needed. At this point, the entire workflow is complete.
Latent space is a core concept in diffusion models. AI doesn't generate images or video directly at the pixel level. Instead, it first performs noise diffusion and denoising operations in a compressed, low-dimensional "latent space," and then uses a VAE decoder to convert that latent representation back into visible pixel output. This design dramatically reduces computation — operating in latent space is orders of magnitude faster than working in raw pixel space. MiniMax H3's dual-channel output (video + audio) maintains independent latent representations for each, which is why two separate VAE decoders are needed rather than a single shared one. Understanding the role of latent space also helps explain why parameters in nodes like "K-sampler," "scheduler," and "random noise" directly affect the final output quality.
Getting Started: Practical Advice
The main learning curve of this workflow lies in ComfyUI's node-wiring logic, not the models themselves. Users with existing Flux workflow experience will get up to speed quickly, since the sampling section is nearly identical. Beginners can also build it by following the node sequence step by step, but understanding the role of each node — encoding, decoding, sampling, scheduling — is what ultimately enables flexible customization.
For users with limited hardware, the combination of int8 quantized models with the lowvram, chunked processing, and memory saver trio represents a realistic path to running open-source video models locally. Keep in mind that the performance figures in the original video come from a single creator's demo — test on your own hardware before drawing conclusions. Local open-source video generation is genuinely lowering the barrier to creation, but it's worth approaching claims like "free," "fastest," and "best open-source" with a critical eye.
Related articles
Cursor 3.0 Complete Beginner's Guide: Getting Started with AI-Powered IDE Development
Cursor 3.0 beginner's guide: from download and setup to parallel sub-agents, cloud development, skills, and automations. Master model selection, design mode, and Git with this complete AI IDE walkthrough.
Codex + Playwright as a Skill: UI Automation Without Manual Commands
Wrap Playwright as a Codex Skill so AI agents run UI automation tests via natural language. Covers install, Sauce Demo walkthrough, PO pattern, and MCP vs CLI+Skill tradeoffs.
Replicate the $400/Year 'Dedao Brain' With Obsidian + AI Agents — For Free
How to replicate Dedao Brain Expert Edition (¥2,999/year) using free Obsidian + AI agents. A breakdown of Germinate, Polish, Challenge, Style Coach, and more as reusable prompt skills.