MiniMax H3 Open-Source Workflow: Breathing-Skin Results Even on Low VRAM

Breaking down the MiniMax H3 de-greasing dual-sampling workflow: runs on 12GB VRAM, fused model plus LoRA improves skin texture and speeds things up.
Based on a Bilibili creator's MiniMax H3 dual-sampling workflow tutorial, this article outlines technical highlights for de-greasing, speedup, and low-VRAM adaptation. It merges FL and RE models, adds a line-breaking LoRA to reduce greasy faces, and uses dual sampling that feeds first-pass latent data directly into upscaling before sampling again, skipping re-encoding. Two tiled-processing nodes allow it to run on as little as 12GB VRAM, with tips on LoRA combinations, weights, and step allocation.
In AI video generation, the "greasy" look of character faces and the high VRAM barrier have long been pain points for creators. Recently, a dual-sampling "multi-pass" workflow for the MiniMax H3 model has sparked discussion among Bilibili creators, claiming to optimize the execution pipeline, improve model and LoRA combinations, and even run on 12GB VRAM devices. This article breaks down the technical highlights and practical experience based on that tutorial.
Core Improvements: De-Greasing and Dual-Sampling Speedup
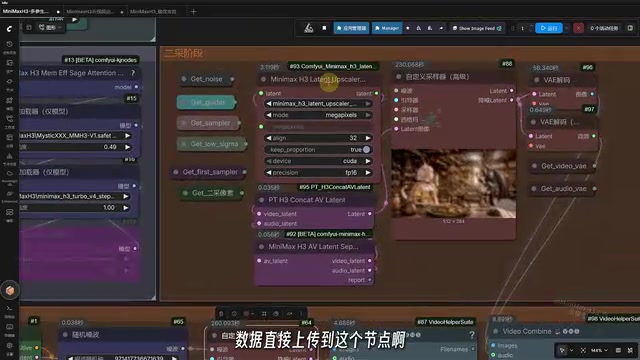
Character faces generated with the FL model in the past often looked greasy and lacked realistic skin texture. This workflow merges the FL model with the RE model to form a fused model that combines reference capability with aesthetic performance. It also introduces a "line-breaking" LoRA specifically designed to reduce the greasy look in character generation. The creator says the actual results are "pretty good." In addition, the workflow adopts a dual-sampling approach: the latent-space data from the first sampling pass is fed directly into a node for upscaling, then into the sampler, skipping the re-encoding step. According to the creator's analysis, this change "makes it a bit faster."
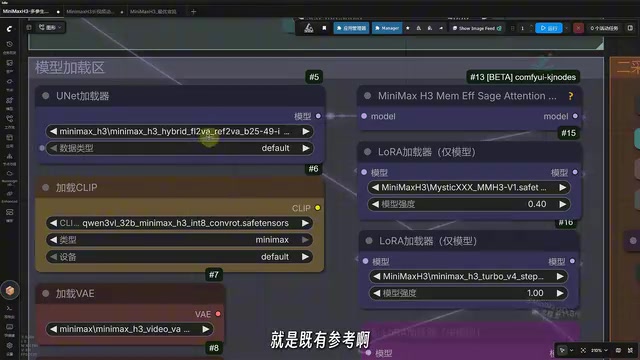
Latent space is a key concept in diffusion models. In AI video/image generation, raw pixel data is compressed by an encoder (such as a VAE) into a low-dimensional latent representation space, where the diffusion and denoising processes take place, and is finally restored to pixel images by a decoder. Compared with operating directly in pixel space, latent space dramatically reduces computation, and is the foundation that allows current mainstream generative models to run on consumer-grade GPUs. The "first-pass latent-space data" mentioned in the article refers to the abstract feature tensor obtained after the first sampling pass, not the final image; feeding it directly into the upscaling node means bypassing the traditional "decode → pixel upscale → re-encode" chain, reducing information loss and computational overhead—this is the core reason the dual-sampling approach can speed things up.
LoRA (Low-Rank Adaptation) is a lightweight model fine-tuning technique. It does not modify all the weights of the base model; instead, it attaches small-scale low-rank matrices alongside specific layers, and only these additional parameters are updated during training. Since the parameter count is typically only a few percent of the original model or less, LoRA files are small, load quickly, and can be enabled or combined as needed at inference time. Different LoRAs are often trained for specific styles, image-quality defects, or motion types, so stacking multiple LoRAs can cause interference and requires adjusting weights to balance the effects—the weight coordination among the line-breaking LoRA, speedup LoRA, fight-scene LoRA, and mystic mentioned in the article is a direct manifestation of this mechanism.
Low-VRAM Adaptation: Tiled Processing and Node Configuration
For low-VRAM users, the workflow includes two low-VRAM nodes. The creator's own device has a 5060Ti with 16GB VRAM and 32GB RAM, and admits "the performance isn't great either." The underlying logic of these two nodes is to process model data and video generation data in chunks, and users can set the number of chunks themselves—the larger the number, the lower the VRAM pressure. It is said that even 12GB VRAM can run it. In terms of generation speed, the creator measured that an 88-second video took 10 minutes, and a 14-second video took 20 minutes, and considers "this speed acceptable to me." With a better GPU, a video can basically be produced in about ten-plus minutes.
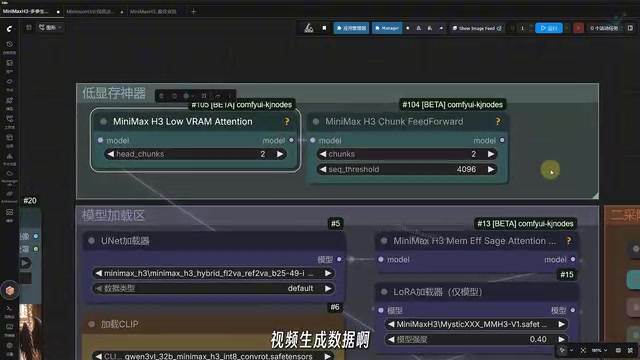
Tiled processing (tiling / chunking) is a common engineering technique for dealing with VRAM bottlenecks. Video generation requires model weights, latent-space features, and intermediate attention computation results to reside in memory simultaneously, and a slightly higher resolution or frame count will trigger out-of-memory (OOM). The tiling idea is to split the model layers or data tensors into several small chunks, compute them block by block, and then stitch them together, thereby reducing peak VRAM usage to the level required by a single chunk. The cost is extra scheduling and synchronization between chunks, with a slight drop in computational efficiency; therefore, the more chunks, the more VRAM is saved but the slower the speed, and users need to trade off between VRAM and time. The statement in the article that "the larger the number, the lower the VRAM pressure" stems from this.
Model and LoRA Combination Strategy
The workflow provides multiple LoRA options. In addition to the de-greasing line-breaking LoRA and the speedup LoRA, there is a "disabled LoRA" for fight scenes or weapon motions with larger movement amplitude. The creator reminds users that after enabling this LoRA, it is not recommended to also turn on mystic; otherwise, its weight should be lowered to around 0.2. This flexible combination allows creators to adjust the style according to the content type.
Underlying Logic of Dual Sampling and Parameter Settings
The change in dual sampling is: the first-pass latent-space data is passed directly into the node for upscaling, then sampled again. The pipeline skips re-encoding. The workflow has six general loading nodes, two video upload nodes, and two audio reference nodes, which can be toggled with Ctrl+B or a button. The input area includes the prompt, resolution selector, video duration, and second-pass pixel size. The creator suggests setting the first pass to 0.4 and the second pass to 0.7, adjusting according to the reference table. In the basic scheduler, twelve steps is the total denoising step count, split into eight steps for the first pass and the remaining four steps for the second pass. If faster speed is desired, the total steps can be changed to ten (six steps for the first pass, four for the second).
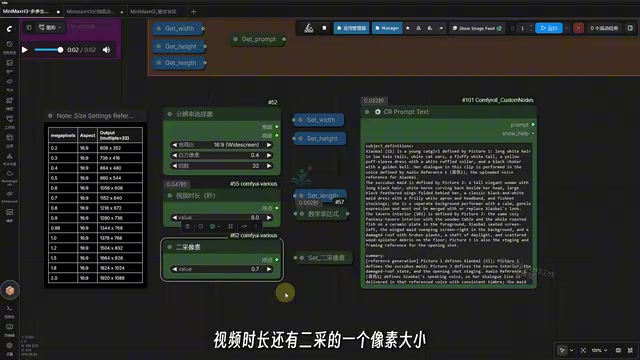
The basic scheduler (sampler/scheduler) determines the noise level and sampling strategy at each step of the denoising process. The article's statement that "twelve steps is the total denoising step count, split into eight for the first pass and the remaining four for the second pass" means dividing the total denoising budget into two sampling stages: the first pass completes most of the structure generation at a lower resolution or coarser granularity, and the second pass refines details with fewer steps at a high-resolution stage. This step allocation is a compromise between speed and quality—insufficient first-pass steps lead to deviations in composition and semantics, while insufficient second-pass steps make details blurry. Common schedulers (such as the Euler and DPM++ series) differ in their sensitivity to step count; when tuning in practice, you can first fix the total steps and then fine-tune the ratio between the two stages.
Practical Experience and Use Cases
Judging from the creator's demo, this workflow can stably produce videos on a 5060Ti, and the speed is acceptable. The de-greasing LoRA's improvement to skin texture is intuitive, though the "breathing" description is somewhat subjective. The speedup from skipping re-encoding in dual sampling is more significant on low-VRAM devices. For creators who need rapid iteration, this solution lowers the hardware barrier. However, the combination of the fused model and multiple LoRAs may increase debugging costs, and beginners need to spend time understanding the node logic.
Overall, this MiniMax H3 workflow offers concrete solutions in three areas: de-greasing, speedup, and low-VRAM adaptation. It is not a one-click magic bullet, but it provides an actionable optimization path for creators limited by hardware.
One-line Summary
Breaking down the MiniMax H3 de-greasing dual-sampling workflow: runs on 12GB VRAM, fused model plus LoRA improves skin texture and speeds things up.
Paragraph Summary
Based on a Bilibili creator's MiniMax H3 dual-sampling multi-pass workflow tutorial, this article outlines its technical highlights in three areas: de-greasing, speedup, and low-VRAM adaptation. The workflow merges the FL model with the RE model and introduces a line-breaking LoRA to reduce the greasy look of character faces; the dual-sampling approach feeds the first-pass latent-space data directly into the upscaling node before sampling again, skipping re-encoding to speed things up. For low VRAM, two tiled-processing nodes are built in—the more chunks, the lower the VRAM pressure—and it is said to run even on 12GB VRAM. The article also covers precautions for combining multiple LoRAs and their weights, node configuration, and step-allocation suggestions (e.g., 0.4 for the first pass and 0.7 for the second, with twelve steps split into eight plus four), along with speed references from real-world tests on a 5060Ti. The overall assessment: this solution is not a one-click magic bullet, but it provides an actionable optimization path for hardware-constrained creators, while the combination of the fused model and multiple LoRAs also brings some debugging cost.
Related articles

How Accurate Are Sci-Fi's Predictions About AI?
How accurate are sci-fi's predictions about AI? Drawing on a Hacker News discussion, this article analyzes sci-fi's foresight and blind spots in AI development, arguing its true value lies in inspiring thought rather than precise prediction.

SwarmEvolve: Latent-Space Agent Swarms Accelerate Evolutionary Search
SwarmEvolve lets hundreds of low-cost agents swarm-reason in latent space, sharing info via KV caches to achieve fast evolutionary search for math and science problems—reaching in a median of 3–8 minutes the best scores other frameworks need 60 minutes for.

trainlint: Static Checks Catch ML Training Bugs That Don't Crash
trainlint is a static analysis tool that finds ML training bugs that don't throw errors, including data leakage, leftover eval mode, and softmax/CrossEntropyLoss conflicts across 14 categories. This article covers its principles, validation results, and limitations.