n8n Email Automation in Practice: From Form Collection to Auto-Reply

Build a complete n8n email automation workflow in four steps: form submission, auto-reply, and data storage.
Based on a YouTube tutorial, this article breaks down how to build a "form collection → data storage → auto-reply" email workflow using the open-source automation tool n8n. Starting from the simplest two-node flow of "manual trigger + send email," it progressively introduces the Form Submission trigger, expressions for dynamically referencing form data, and Google Sheets' Append Row operation to form a complete loop. It also covers practical details like disabling the n8n attribution, OAuth permission scopes, and expression breakage after inserting new nodes, noting that the pattern extends to order confirmations, event notifications, and CRM auto-responses.
Why Choose n8n for Email Automation
n8n is an open-source workflow automation tool built around the core idea of chaining different services and applications together using "nodes." Compared to commercial products like Zapier, n8n supports self-hosting, keeps your data entirely in your own hands, and its free tier has virtually no limitations.
According to a tutorial demonstration on YouTube, n8n's learning curve is lower than you might expect — building a complete email automation workflow from scratch takes only a few minutes. Based on that video, this article breaks down how to build a full "form collection → data storage → auto-reply" workflow using n8n.
The first node in any n8n workflow is always a Trigger. The trigger determines when the automation starts, and available types include manual trigger, scheduled trigger, form submission trigger, and more. After the trigger come the action nodes — sending emails, writing to spreadsheets, calling APIs, etc.
On self-hosting: Self-hosting means deploying software on a server or local machine that you control, rather than using a vendor's cloud service. For n8n, self-hosting means all workflow definitions, execution logs, and the data flowing through each node — including sensitive information like email addresses and form contents — never pass through a third-party server. This stands in sharp contrast to SaaS products like Zapier, which require uploading data to their cloud to complete automation. For teams with data compliance requirements (such as GDPR or internal enterprise data security policies), self-hosting is a key reason to choose n8n. The trade-off is maintaining your own runtime environment, typically deployed via Docker, along with server costs and upgrade maintenance work.
On triggers and nodes: n8n's architecture can be likened to an assembly line: the Trigger is the starting point, responsible for listening for whether an event occurs (such as receiving a form submission, reaching a specified time, or being manually clicked to execute); Action Nodes are the processing stations along the line, each encapsulating an API call to some external service. Data passes between nodes as JSON objects — the output of an upstream node becomes the input of a downstream node. Understanding this "data flows from top to bottom" model is the prerequisite for grasping the expression configurations and pitfalls discussed below.
Step 1: Send the Simplest Possible Email
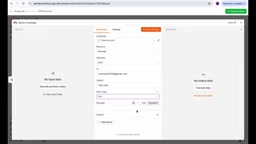
The first step in building any n8n workflow is choosing a trigger. Manual trigger is the most commonly used method during debugging — click the execute button and the flow runs immediately, making it easy to quickly verify whether the subsequent nodes are correct.
After adding a Gmail node, select the "Send a message" operation and authorize via your Google account. During authorization, you can selectively grant permission scopes — for example, only allowing access to Gmail and Drive, rather than handing over full account permissions.
When configuring the email content, simply fill in the recipient address, subject, and body. There's a practical detail in the video demonstration: by default, n8n appends a "Sent with n8n" attribution at the end of the email. If you don't want recipients to see it, just turn off the "Append n8n Attribution" option under "Add Option."
Click to execute the workflow, and the email arrives almost instantly. This simplest two-node flow of "manual trigger + send email" already verifies that the connection between n8n and Gmail works properly.
On OAuth authorization: When connecting to Gmail, n8n uses the OAuth 2.0 authorization flow rather than directly entering account credentials. The core idea of OAuth 2.0 is "delegated authorization": users don't have to hand their Google account password to n8n; instead, Google issues a time-limited, scope-restricted Access Token. The "Scope" options that appear during authorization are precisely what limits what this token can do — checking only Gmail and Drive means n8n can only read and write those two services and cannot access calendars, contacts, or other data. After the token expires, it can be automatically renewed via a refresh token, so you only need to configure it once for long-term use. This is also why connecting third-party services in n8n typically redirects to the service provider's official login page, rather than entering credentials within the n8n interface.
Step 2: Trigger Auto-Reply with Form Submission
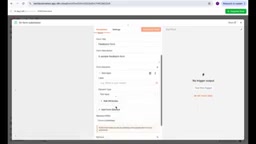
In real-world scenarios, email automation is usually not triggered manually but driven by some event. Form submission is the most typical trigger scenario: after a user fills out a feedback form, the system automatically sends a thank-you email.
In n8n, replace the trigger with a "Form Submission" node. This node automatically generates a form page with two addresses — a test URL and a production URL. Use the test URL during testing and switch to the production URL when going live.
Adding form fields is intuitive. In the video demonstration, three fields are created: name (text input), email (text input), and feedback content (textarea). The difference between a textarea and a text input is that the former is suited for longer content.
Once the form design is complete, click execute and n8n will open the form page for test filling. After submission, the data automatically flows into the next node.
Step 3: Make the Email Content Dynamic
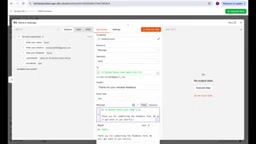
For the auto-reply after form submission, the key is that the email content must be able to reference the data entered in the form. n8n achieves this through its "Expression" mechanism.
In the Gmail node's recipient field, click the expression button and select the email field output by the form node. This way, the email is sent to the address the user entered in the form, rather than a hardcoded fixed address.
The email body can also use expressions. For example, write "Hi [name], thank you for submitting the feedback form, we'll get back to you soon," where the name portion is dynamically pulled from the form data. The video also mentions that the email format can be plain text or HTML — if you need custom colors, font sizes, or other styles, choose HTML mode.
This "form trigger → dynamic reply" flow is essentially a minimal CRM auto-response system. E-commerce order confirmation emails, event registration success notifications, and survey thank-you letters all share the exact same underlying logic.
On expression syntax: An n8n expression is essentially a piece of JavaScript code written inside double curly braces {{ }}, which is evaluated at runtime and replaced with the actual result. Data between nodes is exposed through an object called $json, so {{ $json.email }} retrieves the email field from the current node's input data. To reference data from a node that isn't the direct upstream, use $node["node name"].json.field name. When you click the "expression button" in the video and select a field from the panel, n8n automatically generates these reference paths, avoiding manual errors. Mastering expressions is the key watershed that takes n8n from a "fixed template" to a "general-purpose tool" — anything that needs to vary between executions should be filled in via expressions rather than hardcoded.
Step 4: Store Data in Google Sheets
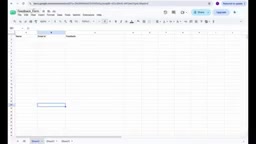
Auto-reply is only the first step — saving the collected data is equally important. Insert a Google Sheets node between the form trigger and the email send, select the "Append Row" operation, and each form submission's data gets appended to the specified spreadsheet.
During configuration, specify the target spreadsheet and sheet name, then select "Map Each Column Manually" to manually map columns. Simply map the three form fields — name, email, and feedback — to three columns in the spreadsheet.
One easy pitfall: after inserting a new node, the existing email node's expression references may break and need to be re-selected. In the video demonstration, after adding the Google Sheets node, both the recipient and name expressions in the email node showed error prompts, which were resolved by re-selecting the corresponding fields through the expression panel.
The overall workflow execution order becomes: form submission → write to Google Sheets → send thank-you email. After execution, verification shows that Google Sheets successfully recorded the name, email, and feedback content, while the inbox also received the dynamically generated thank-you email.
On field mapping and column matching: The Google Sheets node's "Map Each Column Manually" mode requires manually specifying which input field corresponds to each column. n8n first reads the target spreadsheet's header row, uses it as the list of selectable columns, and then writes the expression results the user selects into the corresponding columns. There's an implicit constraint here: header names must match the write order, and if the spreadsheet is renamed or columns are added or removed, the existing mapping may break. Additionally, the Append Row operation adds a new row at the end of the spreadsheet by default and won't overwrite existing data, making it suitable for log-style accumulation; if you need to update a specific row, you should switch to the "Update Row" operation and specify a matching column. Understanding how field mapping works clarifies why inserting a new node changes the upstream data source and causes the original expression references to error out — the node the reference path points to is no longer the direct upstream.
Room to Extend This Workflow
On the surface, this is just a simple "auto-reply after form submission" flow, but it demonstrates n8n's most core way of thinking: use triggers to capture events, use nodes to process data, and use expressions to connect the data flow.
Once you master this pattern, there are many directions to extend it. For example, swap Google Sheets for a database or CRM system, replace email with Slack notifications or SMS, add conditional logic to the flow (such as extra notification to the person in charge when a feedback rating is below 3), or set up a scheduled trigger to batch-process backlogged data.
n8n's value isn't in how powerful any single node is, but in turning the "glue code" between different services into visual drag-and-drop connections. For teams that frequently move data between multiple tools, this kind of automation can save a huge amount of repetitive work.
Related articles

How Big Can Stars Really Get? The Physical Limits of the Largest Stars
Red supergiants are the largest stars by volume, with radii up to 2,000 times the Sun, engulfing the inner solar system. But there is no precise upper limit on stellar size—models predict up to 15,000 solar radii. The most massive blue stars are far smaller than red supergiants—biggest and heaviest are two different things.

Apple HomeView Smart Display Full Feature Breakdown: Wall-Mount or Desktop, $299
Apple launches HomeView, a $299 smart display with wall-mount and desktop options, 12MP camera for facial recognition, smart home control, music playback, and recipe step-by-step cooking. Full breakdown of watch faces, apps, privacy, and cooking integration.

Where Did the Promised New Studio Go? Craft Computing Answers After Five Years
Craft Computing's host responds to viewer questions: the new studio promised five years ago was shelved as construction costs soared from $30,000 to $75,000, and was replaced by a 168-square-foot garage conversion.