NRF52840 Bluetooth Keyboard Development: Hardware Selection and AI-Assisted Project Setup

Building a wireless left-hand keyboard with NRF52840 and ZMK, guided by AI from setup to first flash.
This article documents the first phase of building a custom Bluetooth left-hand keyboard using an NRF52840 MCU and ZMK open-source firmware. It covers the hardware selection rationale, the AI-assisted project initialization workflow, and an honest account of the pitfalls encountered — including UF2 Bootloader flash offsets, missing Kconfig options, and broken device tree references — along with how each was resolved.
The Backstory: A Left-Hand Keyboard Born from Real Pain
This embedded development project started with a genuine need. During video editing, the left hand constantly hammers complex keyboard shortcuts — for example, repeatedly triggering Ctrl+Shift+B to execute cuts. Over long, intensive sessions, the pressure on the pinky finger is considerable. To solve this problem, the author decided to build a dedicated wireless left-hand keyboard from scratch, freeing productivity from the tyranny of awkward key combinations.
This is also the opening chapter of a complete hands-on embedded development series. Like a previous mini-program development series, this one uses a "real project as the driving force" approach, walking through the entire journey from hardware selection and AI-assisted project initialization to flashing and debugging. This installment focuses on two things: finalizing the hardware and software stack with a clear rationale, and using AI programming tools to initialize the project and set up the development environment.
Feature Planning
The keyboard's core features are designed around the editing workflow:
- Timeline zoom: Controlled via a knob (EC11 rotary encoder) — this is the biggest pain point being solved
- Play/Pause: Triggered by a dedicated key or by pressing down the encoder
- Common shortcuts: 4–6 keys mapped to high-frequency operations like select, split, undo, save, set in-point, and add keyframe
The EC11 is an incremental rotary encoder that determines rotation direction and step count by detecting two quadrature phase signals (Channel A and Channel B). It also has a built-in pushable shaft switch, enabling both rotation and press inputs. Unlike a potentiometer, an encoder has no physical end stop — it can rotate indefinitely — making it ideal for continuous adjustments like timeline zooming. In embedded development, the EC11 is typically read via GPIO interrupts or timer polling. ZMK firmware natively integrates an encoder driver module, which can be declared directly in the device tree configuration and bound to specific key behaviors.
Concentrating all of these controls in one hand dramatically reduces physical strain.
Hardware Selection: Why NRF52840
The hardware choices were made after careful deliberation. The overall configuration includes a dual-mode encoder (EC11) that both rotates and clicks, mechanical key switches, a 0.91-inch monochrome OLED display, and support for both Bluetooth 5.0 and USB connectivity.
The MCU selection was the central decision. There are several Bluetooth keyboard solutions on the market — including the domestic CH582M and Espressif's ESP32-S3 — but the final choice was the Nordic NRF52840, for three reasons:
- Native ZMK community support: The NRF52840 is natively supported by ZMK, the open-source keyboard firmware. This means the community's mature solutions can be reused directly to build keyboard software quickly, drastically shortening the development cycle with no need to write core functionality from scratch. While ZMK has some support for ESP32 and CH582M, those paths generally require significantly more custom development work.
- Low power consumption: The ESP32 draws more power, but a wireless keyboard demands strict standby efficiency. The NRF52840 holds a clear advantage in low-power performance.
- Extensibility: The CH582M remains a candidate for future exploration, leaving room for iteration.
Nordic Semiconductor's NRF52840 is an ARM Cortex-M4F-based SoC running at 64MHz, integrating Bluetooth 5.0 (BLE + 2.4GHz proprietary protocol), USB 2.0 Full Speed, NFC, 256KB RAM, and 1MB Flash. Its standout feature is exceptional power efficiency: current draw in deep sleep is approximately 1.5μA, and average current during BLE advertising can be kept in the single-digit μA range. This allows a coin-cell-powered wireless keyboard to achieve months of standby time. Compared to the ESP32-S3, which draws tens of milliamps in Wi-Fi/Bluetooth dual-mode operation, the NRF52840's advantage in pure BLE scenarios is enormous, making it one of the top MCU choices for wireless peripheral products.
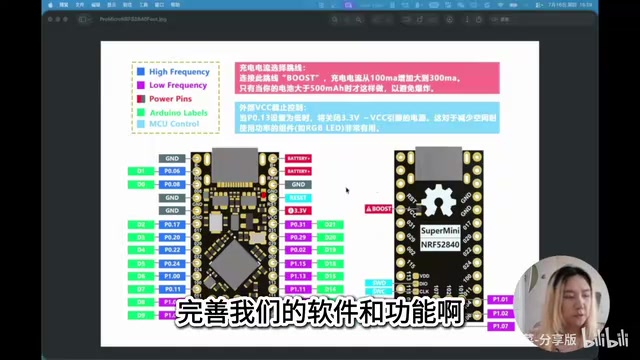
Development Hardware
The author takes the cautious path of "validate on a dev board first, then spin a custom PCB." The development board used is the SuperMini (now rebranded ProMicro) NRF52840, which comes with the chip, antenna, and USB interface already integrated. It's compatible with the nice!nano ecosystem and ships with a UF2 Bootloader, making it ideal for rapid prototyping.
UF2 (USB Flashing Format) is a firmware flashing format designed by Microsoft for embedded devices. When connected to a computer, the device appears as a USB mass storage device (like a thumb drive) — simply drag and drop a .uf2 firmware file onto it to complete flashing. This dramatically lowers the barrier to entry. The NRF52840's UF2 Bootloader typically occupies the first ~0x26000 bytes of Flash. Application firmware must be flashed starting from this offset address. If you flash directly using a J-Link or similar debugger, you must be careful about the start address — otherwise you'll overwrite the Bootloader itself, leaving the device unable to update via UF2 and requiring recovery through a debugger.
Additional debugging tools include: a J-Link emulator (with four wires soldered for debugging), a USB-to-serial adapter (for serial debug output), a perfboard, an EC11 encoder, and mechanical key switches. The demo-phase strategy is to get the hardware running first; the software layer barely requires writing anything from scratch.
ZMK: The Core Value of an Open-Source Keyboard Firmware
The reason this project can be "low effort" on the software side comes down to fully leveraging ZMK as an open-source project. By having AI directly parse ZMK's GitHub repository, its core features can be quickly summarized.
ZMK is an open-source mechanical keyboard firmware built on Zephyr RTOS, licensed under MIT, and primarily targeting wireless keyboard use cases. Zephyr RTOS is an open-source real-time operating system project led by the Linux Foundation. It features a highly modular kernel architecture supporting hundreds of hardware platforms from Cortex-M0 to RISC-V. Its two core configuration mechanisms are Device Tree (DTS/DTSI format) and Kconfig: the device tree uses a declarative language to describe hardware topology (peripheral addresses, pins, clocks, etc.), which the kernel parses at compile time into C header files; Kconfig controls the enabling and parameters of software features, similar to the Linux kernel's menuconfig system. ZMK builds a keyboard abstraction layer on top of this, encapsulating key matrices, encoders, Bluetooth HID, and other functions as standardized modules. Developers adapt hardware by modifying .overlay and .conf files, without ever touching low-level driver code.
ZMK's key advantages include:
- Wireless-first architecture: The underlying stack is optimized for Bluetooth Low Energy (BLE), with native BLE connectivity support. The BLE protocol stack has passed Bluetooth SIG certification, making it highly suitable for production use. HID (Human Interface Device) is the Bluetooth standard protocol layer for describing human input devices. ZMK's official certification means excellent compatibility with macOS, Windows, iOS, and Android — no extra drivers needed.
- Modern configuration system: Built on Zephyr RTOS using Device Tree and Kconfig. The overall development experience "feels a bit like developing for Linux" — flexible but with a learning curve.
- Permissive MIT license: Better suited for commercial use than GPL.
- Complete key mapping: Rich key mapping functionality is built in; developers just configure rather than implement.
- Broad hardware support: Supports all Zephyr-compatible MCUs (NRF52840, STM32, etc.), plus rotary encoders, pointing devices, LED effects, battery level reporting, and more.
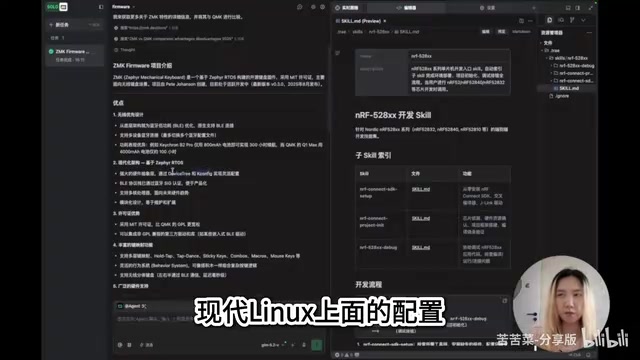
This means Bluetooth drivers, keyboard management, key mapping, and encoder drivers are all provided by ZMK. The developer's primary job is peripheral circuit design and configuration. This is the core value proposition of choosing NRF52840.
AI-Assisted Project Initialization in Practice
The author wrote a Skill module specifically for NRF52 series development on macOS and open-sourced it on GitHub. The Skill contains three sub-modules:
- SDK Setup: Installs the nRF Connect SDK, cross-compiler, and J-Link drivers
- Project Initialization: Creates a base project through interactive dialogue with an AI Agent
- Debug Skill: Assists with subsequent development and debugging
Interactive Configuration Flow
During initialization, the AI walked through a series of questions to pin down the configuration: MCU confirmed as NRF52840, board selected as nice!nano v2 compatible (a common ProMicro alternative), keyboard layout tentatively set to "custom simple matrix," and the AI was told about the need to support one encoder, six keys, and an I2C display.
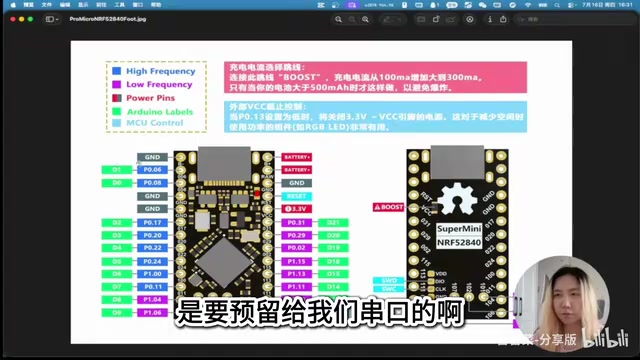
For the display driver, the AI identified it as SSD1306 (128x32) and automatically completed pin assignments: P0.08/P0.06 reserved as serial D0/D1, P0.17/P0.20 assigned as I2C SDA/SCL, and the remaining pins allocated to the key matrix and LED. These assignments were largely consistent with the schematic.
Debugging and Pitfalls: The Real Limits of AI-Assisted Development
Things weren't smooth sailing after initialization — the process exposed the real limitations of AI-assisted development. Several typical issues were encountered throughout, using the GLM-4.5 model:
Flash offset issue: Because of the UF2 Bootloader, the application firmware must be written at an offset (approximately 0x26000). The Mac couldn't recognize the USB storage device (Windows could), so J-Link had to be used instead. The AI first needed to read the current firmware partition layout to find the correct write address, avoiding a full-chip erase that would wipe the Bootloader. This offset is essentially the size of the Bootloader's own footprint in Flash — the flashing tool must explicitly specify the start address, or it will write application code to the wrong location or corrupt the Bootloader entirely.
Configuration override issue: The compiled firmware was missing many core features. Deep investigation revealed the problem was in the board configuration — the AI-generated overlay referenced a nice!nano v2 DTSI file that didn't exist. The correct approach is to use the board-level configuration for nice!nano already included in the ZMK app directory. Additionally, many critical Kconfig options were showing as "not set," indicating the AI hadn't fully grasped Kconfig's override rules and logic. Kconfig's override mechanism follows a strict priority order; board config, application config, and user config have specific merge rules. Simply adding options to a .conf file doesn't always take effect — you need to understand the load order of configuration files at each level.

Serial output not working: The initial firmware hadn't configured P0.06 and P0.08 as serial output, resulting in no output after reset. By guiding the AI to enable UART0 (mapped to those two pins) in the board-level configuration, serial output was finally achieved.
After multiple rounds of debugging, the keyboard was successfully flashed. The Mac popped up a connection confirmation, and Bluetooth was able to discover the "mykboard" device. At this point, the basic development and debugging environment was complete.
Lessons Learned and What's Next
The most important takeaway from this project is: choosing the right open-source ecosystem can dramatically lower the barrier to embedded development. With an NRF52840 dev board that fits natively into ZMK's official support, almost no core software needs to be written from scratch — developers can focus entirely on peripheral circuit design and configuration tuning.
This case also objectively illustrates the two sides of AI-assisted development: AI can efficiently handle project scaffolding, pin assignment, and multi-round troubleshooting. However, when it comes to the deeper mechanics of Zephyr RTOS's two core configuration systems — DTSI device trees (telling the kernel how to configure hardware resources) and Kconfig (system-level feature configuration) — it still makes mistakes, and developers need foundational knowledge to catch and correct them. The complexity lies in the fact that device trees and Kconfig are not independent: the device tree describes "what hardware exists," while Kconfig decides "which software features to enable." The two must be aligned for the firmware to compile correctly. Any misconfiguration in either will cause features to silently fail — which is precisely the boundary scenario that current AI struggles most to handle precisely.
Beyond that, turning hard-won debugging experience into reusable, open-sourced Skills is an engineering habit worth cultivating. The next steps include drawing a schematic in LCEDA to connect the encoder, keys, display, and other peripherals to the dev board, achieving real keypress reporting — and a dedicated video deep-diving into Kconfig and DTSI internals from a source code perspective.
Key Takeaways
Related articles

Disaster and Glory of the Apollo Program: The History We Must Revisit Before Returning to the Moon
From the fatal Apollo 1 fire to Apollo 8's daring lunar orbit to Apollo 11's successful landing—revisiting the disasters, fears, and compromises of the Apollo program and their lessons for today's return to the Moon.
Netflix Trust Exercise Turns Into Firing Trap: Where Are the Boundaries of Corporate Trust?
A Netflix employee was fired after sharing private info in a trust exercise. We analyze the risks of corporate trust exercises and how employees can protect themselves.

AMD CDNA5 Architecture Deep Dive: Technical Evolution and the AI Computing Competition Landscape
Deep analysis of AMD's CDNA5 architecture covering Chiplet packaging upgrades, HBM memory evolution, and low-precision compute optimization, examining how AMD challenges NVIDIA's AI chip dominance.