Qwen3-VL Local Deployment & Fine-Tuning in Practice: From Environment Setup to Circuit Board Recognition
A complete hands-on guide to fine-tuning Qwen3-VL for circuit board recognition with practical tips.
This article provides a comprehensive walkthrough of fine-tuning the Qwen3-VL vision-language model for circuit board component recognition. It covers VLM architecture fundamentals, GPU and cloud server selection, FlashAttention offline installation techniques, dataset preparation strategies, and TF32/BF16 mixed-precision training optimizations — offering practical guidance for customizing multimodal models in vertical domains.
Multimodal large models are becoming a key direction for real-world AI applications. Based on a hands-on Qwen3-VL fine-tuning tutorial, this article systematically walks through the complete workflow — from environment setup and data preparation to model fine-tuning and deployment testing — helping you understand how Vision-Language Models (VLMs) can be custom-trained for vertical domains.
VLM Architecture Explained: How Qwen3-VL Understands Images
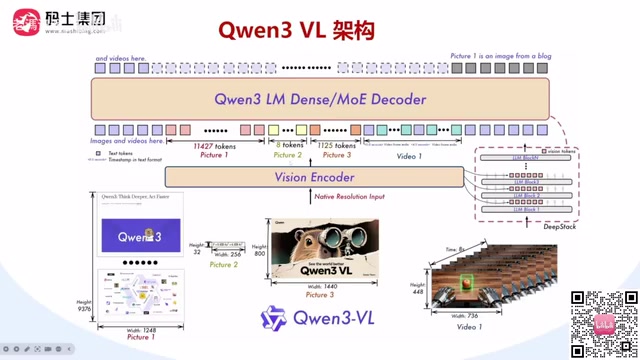
Before diving into practice, understanding the underlying architecture of multimodal large models is essential. Qwen3-VL, as a Vision-Language Model (VLM), is fundamentally built on a Large Language Model (LLM), with its multimodal capabilities coming from a Vision Encoder stacked in front of the LLM.
The Role of the Vision Encoder: Spatial Alignment from Vision to Semantics
The Vision Encoder's essential job is "alignment" or "transformation." Whether the input is a landscape image, portrait image, high-resolution photo, or video (essentially a sequence of frames), the encoder converts all visual content into tokens that are ultimately passed to the large language model for comprehension.
Large language models are inherently good at processing text inputs (prompts, sentences). Multimodal large models build on this by using a front-end vision encoder to "translate" images into token representations that the LLM can understand. In simple terms, this is a form of "spatial alignment" — mapping visual information into a semantic space that the language model can comprehend.
From a technical standpoint, Vision Encoders are typically based on the Vision Transformer (ViT) architecture. ViT was originally proposed by Google in 2020, with the core idea of splitting an image into fixed-size patches (e.g., 16×16 pixels), flattening each patch and projecting it into a vector via linear projection, then feeding it into a standard Transformer encoder with positional encodings added. Qwen3-VL makes key improvements on top of this by supporting dynamic resolution input — while traditional ViT requires fixed input dimensions, the Qwen series' vision encoder can adapt to images of different resolutions, avoiding information loss from forced resizing. Additionally, alignment between visual tokens and text tokens typically requires a Projection Layer or Connector (such as a linear mapping or Q-Former structure) to transform the high-dimensional feature vectors output by the vision encoder into representations that match the dimensionality of the LLM's word embedding space. This step is a critical bottleneck in multimodal fusion and directly affects the model's accuracy in understanding image content.
Audio Extension and Unified Multimodal Architecture
This architecture is highly extensible. If the input is audio, you simply replace the Vision Encoder with a Speech Encoder to achieve alignment. Current mainstream multimodal large models essentially follow this pattern: an LLM at the core, with different Encoders chained to the front end depending on the input type.
It's important to emphasize that these Encoders are not simple data reading tools (like the FFmpeg library) — they are model components that require pre-training. Their task is not just to convert data into numerical values, but to convert it into tokens that the back-end LLM can understand. Therefore, during fine-tuning, you need to decide which part to train: the back-end LLM, the front-end Encoder, or specific layers and modules of both. Current mainstream parameter-efficient fine-tuning methods like LoRA (Low-Rank Adaptation) can be selectively applied to the LLM portion, the vision encoder portion, or the connector portion — different choices lead to markedly different fine-tuning results.
Environment Setup: GPU Selection and Cloud Server Image Preparation
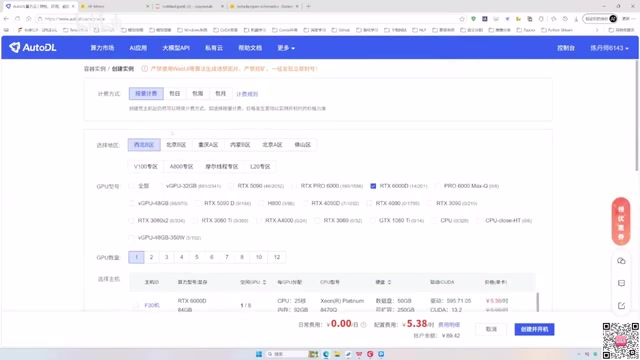
This hands-on project is based on an AutoDL cloud server. The key to environment setup lies in making smart choices for GPU and disk space.
Three Core Metrics for GPU Selection
This tutorial uses an RTX 6000D (Blackwell architecture) with a massive 84GB of VRAM. The reason for choosing a high-VRAM GPU is that the Qwen3-VL-8B model alone takes up about 17-18GB of VRAM just to load. With a commonly used 4090 (24GB), after subtracting the model's footprint, only about 7GB remains — loading high-resolution image datasets while reserving space for gradient computation and the optimizer would be extremely tight, easily triggering OOM (Out of Memory) errors.
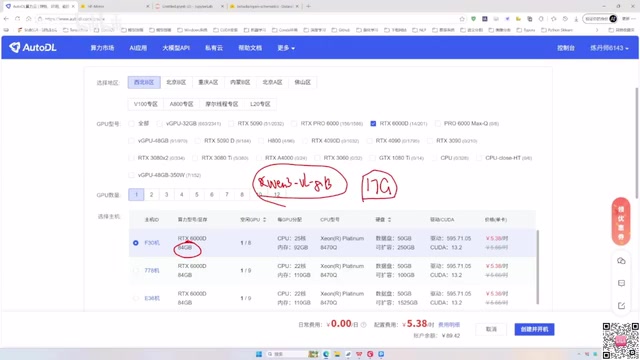
When choosing a GPU, focus on three key metrics:
- VRAM Size: Determines how large a model and data batch you can load;
- Bandwidth: The RTX 6000D offers about 1.4-1.5TB/s, while the A800 provides about 2TB/s — higher bandwidth means faster data throughput per unit of time;
- Multi-GPU Interconnect Capability: The RTX 6000D has NVLink disabled, making it suitable only for single-GPU training; the A800/A100 support multi-GPU parallelism.
For scenarios with insufficient VRAM, quantization approaches (such as int8 quantization) can be used for low-precision training, reducing model memory usage from 17GB to about 8GB, freeing up more space for data loading. The quantization technique mentioned here is closely related to QLoRA (Quantized LoRA) — QLoRA stacks LoRA adapters on top of a 4-bit quantized base model for training, enabling fine-tuning of 7-billion-parameter models on a single consumer-grade GPU with 24GB of VRAM.
Image Selection and Disk Expansion
The base image selected for this project is: PyTorch 2.8.0 + Python 3.12 + Ubuntu + CUDA 12.8. Since the dataset is large (317GB), the data disk was expanded from the default 50GB to 400GB. Using an instance with a pre-built base image automatically sets up PyTorch, CUDA, and other low-level environments, making subsequent dependency installation much more convenient.
Dependency Installation: FlashAttention Offline Installation Tips for Speed
After instance creation, you can log into the server via JupyterLab or SSH (e.g., VS Code Remote) to proceed.
Core Python Dependencies
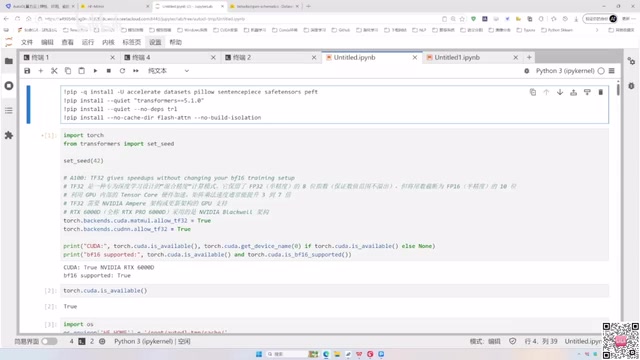
Key modules to install include:
- datasets: HuggingFace dataset loading library;
- safetensors: Parses the mainstream SafeTensor model format, which offers faster loading speeds and better security compared to the traditional pickle format (avoiding pickle deserialization vulnerabilities);
- peft: Parameter-Efficient Fine-Tuning library, supporting methods like LoRA. The core idea of LoRA is to inject low-rank decomposition matrices (the product of two small matrices A and B) alongside the pre-trained model's weight matrices, freezing the original weights during training and only updating these two small matrices. For example, for a 4096×4096 weight matrix, using LoRA with rank=16 reduces trainable parameters from about 16 million to about 130,000 — a compression ratio exceeding 100x, making it possible to fine-tune billion-parameter models on consumer-grade GPUs;
- transformers (5.1.0): HuggingFace's core library, wrapping extensive model loading and training capabilities;
- trl: Reinforcement learning and training library, supporting multiple training paradigms including SFT (Supervised Fine-Tuning), RLHF (Reinforcement Learning from Human Feedback), and DPO (Direct Preference Optimization).
How to Install FlashAttention from Pre-compiled Packages
The tutorial specifically highlights a practical tip: compiling FlashAttention from source is extremely time-consuming (potentially over an hour). A much more efficient approach is to directly download the corresponding pre-compiled offline package (.whl file) and install it with pip install.
FlashAttention was proposed by the Tri Dao team at Stanford University and is an IO-aware exact attention computation algorithm. Traditional self-attention mechanisms need to write the complete N×N attention matrix to the GPU's High Bandwidth Memory (HBM), and when sequence length N is large, memory usage grows at O(N²). FlashAttention uses tiling and kernel fusion techniques to decompose the attention computation into small blocks, performing calculations in the GPU's on-chip SRAM (which is an order of magnitude faster than HBM) before writing results back, avoiding memory reads and writes for large intermediate matrices. This not only reduces memory usage to O(N) but also significantly improves computation speed by reducing HBM accesses — achieving 2-4x speedups for long sequence scenarios. This is particularly important for multimodal large models, because a single high-resolution image can produce hundreds or even thousands of visual tokens after passing through the Vision Encoder, and combined with text tokens, the sequence length far exceeds pure text scenarios, making FlashAttention's acceleration benefits even more pronounced.
When downloading, you must strictly match version numbers:
- torch2.8 corresponds to PyTorch 2.8;
- cu128 corresponds to CUDA 12.8;
- cp312 corresponds to Python 3.12;
- linux_x86_64 corresponds to Ubuntu and Intel x86 CPUs.
As long as versions are aligned, offline installation can save you from lengthy compilation wait times and be completed within minutes. The reason such strict version matching is required is that FlashAttention's underlying implementation consists of highly optimized kernel code written in CUDA C++, which binds to specific CUDA runtime libraries and Python ABI during compilation.
Dataset Preparation: Core Materials for Circuit Board Recognition Fine-Tuning
This hands-on project uses a 317GB circuit board dataset from HuggingFace. Its structure can be viewed through the Dataset Viewer, containing multiple fields:
- Image column: High-resolution professional circuit board images;
- Components Used: Manually annotated component names;
- Name: Image name;
- Description: Descriptive text;
- Extension Used: Additional extension information.
The training goal is to enable Qwen3-VL to more accurately identify component names and text annotations on circuit board images. This is a classic scenario for vertical domain fine-tuning — because the characters on circuit boards are extremely small and the domain is highly specialized, optimizing prompts alone is nearly impossible to improve recognition accuracy, making fine-tuning the inevitable choice for enhancing the model's domain-specific capabilities.
From a technical perspective, circuit board component recognition falls under the category of Fine-Grained Visual Recognition. The challenges in this type of task include: targets are usually extremely small (e.g., a 0402-package resistor is only 1.0×0.5mm), inter-class differences are subtle (different capacitor models look nearly identical), and silkscreen text annotations may be only 0.5mm in height. General-purpose multimodal large models are pre-trained primarily on natural images and web text, lacking sufficient industrial PCB (Printed Circuit Board) images, and therefore perform poorly on such tasks. Data quality during fine-tuning directly determines the final results — annotation accuracy, image resolution consistency, and class distribution balance are all critical. Additionally, constructing the conversation message body (i.e., converting image-text data into instruction formats that the model can train on) is an often overlooked but extremely important step, requiring the conversion of raw image-text pairs into multi-turn dialogue JSON structures so the model can learn the pattern of "looking at an image and answering questions."
When Should You Fine-Tune a Large Model?
The criteria are clear: when the pre-trained model cannot meet vertical business requirements or doesn't perform well enough on specific tasks, you should consider fine-tuning. Circuit board component recognition is a classic case that cannot be solved through Prompt Engineering alone — the model lacks training data for this specialized domain and can only acquire domain knowledge through fine-tuning.
Generally speaking, the optimization path for AI applications follows a progressive strategy: first try prompt optimization (zero cost) → then try Few-Shot learning (providing examples in the prompt) → then consider Retrieval-Augmented Generation (RAG, incorporating external knowledge bases) → and only then proceed to fine-tuning. While fine-tuning delivers the strongest results, it also means higher data preparation costs, computational resource consumption, and engineering complexity, so you need to balance performance gains against cost investment.
Performance Optimization: TF32 Mixed Precision and BF16 Training Strategies
An important optimization at the code level is enabling TF32 mixed-precision computation. Newer GPUs (A100, RTX 6000D, etc.) all support this mixed-precision mode designed specifically for deep learning.
TF32 retains the numerical range of single-precision floating point (avoiding overflow) while truncating the mantissa to a precision similar to FP16 (saving computation). To understand TF32's advantages, it helps to compare several common floating-point formats: FP32 uses 1 sign bit, 8 exponent bits, and 23 mantissa bits, offering the highest precision but slowest computation; FP16 uses 5 exponent bits and 10 mantissa bits, offering fast computation but a small exponent range that's prone to overflow or underflow; BF16, proposed by Google Brain, uses 8 exponent bits and 7 mantissa bits, preserving the same numerical range as FP32, and while its precision is slightly lower than FP16, it far exceeds FP16 in training stability; TF32 uses 8 exponent bits and 10 mantissa bits, totaling 19 bits — it's not a storage format but a computation mode: data is still stored in FP32, but when Tensor Cores execute matrix operations, the mantissa is automatically truncated to 10 bits for computation, balancing precision and speed.
You can enable it by setting the following two options:
torch.backends.cuda.matmul.allow_tf32: Allows matrix multiplication to use TF32;torch.backends.cudnn.allow_tf32: Allows neural network convolution computations to use TF32.
The GPU's internal Tensor Cores accelerate these matrix operations, saving VRAM while improving computation speed. In actual training, BF16 is typically recommended as the primary format for mixed-precision training, with TF32 serving as an acceleration method for matrix operations — both can be used together. Additionally, you should check whether your GPU supports BF16 — compared to FP16, BF16 offers superior numerical stability and should be prioritized during fine-tuning.
The Role of CUDA in the Training Pipeline
The tutorial also clarifies a fundamental concept: the CUDA Toolkit is essentially a "translator." The Python code we write cannot be directly executed by NVIDIA GPUs — it needs to go through layers of translation: Python → CUDA functions → GPU assembly language. More specifically, when PyTorch executes a tensor operation, it calls CUDA libraries such as cuBLAS (linear algebra library) and cuDNN (deep learning primitives library) under the hood, which internally encapsulate PTX instructions (GPU assembly) that are highly optimized for different GPU architectures, ultimately executed in parallel by the GPU's Streaming Multiprocessors. This is the fundamental reason why CUDA versions must strictly match PyTorch and GPU drivers in environment setup — version mismatches can cause kernel functions to fail to invoke correctly, resulting in performance degradation at best or runtime errors at worst.
Summary: The Complete Path to Multimodal Large Model Fine-Tuning
Fine-tuning multimodal large models may seem complex, but when broken down, it can be summarized as a clear workflow: select the appropriate GPU and image → install core dependencies (including FlashAttention) → prepare and clean the vertical domain dataset → construct conversation message bodies → set training hyperparameters → execute fine-tuning → test and validate results.
The real barrier isn't the code itself, but the mastery of details at every step — environment debugging, version matching, VRAM planning, and data quality control. Only by mastering the ability to build environments from scratch can you handle new tasks with confidence. Completing a full Qwen3-VL multimodal fine-tuning project not only deepens your understanding of VLM architecture but also adds a solid project experience to your resume.
Related articles
Design Principles of AI Mathematical Solving Systems: A Complete Guide to LEAN Formal Proofs
Deep dive into AI math solving system architecture: generate-verify-iterate workflows, LEAN formal proofs, chunking strategies for long proofs, and practical paths for individual developers.

Tesla Cybercab Bans Children Under 13 — Even With a Parent Present
Tesla's Cybercab robotaxi bans riders under 13, even with a parent. The policy is stricter than Model Y robotaxis, driven by safety, liability, and operational concerns.
Roland Launches Melody Flip: How a Generative AI Music Plugin Empowers Professional Creators
Roland enters generative AI music with Melody Flip, a DAW plugin offering 250 palettes for professional creators. We analyze its features, how it differs from Suno, and its industry impact.