Tutorial: Locally Deploying Qwen Models with llama.cpp — GPU Compatibility & Parameter Tuning in Practice
A practical guide to deploying Qwen models locally with llama.cpp, covering GPU setup and parameter tuning.
This tutorial walks through the full process of locally deploying Qwen series models using llama.cpp. It covers GPU compatibility for NVIDIA, AMD, and Intel cards, GGUF model selection by VRAM tier, KV cache quantization to save memory, context length optimization, and integration via the OpenAI-compatible API. Real-world benchmarks and Agent capability demos are also included.
For users looking to run large language models locally, llama.cpp is one of the most popular and efficient inference frameworks available today. Initiated by Georgi Gerganov in early 2023, llama.cpp is written in pure C/C++ with no dependency on heavyweight deep learning frameworks like PyTorch. It achieves extreme low-level performance optimization through its custom GGML tensor library (which later evolved into the GGUF format). Its core innovation lies in multi-level weight quantization, which can compress models with billions of parameters down to a size manageable by consumer-grade hardware. As of 2025, llama.cpp supports dozens of model architectures including Qwen, DeepSeek, Mistral, Gemma, and more, making it the de facto standard for local inference.
Compared to the compute costs and privacy concerns of cloud APIs, local deployment is not only free of charge but also keeps data on your machine. Additionally, you can fully leverage your GPU's performance through parameter tuning. This article systematically walks through how to deploy the Qwen (Tongyi Qianwen) series of models using llama.cpp, integrate with toolchains like DeepSeekAd Harness, and covers compatibility solutions for AMD/Intel GPUs along with context window optimization tips.
Environment Setup & GPU Compatibility
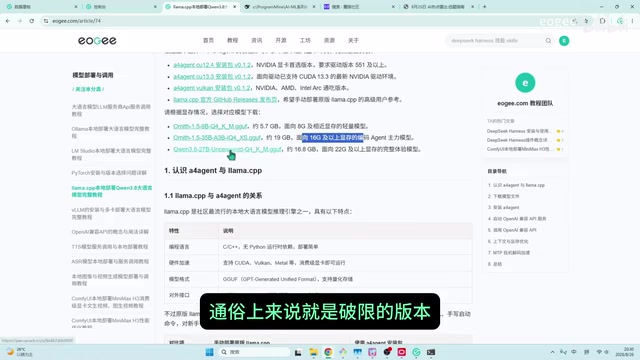
The first step in local deployment is choosing the correct build version based on your GPU. This is often where beginners run into the most trouble — a CUDA version mismatch will cause startup failures.
Determining Your GPU's CUDA Version
The process is very straightforward: open a command prompt (cmd), run the nvidia-smi command, and check the CUDA Version field in the upper right corner.
It's important to note that the CUDA Version shown in nvidia-smi is actually the maximum CUDA runtime version supported by your current driver, not the version of the CUDA Toolkit installed on your system. This distinction is critical: the driver version determines which CUDA-compiled binaries can run. Newer drivers are generally backward-compatible with programs compiled for older CUDA versions, but the reverse is not true. This is precisely why a build compiled for a newer CUDA version fails to launch on an older driver.
- If your CUDA version is 13.3 or higher, you can download the corresponding CUDA 13.3 build (suitable for newer GPUs);
- If your version is lower (e.g., older-generation NVIDIA GPUs), choosing the CUDA 12.4 build is a safer bet.
The core differences between the two are minimal — they mainly differ in the additional extensions used during the build, while functionality is essentially identical.
Solutions for AMD and Intel GPUs
Users with AMD GPUs or Intel GPUs should download the Vulkan version of the installation package. Vulkan is a cross-platform, low-level graphics and compute API maintained by the Khronos Group. Originally designed as the successor to OpenGL, its Compute Shader capabilities make it a strong choice for general-purpose GPU computing. Unlike CUDA, which is exclusive to NVIDIA hardware, Vulkan supports NVIDIA, AMD, Intel, and even some ARM-based GPUs, offering extremely broad coverage. The Vulkan backend in llama.cpp achieves GPU-accelerated tensor operations through the kompute library. While performance on equivalent hardware is typically slightly lower than the native CUDA backend (roughly a 10%–20% gap), it remains the most stable and viable GPU acceleration option for non-NVIDIA users. AMD users may also consider the ROCm backend, but its compatibility with consumer-grade GPUs is not as broad as Vulkan's.
If you have build experience, you can also visit the GitHub Release page to compile your own build.
Choosing a GGUF Model Tier Based on VRAM
GGUF (GPT-Generated Unified Format) is the model file format specific to the llama.cpp ecosystem. It evolved from the earlier GGML format and packages model weights, tokenizer configuration, metadata, and all other information into a single file for easy distribution and loading. The Q4KM quantization tier means 4-bit quantization using a K-means clustering Medium configuration, which strikes a good balance between precision and compression ratio. Common quantization levels from highest to lowest include: F16 (lossless), Q8_0, Q6_K, Q5_KM, Q4_KM, Q4_KS, Q3_K, Q2_K, etc. Each step down reduces model size by approximately 20%–30%, but output quality gradually decreases as well.
Based on VRAM size, the following three model tiers are recommended:
| Model | VRAM Required | Use Case |
|---|---|---|
| Onith 1.5-9B Q4KM | 8GB VRAM | Getting started |
| Onith 1.5-35B-A3B (~19GB) | 16GB+ VRAM | Primary use |
| Qwen3-27B (uncensored version) | High VRAM | Advanced users |
The "A3B" in Onith 1.5-35B-A3B indicates that only about 3 billion parameters are active, implying the model uses a MoE (Mixture of Experts) architecture. While the total parameter count of a MoE model is large (35B), during inference each token only activates a subset of expert networks, so the actual number of parameters involved in computation is far less than the total. Inference speed is comparable to that of a dense 3B-parameter model. This makes it an excellent balance between speed and quality, and it's especially well-suited for local deployment scenarios where VRAM is limited but high-quality output is desired.
Installation & First Launch
After downloading, you'll get an installer package called A4agent. Taking the Vulkan version as an example, the installation process is very simple: double-click to run → Next → Create desktop shortcut → Install → Finish.
Automatic Hardware Detection with Recommended Presets
The biggest advantage of this integrated package is its out-of-the-box hardware detection. Upon launch, it automatically detects your GPU model and VRAM size, and recommends:
- An appropriate model tier;
- The context length you can enable;
- Suggested KV cache level.
All preset values can be manually adjusted later, making it extremely beginner-friendly.
Adding a GGUF Model Directory
The next step is selecting a model directory. The program's detection logic is straightforward: as long as the folder you add contains .gguf format model files, it will automatically recognize that directory as a model directory. Using the smaller Onith 1.5-9B as an example, simply select the folder and proceed.
The default service port is 8080. If that port is already in use, you can customize it to another port in the configuration page. After clicking Finish, the program will automatically load the model onto the GPU. When the status shows "Running successfully," loading is complete.
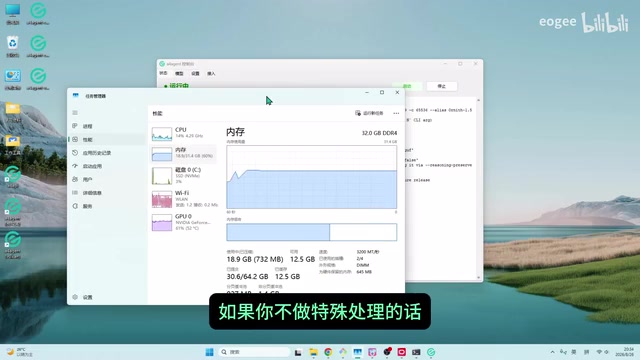
It's worth mentioning the memory management mechanism: llama.cpp first stores the model in RAM, then copies it from RAM to VRAM. This two-stage loading strategy stems from the operating system's memory mapping (mmap) mechanism — the model file is first mapped to virtual memory space via mmap, and then the CUDA/Vulkan runtime transfers the required weight data to GPU VRAM. By default, the memory mapping continues to occupy RAM, but this integrated package includes an optimization — RAM is automatically released after 90 seconds, preventing long-term system resource consumption. Using the 9B model as an example, it only occupies about 7.5GB of VRAM.
Key Parameter Tuning
Parameter configuration is the core factor determining model performance and user experience. Proper parameter settings can yield the best results within limited VRAM.
Context Length Settings
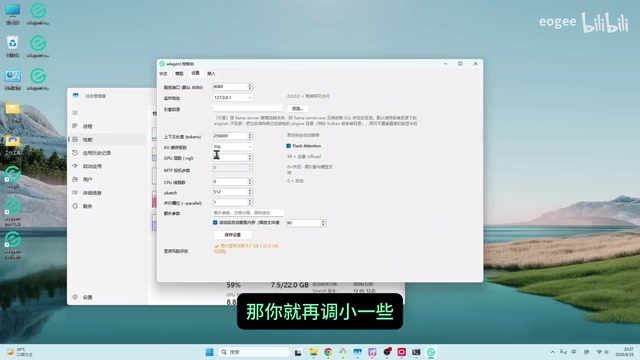
The default context length is 64K, while the Onith model supports up to 256K context. If you have VRAM to spare, you can max it out at 256K to handle longer documents and conversation histories. Keep in mind that context length directly determines the VRAM usage of the KV cache — doubling the length doubles the KV cache consumption — so you need to balance context length against available VRAM.
KV Cache Quantization Explained
The KV cache (Key-Value Cache) is the core acceleration mechanism for autoregressive inference in Transformer models. When generating each new token, the model needs to compute attention scores against all historical tokens, which involves querying the historical Key and Value vectors. If these were recomputed from scratch every time, computational cost would grow quadratically with sequence length. The KV cache stores previously computed Keys and Values in VRAM for reuse, reducing incremental inference complexity to linear. However, its VRAM usage is proportional to context length — for example, at FP16 precision, a 9B-parameter model with 256K context could have a KV cache consuming several GB of VRAM.
Beyond quantizing the model itself, the KV cache can also be quantized, which is a crucial technique for saving VRAM:
- F16: Full precision, no quantization, best quality;
- Q8: Halves VRAM usage with minimal quality loss;
- Q4: Halves it again, extremely VRAM-efficient, the lowest recommended tier.
The pattern is very clear: going from F16 → Q8 divides VRAM by 2, and from Q8 → Q4 divides by 2 again. If you prioritize quality and have sufficient VRAM, stick with F16. Quantizing the KV cache from FP16 to Q4 can save roughly 4x VRAM with minimal precision loss — this is the key trick for supporting long contexts with limited VRAM.
GPU Layers & Prediction Parameter Configuration
- GPU Layers: Default is 99, meaning inference is fully offloaded to the GPU. Transformer models are built by stacking multiple layers, each containing attention mechanisms and feed-forward networks. The GPU layers parameter determines how many layers are computed on the GPU, with the remaining layers falling back to the CPU. If you only have 4GB of VRAM, you'll need to reduce this value to offload some layers to the CPU — while CPU inference is much slower than GPU, this hybrid inference approach (CPU+GPU offloading) at least allows users with insufficient VRAM to run larger models;
- MTP (Multi-Token Prediction): Requires model support; not available for some models;
- Predicted Token Count: This refers to Speculative Decoding, where multiple tokens are predicted at once to improve throughput (Tokens/sec). The principle is to first draft multiple candidate tokens using a low-cost method, then have the main model verify them all at once, turning multi-step sequential generation into single-step parallel verification. Common values are 8/4/2/1, and the optimal value depends on model size and hardware configuration — testing to find your optimal value is recommended;
- CPU Thread Count: Keep the default of 0 when using pure GPU inference.
There's also an "Extra Parameters" input field where you can directly enter native llama.cpp command-line arguments to meet the customization needs of advanced users. After making changes, click Save — you must stop the service and restart it for changes to take effect.
Integrating with Toolchains & Real-World Testing
Once configured, llama.cpp exposes an OpenAI-compatible API. An OpenAI-compatible API refers to an HTTP service that follows the OpenAI Chat Completions API specification, including standard endpoints like /v1/chat/completions and /v1/models, along with a unified request/response JSON format. Since OpenAI's API has become the industry de facto standard, virtually all AI application clients and development frameworks (such as LangChain, AutoGen, Open Interpreter, etc.) have built-in native support for this interface. This means users only need to change the API address from api.openai.com to localhost:8080 to switch to local inference without modifying any application code, greatly lowering the integration barrier for local deployment.
How to Connect via the OpenAI-Compatible API
Using DeepSeek Harness as an example:
- Add a custom provider with any display name (e.g., llama-cpp);
- Enter the API address provided in the application;
- Select "OpenAI Compatible Protocol" as the API protocol;
- Click "Fetch Models," select the corresponding model, and create the provider.
If the listening address is set to 0.0.0.0 (default is 127.0.0.1), all machines on the local network can access the service, making it suitable for sharing inference compute across multiple devices.
Real-World Inference Performance
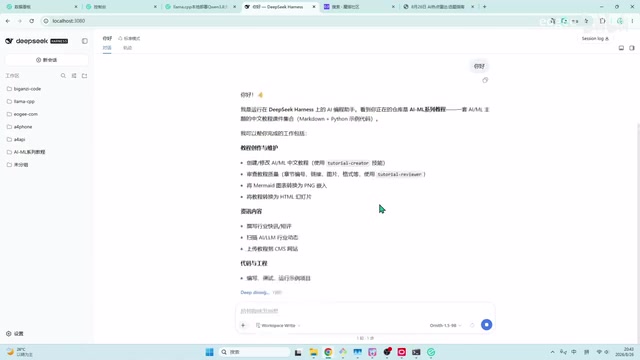
In real-world testing with the 9B model:
- Output speed was approximately 41 Tokens/sec, a very smooth experience;
- Time to First Token was approximately 15.4 seconds — Time to First Token (TTFT) includes two phases: cold-start model loading (mapping weights from RAM to GPU compute units and compiling CUDA/Vulkan kernels on the first request) and Prompt Processing (performing a one-time parallel attention computation across all tokens in the input prompt). 15.4 seconds is within the normal range for a cold-start scenario;
- After entering a warm state, subsequent responses were nearly instant — in the warm state, weights are already resident in VRAM and compute kernels are cached, eliminating cold-start overhead. Additionally, shorter conversational inputs make Prompt Processing time negligible.
Furthermore, the content creator also demonstrated Agent capabilities: the model was able to classify available skills, covering categories like creation & review, publishing & deployment, multimedia tools, and more — it could even determine collaborative relationships between skills. When invoking the MD2PPT tool, the model successfully converted a tutorial article into a well-structured PowerPoint presentation, complete with a table of contents, paginated content, and illustrations. The overall result was quite impressive.
Conclusion
This article provided a complete walkthrough of rapidly deploying Qwen series models using an integrated package: from GPU compatibility and GGUF model selection, to KV cache quantization and parameter tuning, to OpenAI-compatible API integration. Compared to other solutions like Ollama, LM Studio, and vLLM, this llama.cpp-based integrated package excels at automatic hardware detection, automatic memory release, and visual parameter tuning, and is especially friendly to AMD and Intel GPU users. If you want to run large language models locally at zero cost while protecting your privacy, this solution is well worth trying.
Related articles

Chain of Thought Isn't Just for AI: How Humans Can Use CoT to Improve Thinking Quality
Chain of Thought isn't just a prompt trick for large models. Starting from a Hacker News discussion, this article analyzes why CoT works for human thinking too, breaks down actionable ways to transfer it, and highlights the key differences between human CoT and machine CoT.
Cloudflare Teams Up with OpenAI: Closi…
Cloudflare Teams Up with OpenAI: Closing the Loop from Vulnerability Discovery to Defense with AI
Cloudflare uses OpenAI Daybreak to investigate security vulnerabilities and generate reviewable remediation plans, while developers use Codex to boost coding efficiency and quality.

Orca Multi-Agent Orchestration in Practice: A Guide to Parallel Collaboration with Claude and Codex
Orca is Stable AI's free open-source agent workbench supporting 34 agents like Claude Code and Codex in parallel. Learn its Git worktree isolation, multi-model orchestration, and mobile management.