Breaking Down Claude Opus 5.5's Approach to Generating Animated Videos with Code

How Claude Opus 5.5 turns code into animated video through a deterministic, frame-by-frame engineering pipeline.
The article breaks down the technical pipeline behind Claude Opus 5.5's demo clips: the model writes requirements as code, the browser renders frames along a timeline, and a tool assembles them into video. Hand-drawn aesthetics come from posing characters every two frames at 30fps; interface morphing relies on SVG path interpolation with staggered exits and entrances; 3D walkthroughs use a WebGL scene with scripted camera paths. The author validated the full workflow with a 12-second sample and emphasizes that prompts should start from "what change the audience needs to understand." The method isn't Claude-exclusive — its real value is turning video creation into a file-based, iterable engineering asset.
From Code to Video
Claude Opus 5.5's recently released demo clips of code-generated videos have attracted considerable attention — hand-drawn-style lines that animate, interfaces that continuously morph and stretch, even a walkthrough of a three-dimensional room. Behind these seemingly complex effects lies a clear, reproducible technical pipeline.
The core logic isn't mysterious: the model writes your requirements as code, the browser renders that code into individual frames, and those frames are assembled into a video. Take a cat walking from left to right — its position changes over time, sample 30 frames per second, and motion emerges. More importantly, this approach gives you full control over every frame. Rewind to any moment, and the cat is still in exactly the same position — meaning you can precisely inspect and correct any individual frame.
This "code-driven + frame-by-frame export + video synthesis" workflow essentially transforms video creation into a programmable, debuggable engineering problem — rather than a one-shot black-box generation.
How the Hand-Drawn Look Is Built
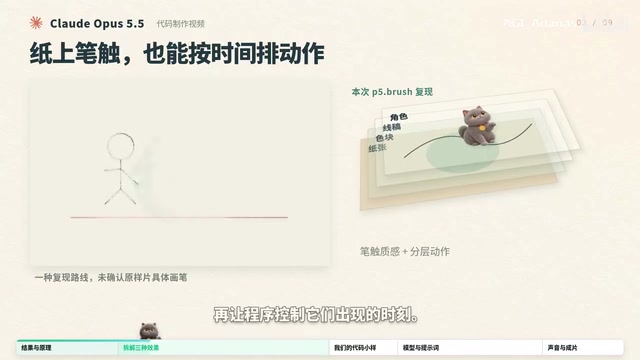
The hand-drawn animation segment in the demo is particularly striking: lines with subtle wobble, colors that look painted on paper, and movement with the staggered, choppy quality of hand-drawn work. Reproducing this aesthetic can be done with an open-source drawing library — lines, color fills, and characters each on their own layer, with the program controlling when each appears.
The canvas exports at 30 frames per second, while characters only switch to a new pose every two frames. Playback still feels fluid, yet retains the distinctive pauses of hand-drawn animation. This detail is telling: the "hand-drawn feel" isn't randomly generated — it's a visual effect deliberately crafted through precise control of frame rate and pose-switching rhythm.
It's worth noting that which specific drawing library was used in the original demo would require examining its actual generated code. What's described here is simply one viable approach to reproducing the effect.
The "open-source drawing library" mentioned here — a well-known industry example is Rough.js, which adds hand-drawn wobble to straight lines and rectangles. Adjusting the roughness and bowing parameters controls the degree of "handmade" feel. In more complete hand-drawn animation scenarios, Rough.js is typically paired with a Canvas or SVG rendering layer. Different character poses correspond to a set of pre-drawn keyframe images, switched by code according to timestamps. "Switching pose every two frames" has a proper industry term: "on twos" (shooting on twos). This is standard practice in traditional hand-drawn animation — Disney's early films made extensive use of this rhythm, saving drawing effort while producing a texture distinctly different from smooth computer animation. Modern CSS/JS animations default to interpolating every frame, which actually loses this "human hand trace," so deliberately skipping intermediate frames is needed to recreate it.
The Mechanics of Morphing Interfaces and 3D Walkthroughs
The key to the interface morphing segment is that "the same shape stays in view at all times." A shape stretches and unfolds, its content replaced along the way, while the viewer's eye never has to search for a new subject. The implementation has a clear division of labor: web elements handle text and buttons, vector graphics handle outlines, and an animation library controls the rate of change.
The most common place to go wrong is the handoff — new text enters before old text has finished exiting. The fix is to stagger the exit and entrance so the transition stays clean. These kinds of details are worth spelling out explicitly in your prompts.
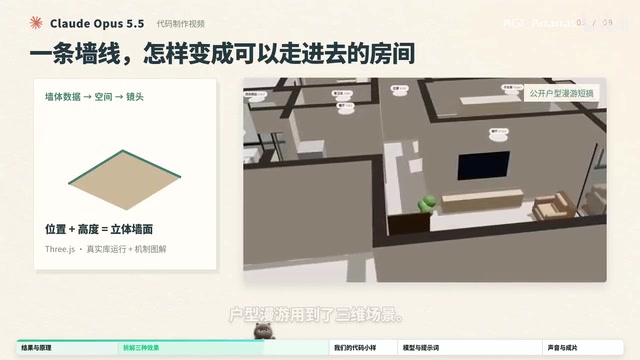
The 3D walkthrough uses a complete three-dimensional scene. In the project code, walls and furniture all have coordinate positions, and the camera can move through the room. A wall line on a flat plane, given height and furniture, becomes a room with depth. Turning it into a video also requires writing a camera path: when to walk through the door, when to turn toward the window — all managed by the timeline. Swapping in a new background image, however, still requires checking recognition accuracy and size compatibility.
The "vector graphics for outlines, animation library for rate of change" mentioned here corresponds to the common tech stack of SVG morphing combined with GSAP (GreenSock Animation Platform) or Anime.js. SVG <path> elements can achieve smooth shape-to-shape morphing by interpolating between two sets of path point data — provided the anchor point counts of both paths match. This is also the technical root of the "handoff glitch" problem: if the old and new path structures don't align, interpolation produces shape tearing. The 3D walkthrough section typically relies on Three.js, the most mainstream WebGL wrapper for browsers. It lets you define wall coordinates, material textures, and camera paths in JavaScript, with the browser using the GPU to render a perspectively correct 3D scene. "Writing the camera path into the timeline" is essentially updating the camera's position and lookAt vectors per frame inside Three.js's animation loop.
A Complete Reproduction of a 12-Second Sample
The author personally followed this pipeline to build a 12-second sample: a cat catches an incoming question, paper slips fly into a toolbox, the result appears in a reply, with each action corresponding to a clearly defined step.

The production workflow: first lock down the position and timing of each step, then have the browser export frames one by one, and finally assemble the video. Both the code and the final clip are preserved — to swap characters or adjust hold times, just continue editing within this same set of files.

This "file-based, iterable" way of working is the most valuable part of the entire pipeline — it transforms a one-time creative act into a reusable asset.
The "browser exporting frame by frame" step is more complex in practice than it sounds. A common approach uses headless browser tools like Puppeteer or Playwright: a script automatically advances the page timeline to each frame (e.g., every 1/30 second), calls the screenshot interface to export PNGs, and finally uses FFmpeg to assemble the image sequence into an MP4. The challenge here is timing synchronization: CSS animations or requestAnimationFrame loops in the page need to be "frozen" at a specified moment rather than running freely against the system clock — otherwise screenshot timing and animation state won't align. An alternative is integrating CCapture.js or RecordRTC directly into the Canvas animation code to capture each frame's pixel data from inside the browser, avoiding the timing issues of external tools. Regardless of approach, the "every frame is inspectable" property depends on the animation itself being deterministic — given the same timestamp, the visual state is completely consistent. This is the core advantage of code-driven animation over real-time screen recording.
Can Other Models Do This?
A natural question: is this method exclusive to Claude Opus 5.5? The answer is no. Canvas, animation libraries, and rendering tools can all be invoked by other programming-capable models — DeepSeekAd and others can attempt the same tasks.
Actual results depend on whether the model can write complete, runnable actions, resolve dependencies, and fix problems based on preview feedback. The author admits to not running cross-model benchmarks this time, preferring to leave behind a reusable production pipeline rather than a performance competition.
How to Write the Prompt
The starting point for writing a prompt should be: "what change does the audience need to understand?" For the sample clip, the author wrote: the question first reaches the character's hands, then sets off, the tools produce a result that returns, and only then does the character give their answer. Next, add visual conditions — landscape orientation, layered paper slips, text in the later steps, with each step pausable for inspection.
Finally, write delivery requirements: able to seek to any moment, keyframes first then export to video; if the preview has issues, fix specific actions — if a paper slip blocks the result, have it exit first; if information is hard to read, enlarge the font and leave a little reading time.
For clips with voiceover, you also need to leave space for the audio: wherever a sentence reaches in describing an action, the visuals follow along; subtitles must match the actual audio, not be evenly distributed by word count. All of this is actionable experience distilled from practice.
What's Really Worth Taking Away
The value of this pipeline isn't in any single impressive demo clip — it's in the transferability of the methodology. The remote repository contains frame-export scripts, and the prompt library includes cases in many different styles. Start by picking one effect and producing a few seconds of it, then get it stable.
As the author puts it, what's truly worth taking away is this: when you see an effect, being able to articulate how it moves, what it says, and how to verify it. That way, the next time you change the subject, you still have a set of methods you can keep reusing. This may be the critical step that moves AI-assisted video creation from "getting lucky" to "engineering discipline."
Related articles

Gaussian Process Bandit Optimization: Exploration Strategies and Inference Regret Guarantees
Cumulative regret guarantees in Bayesian optimization fail to reflect final recommendation quality. This article examines a new study that provides inference regret guarantees for Gaussian process bandit optimization through exploration query strategies and fill distance analysis, validated on hyperparameter optimization and control tasks.
The Most Detailed Codex Guide on Bilibili: From Installation to Real-World Practice
The most detailed Codex guide on Bilibili: from app store installation to daily work mode configuration, with a real coffee shop project demonstrating file organization, data extraction, dashboard creation, and other practical tasks. Learn to use Plan Mode and desktop pets to leverage Codex efficiently.

Appearance Compensation in Volume Rendering: Why RGB Accuracy Cannot Guarantee Density Correctness
Volume rendering research reveals that volumetric data perfectly reproducing external RGB views may still contain density errors: appearance compensation can double central density and keep external rays unchanged even when L2 error exceeds 14.52%. Density recovery depends on appearance capacity, spatial resolution, and measurement design.