Build Your First Make.com AI Agent in 16 Minutes: A Complete Beginner's Guide

Build a Make.com AI Agent from scratch in 16 minutes using the 4-element framework — no coding needed.
This article breaks down the core components of Make.com AI Agents and walks through a hands-on demo of building a company research agent. Unlike fixed automation scripts, Make.com AI Agents can reason autonomously and call tools dynamically. Every agent relies on four key elements: an AI model connection (supporting OpenAI, Anthropic, and others), structured instructions (goal, steps, output format), input (static or dynamic from sources like Google Sheets or Slack), and tools (enabling actions like web search and Google Docs creation). The demo produces a fully structured company research report with zero lines of code.
Make.com (formerly Integromat) has introduced an AI Agent feature that lets users with no coding background build intelligent agents capable of autonomously executing tasks. These agents aren't just simple automation workflows — they're "digital workers" that can reason on their own, call tools, and integrate deeply with business workflows. Based on a hands-on demo by a content creator, this article breaks down the core components of Make.com AI Agents and walks you through building a company research agent from scratch.
What Is a Make.com AI Agent
A Make.com AI Agent is a tool for building autonomous agents that can integrate with business workflows and independently complete multi-step tasks.
The video's author first demonstrates a pre-built "market research agent" as an example: it triggers every few minutes, checks a Google Sheet for rows where the "Research" column is not equal to "Yes," then automatically searches the web for each market — extracting market size, maturity stage, number of competitors, and the latest news. It writes structured data back to the spreadsheet, saves news summaries to a Google Doc with a generated link, and marks the row as "Yes" to avoid reprocessing it next time.
This example perfectly illustrates the difference between an AI Agent and traditional automation — rather than executing a fixed script, the agent "decides for itself" how many searches to run, what information to extract, and how to structure the output.
Make.com's predecessor, Integromat, was a visual automation platform founded in 2012 that officially rebranded as Make in 2022. Compared to similar products like Zapier, Make is known for more complex logic branching, data transformation capabilities, and relatively lower pricing — making it a favorite among intermediate to advanced automation users. Its core concept is the "Scenario": users build workflows by dragging and dropping modules and connecting nodes, with no coding required.
The AI Agent feature is a major upgrade Make introduced in response to the rise of large language models. Traditional automation follows a fixed execution path: if A happens, execute B. AI Agents introduce a "reasoning" layer, allowing agents to dynamically decide their next action based on the current situation — such as determining how many searches to run or which tool to call. This capacity for "autonomous decision-making" is what fundamentally distinguishes it from a standard Zap or Make Scenario.
The Four Key Elements of an AI Agent
The author emphasizes that every agent in Make requires four elements to function properly. Understanding these is the foundation for building any agent.
1. AI Model Connection (The Agent's Brain)
The model is essentially the agent's "brain." Inside the agent configuration, there's a connection field for linking to an AI model provider. Make integrates with providers including OpenAI, Anthropic, Gemini, and others — users simply select a provider and enter their API key.
Once connected, you also need to choose a specific model and the "reasoning effort" — in other words, how much "brainpower" to give the agent. In the market research example, the author selected medium reasoning effort, reasoning that the task orchestration isn't complex and that detailed step-by-step instructions have already been provided, so the agent doesn't need to think too hard.
A beginner-friendly alternative is to use Make's built-in AI provider, which acts as a proxy for accessing OpenAI and Anthropic models — with costs billed through your Make subscription, eliminating the hassle of applying for API keys.
"Reasoning effort" corresponds to the "Thinking" or "Reasoning" modes in large language models — in the OpenAI ecosystem, this maps to the o1 and o3 model series; in the Anthropic ecosystem, it corresponds to Claude's Extended Thinking feature. Enabling higher reasoning effort means the model spends more tokens on internal chain-of-thought reasoning, typically producing higher-quality outputs but at slower speeds and higher cost. For tasks with clear steps and detailed instructions, a standard model is sufficient; high reasoning effort is only truly needed for complex multi-step decisions or ambiguous instructions. That's why the author's choice of medium reasoning effort for the market research case is economically sound — saving the "brainpower" budget for scenarios that actually need it.
2. Instructions (Telling the Agent What to Do)
Instructions are the prompt you give the agent — they determine what it does and how it operates. A good set of instructions typically contains three parts: the agent's high-level goal, a sequential list of task steps to execute, and output format requirements.
The author's advice is to break tasks into a clear, ordered list of steps for the agent to follow. The clearer the instructions, the lower the reasoning effort required, and the more reliably the agent will perform.
3. Input (Data Provided at Each Trigger)
Input is the data provided to the agent each time it's triggered. It can be a static value (e.g., always researching "AI Automation") or dynamic — sourced from Google Sheets, Slack messages, emails, or to-do lists. Make supports integrations with thousands of apps as input sources.
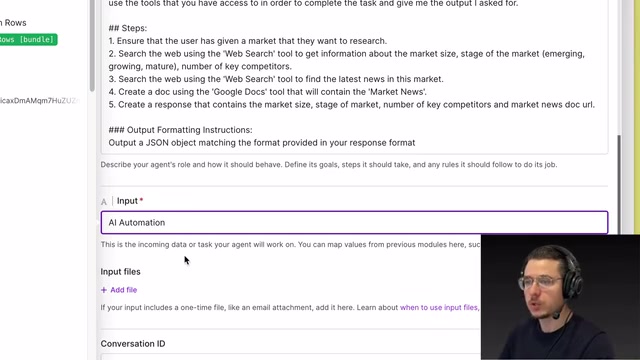
You can also skip setting up an input and simply chat with the agent directly through Make's built-in scenario chat feature, which is very convenient for testing.
4. Tools (Letting the Agent Actually Do Things)
Without tools, an agent can't do anything. Tools enable the agent to perform real actions within apps. The market research agent needs a web search tool to gather information, and a Google Docs creation tool to generate reports.
Important note: you can configure many tools for an agent, but you must explicitly tell the agent in your instructions when and how to use each one.
The tool mechanism in Make.com AI Agents follows the "Function Calling" specification under the hood — a standard interface introduced by OpenAI in 2023 and since widely adopted across model providers. The principle works like this: developers (or the platform) pre-declare callable "functions" along with their parameter descriptions; when the model determines during reasoning that it needs to use a tool, it generates a structured call request, the platform captures it, executes the corresponding action, and returns the result to the model, which then continues reasoning based on that result. In Make's visual interface, this mechanism is wrapped into "tool modules" — users don't need to understand the underlying JSON Schema; they simply add tools and fill in fields just like configuring any other module. This is precisely why clearly describing a tool's purpose and when to call it in your instructions is essential — it's essentially helping the model make the right function-calling decisions.
Hands-On: Building a Company Research Agent from Scratch
With the four elements understood, the author demonstrates a practical use case for sales representatives — automatically researching a prospect's company before a client call.
Creating the Agent and Configuring the Model
In a new Make scenario, click the bubble, search for "Agent," and add the "Run an AI Agent" module. During configuration, establish a model connection — the author selects an Anthropic model through Make's built-in provider, skipping the API key setup process.
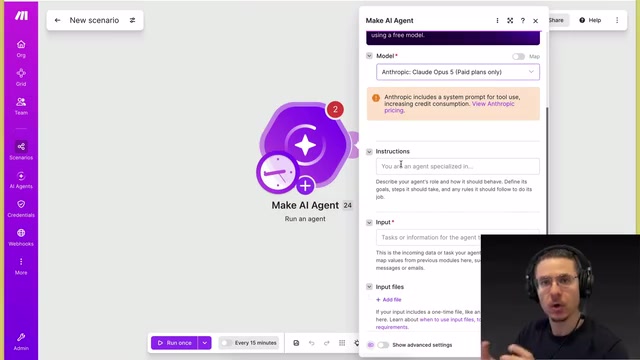
Writing the Instructions
The author's instruction structure is clean and worth adopting as a beginner template:
- Goal: You are a company research agent. You receive a company name or domain as input, search the web, and compile findings into a document.
- Step 1: Confirm the user has provided a company name or domain. If not, ask for it.
- Step 2: Use the web research tool to find the company's website, read through its pages, and learn about their business, customers, and products.
- Step 3: Use the Google Docs creation tool to create a new document and write all findings into it.
- Step 4: Output the document link.
Since only a single link is being output, no additional formatting instructions are needed here.
Setting Up the Input
As a sales rep, the company being researched changes every time, so dynamic input is required. The author mentions two approaches: connecting a Slack channel (the full integration method is covered in his YouTube course), or most simply, chatting directly through Make's built-in scenario chat.
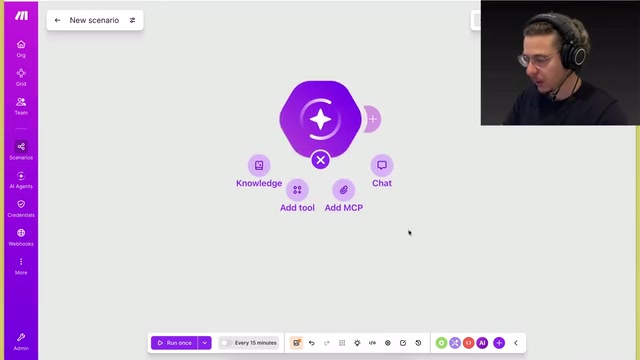
After saving, open the chat window and you can talk directly to the agent — it will prompt you to provide the company name and domain.
Configuring the Tools
Granting the agent two tools is the core of this example:
Web Search Tool: Select Make AI's "Generator Response" module and rename the tool to "Web Search" so the agent understands its purpose. The critical step is setting the search query field to "Let the AI Agent decide" — this way, the agent generates its own search keywords rather than using a fixed static value.
Google Docs Create Document Tool: The author shares a practical tip — in the content field, explicitly require that "content must be in HTML format." Without this, the agent sometimes forgets to apply formatting, resulting in a poorly structured document.
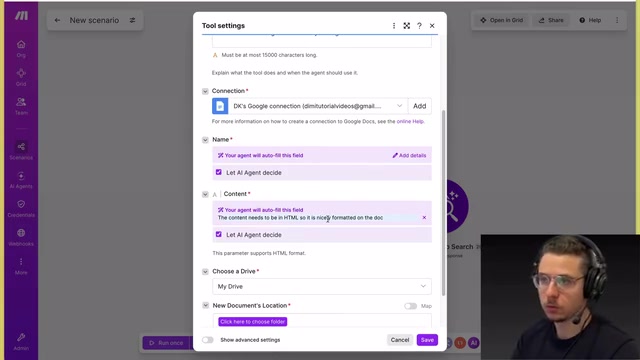
Test Run
Once configured, the author asks the agent via chat to research the CRM tool Pipedrive. The agent autonomously performed four web searches — the model itself determined how many searches were needed to collect sufficient information — then compiled and summarized everything and created a Google Doc.
The final report included sections covering company overview and history, founding story, product and feature breakdown, target customers, pricing, competitive landscape, strengths and considerations. For a sales rep, this is a complete briefing document that can be quickly reviewed before a client call.
Next Steps and Wrap-Up
This 16-minute demo shows just how low the barrier to entry is for Make.com AI Agents: no code, no API keys, and you can build an agent that autonomously researches and produces documents.
The author mentions that for those who want to go deeper, the next steps include connecting agents to chat platforms like Slack, deeply integrating them with business workflows, and giving agents "memory" — enabling them to retain context and conversation history. These are the key steps for upgrading a demo-level agent into a production-ready tool.
For beginners looking to explore AI automation, mastering the four elements — model, instructions, input, and tools — is essentially mastering the universal framework for building any Make.com agent.
Related articles

Gaussian Process Bandit Optimization: Exploration Strategies and Inference Regret Guarantees
Cumulative regret guarantees in Bayesian optimization fail to reflect final recommendation quality. This article examines a new study that provides inference regret guarantees for Gaussian process bandit optimization through exploration query strategies and fill distance analysis, validated on hyperparameter optimization and control tasks.
The Most Detailed Codex Guide on Bilibili: From Installation to Real-World Practice
The most detailed Codex guide on Bilibili: from app store installation to daily work mode configuration, with a real coffee shop project demonstrating file organization, data extraction, dashboard creation, and other practical tasks. Learn to use Plan Mode and desktop pets to leverage Codex efficiently.

Appearance Compensation in Volume Rendering: Why RGB Accuracy Cannot Guarantee Density Correctness
Volume rendering research reveals that volumetric data perfectly reproducing external RGB views may still contain density errors: appearance compensation can double central density and keep external rays unchanged even when L2 error exceeds 14.52%. Density recovery depends on appearance capacity, spatial resolution, and measurement design.