Cherry Studio + MCP in Practice: Building Automated AI Agents and a Local Knowledge Base

A Cherry Studio tutorial covers building three MCP agents and a local knowledge base from scratch.
Based on a Bilibili Cherry Studio tutorial, this article covers building automated AI agents and a local knowledge base from scratch. It demonstrates three agents—scraping web data into CSV, generating analysis reports via search, and operating a terminal through MCP Share. The MCP environment is the hardest part, requiring separate UV and Node downloads. The local knowledge base uses Ollama with Qwen3 and an embedding model, running entirely locally for privacy, with honest notes on real-world pitfalls.
In an era where AI tools keep multiplying, how to truly integrate large model capabilities into your own workflow is a question many people care about. A Cherry Studio tutorial on Bilibili, described by viewers as "the most detailed explanation out there," spends about 20 minutes walking through the entire process of building automated AI agents and a local knowledge base from scratch. This article is based on that video and organizes its key steps and noteworthy details.
Three Agents, Three Kinds of Automation
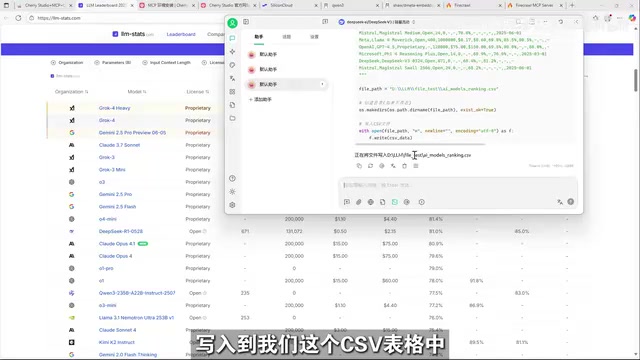
The tutorial opens by showing the end result: three working AI agents. The first scrapes web data and organizes it into a CSV table saved to a specified path; the second calls a search tool to generate an illustrated analysis report and write it to disk; the third operates a command-line terminal through MCP Share—effectively remote-controlling the computer without writing commands by hand.
These three agents cover three typical scenarios: data collection, content generation, and system operation. The video's author also demonstrates a local knowledge base—an "Employee Assistant" for answering questions about the employee handbook. One clear orientation of the whole setup: both the chat model and the embedding model are deployed locally wherever possible, to ensure information doesn't leak out.
Preparation: Models and the MCP Environment
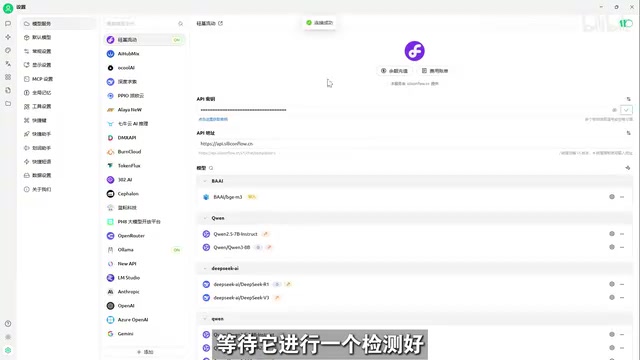
Preparation comes in two steps. The first is installing the Cherry Studio client—just download it from the official website. The second is configuring models. In the video, the author suggests using a cloud API with free credits (such as SiliconFlow) to get the workflow running, because some local models have incomplete MCP support. The configuration method: go to Settings, find Model Services, enter the API key, and click Test. If the interface shows a successful connection, the configuration is correct.
Configuring the MCP environment is the highest-barrier part of the entire tutorial. Cherry Studio can only use its built-in UV and Node environments and will not reuse versions already installed on the system, so you need to click Download in the MCP settings. Because the download source is overseas, failures are fairly likely. The author offers a fallback: download manually and place the files in the corresponding path, and notes that a VPN may be needed. Once the environment is ready, restart the client, install Node.js, and verify in the terminal with node -v and npm -v.
MCP (Model Context Protocol) is a standardized protocol proposed and open-sourced by Anthropic, designed to let large language models connect to external tools, data sources, and services in a unified way. You can think of MCP as the "USB interface" of AI applications: the model itself doesn't hard-code calls to a particular piece of software; instead, MCP servers expose capabilities such as the file system, search engines, and the command line, and the client mounts these capabilities to the model as needed. Its core value is decoupling—the same tool implementation can be reused by different clients, and the model doesn't need separate adapters for each tool. The MCP settings in Cherry Studio are essentially managing the installation, startup, and permission toggles of these tool servers.
Configuring Three MCP Tools
The tutorial configures three MCP tools. The first is built-in file system management, which can create, write, delete, move, and copy files. A key detail: paths in the parameters must use backslashes or double slashes—single forward slashes will cause errors. This is one of the easiest pitfalls in actual operation.
The second is Firecrawl (pronounced "Fearwell" in the video), used for web scraping and search retrieval. It requires configuring the corresponding API key and adding it to Cherry Studio via JSON import. The third is MCP Share, used to operate the command-line terminal. When adding it, select standard output as the type, use npx as the command, and -y plus the fixed package name as the parameters. The author stresses that the parameters must match the demo exactly; after saving, a green indicator means the configuration succeeded.
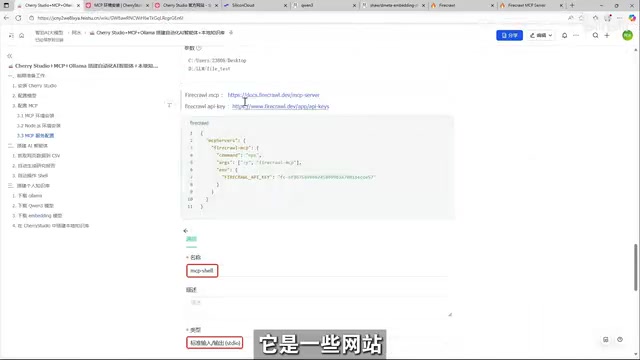
Firecrawl is a web scraping and search service built for large models. It converts web pages into structured Markdown or JSON and supports whole-site crawling, content extraction, and search retrieval. Compared with letting the model read raw HTML directly, Firecrawl first cleans the body text and normalizes the format, significantly reducing context noise and token consumption, which is why it's often used as an agent's "web reader." It offers both a cloud API and self-hosting; the tutorial uses the cloud API, which requires registering on the official website to get a key. MCP Share, meanwhile, is a general-purpose MCP service launcher that dynamically pulls and runs a specified MCP server package via npx—which is why the package name in the parameters must match the demo exactly.
Building the Automated Agents
Agents are built in the chat interface: start a new conversation, enable the corresponding MCP toggles as needed, and enter a prompt. The first agent requires both the file system and web scraping tools enabled. The author chooses DeepSeekAd V3, reasoning that web data is voluminous and needs long-context support, and that small models easily "can't find it."
Actual runs don't succeed on the first try. In the first attempt, the model called Python to save the file, and the wrong path caused a failure; switching to other models still didn't work well, and only switching back to DeepSeek V3 succeeded in scraping the web table and writing it to a local CSV. The author's summary is rather interesting: large models are like people—they can't be guaranteed to be 100% correct, and when they make mistakes, a human needs to judge and adjust.
The second agent uses the search tool to write a Chinese report around a specified GPU model, producing an illustrated result backed by data. The third agent demonstrates querying the local model version number. On the first run, the model didn't call MCP Share; only after disabling the other two tools and retrying did it succeed, returning version 0.9. This also shows that precise control of tool permissions affects an agent's behavioral path.
Local Knowledge Base: Ollama + Qwen3 + Embedding Model
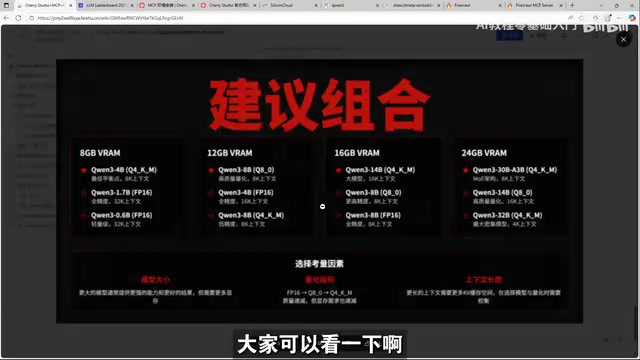
The third part builds a personal knowledge base. First, download Ollama to deploy a local large model; after the one-click install, verify the version in the terminal. Next, pull the Qwen3 chat model. The author provides a reference table for choosing model size based on VRAM and actually uses the 8B version for the demo; the first download takes about twenty minutes.
Then download the embedding model. This model has about 180k downloads, and the first pull likewise takes over ten minutes. Once both models are ready, add Ollama in Cherry Studio's model services, with the API address localhost:11434, add the chat model and embedding model, and test the connection.
Creating the knowledge base happens on the "Knowledge Base" page: create a new knowledge base, select the local embedding model, and drag in the employee handbook file. Then create a new assistant, enable the knowledge base, select the local chat model, and ask "How is absenteeism handled for employees?" The model returns two cited passages covering the handling for one, two, and three days of absenteeism, and can locate the "lateness, early departure, and absenteeism" section in the document. The entire Q&A process runs entirely on the local machine.
An embedding model converts text into a series of high-dimensional vectors, where texts with similar semantics are closer together in vector space. A knowledge base's retrieval flow is usually: documents are split into chunks and converted into vectors by the embedding model and stored in a vector database; when a user asks a question, the question is likewise converted into a vector, the system recalls the most relevant chunks by similarity, and these are handed to the chat model to generate an answer. This explains why the chat model and embedding model need to be configured separately—the former is responsible for "speaking," the latter for "finding." Note that once an embedding model is chosen, the vectors of documents already stored in the knowledge base are bound to that model; switching embedding models midway usually requires rebuilding the index, otherwise retrieval results will be noticeably inaccurate.
Lessons Worth Noting
The value of this tutorial isn't just in the step-by-step demo, but in exposing the friction points of a real setup: MCP environment downloads fail easily, a wrong path separator causes errors, model choice directly determines task success, and agents may not call tools as expected. These details are often invisible in pure documentation tutorials, yet they're exactly where beginners get stuck.
Another implicit message is the division of labor between models: cloud models handle heavy tasks requiring long context and tool calls, while local models handle privacy-sensitive conversation and retrieval. This hybrid architecture strikes a balance between privacy and capability, and for users who want to bring AI into their daily work, it's a pragmatic starting point.
One-line Summary
A Cherry Studio tutorial walks through building three MCP agents and a local knowledge base from scratch.
Paragraph Summary
Based on a Bilibili Cherry Studio tutorial described as "the most detailed explanation out there," this article organizes the key steps for building automated AI agents and a local knowledge base from scratch. The tutorial demonstrates three agents: scraping web data into CSV, calling search to generate an analysis report, and operating a command-line terminal via MCP Share, covering data collection, content generation, and system operation. Preparation requires installing the client and configuring a model API; the MCP environment is the highest barrier and requires separately downloading the built-in UV and Node environments. The article also records real-world friction points, such as a wrong path separator causing immediate errors, model choice determining task success, and agents failing to call tools as expected. The local knowledge base uses Ollama to deploy Qwen3 and an embedding model, with all Q&A running locally for privacy.
Related articles

Agentic Paper Bomb: Using Multi-Agent Systems to Automatically Generate Enterprise Compliance Documents
A Reddit developer shares the Agentic Paper Bomb experiment: five AI agents play executive roles to auto-generate enterprise compliance, security, and DevOps documents. Explores the potential and concerns of multi-agent collaborative document generation.

Building a Sound Source Localization System with Claude Code to Find a Mysterious Beeping Sound
Simon Willison built Beep Locator with Claude Code: multiple devices as microphones, trilateration pinpointed a mysterious beep to ~40cm, showing how to give coding agents hearing.

Rob Roy Classic Dialogue Analysis: The Price of Leadership and the Choice to Survive
An analysis of the classic confrontation dialogue between Rob Roy and Sibbald in *Rob Roy*, exploring the price of leadership, the balance between survival and dignity, and the human insight behind power games.