Codex from Beginner to Master: A 6-Step Hands-On Workflow and Advanced Techniques

Six steps to Codex mastery: from interface isolation to expert configuration—tools lower the bar, thinking sets the ceiling.
Based on a Bilibili Codex tutorial by "AI拆解局," the article breaks the path to AI coding assistant proficiency into six steps. The intro stresses isolating Projects and Threads, since mixing chat boxes causes context pollution; configuration connects domestic models like DeepSeek via a routing tool, requiring strict checks of API Keys and model names; practice covers three run modes and the "materials, rules, acceptance" three-step prompting method; advanced sections explain plan and goal modes plus safety nets like the review panel, browser preview, and element-level annotations; the expert stage uses agents.md as AI house rules and extends to mouse-and-keyboard automation. It closes with a four-layer pyramid: AI lowers the coding bar but multiplies the value of architectural thinking.
AI coding assistants are reshaping developers' workflows, but most people never move past the shallow usage of "open a chat box, paste code." The Bilibili creator "AI拆解局" (AI Breakdown Bureau) released a hands-on Codex tutorial that takes you from zero to one, splitting the learning path into six steps: introductory logic, breaking through limitations, core hands-on practice, advanced productivity, expert configuration, and summary insights. This article draws on the video to organize its key operations and deeper logic.
Getting Started: First Understand the Isolated Design of Projects and Conversations
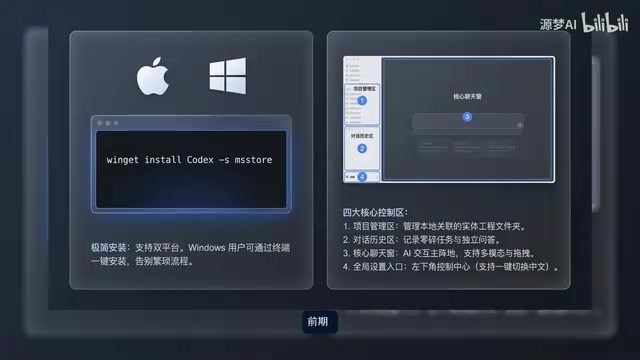
The first step in mastering any tool is figuring out its interface logic. The video divides the Codex interface into four core control areas: project management and chat history on the left, the main window (the core area for code and chat) on the right, and global settings in the bottom-left corner. Each area has its own role, and confusing them will throw your workflow into chaos.
More important is the relationship between Project and Thread. A Project is like a shared desk—all conversations can access the files on that desk—but each Thread's chat history is physically strictly isolated. This means you should not cram all your requirements into a single chat box; you will inevitably run into context pollution later, and the AI will be completely "confused." Categorize early, and you can run efficiently later.
The context window is the total amount of text a large language model can "remember" in a single session, including system prompts, chat history, pasted code, and file contents. The reason each Thread's chat history is physically isolated is essentially that each one occupies its own independent context window; once you cram all requirements into a single chat box, historical messages keep accumulating and crowd out the window, the model's attention to early instructions is diluted, and output quality falls off a cliff. In practice, treat the context window as a scarce resource: one Thread serves only one well-defined task, and for long tasks, start a new conversation periodically and manually carry over the key conclusions—don't make the model "guess" your intent in an overloaded context.
Breaking Through Limitations: Routing Tools to Connect Domestic Models
In the installation and configuration section, the video demonstrates a "three-step magic trick": download and run the installer normally, add a domestic model provider (such as DeepSeekAd) in the console, and the interface automatically highlights and takes over, completing a silent login. No complex network proxy and no overseas account are needed—a small routing tool is enough to swap the core engine for a domestic large model.
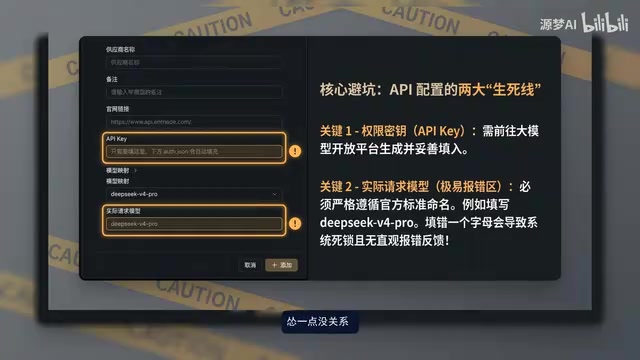
There are two details you must strictly observe: first, the API Key must be legitimately generated on the official open platform; second, the actual model name in the request must exactly match the official naming. The video specifically emphasizes that even a single misspelled letter will plunge the system into a "silent standoff that refuses to die"—it goes on strike without giving any intuitive error message. This kind of low-level mistake is extremely costly to troubleshoot, so make sure to get it right during the configuration phase.
An API Key is the credential for calling a large model open platform's interface; it is generated by the platform and tied to the account's quota and permissions, and if leaked, others could rack up charges on your account. Major domestic platforms (such as DeepSeek, Tongyi Qianwen, and Zhipu) all require you to create a Key in the console and to fill in request parameters strictly according to the model identifier given in the official documentation—the identifier usually consists of the vendor name, model series, and version number, and is not always the same as the display name. The routing tool's job is to start a local proxy service compatible with the OpenAI API specification, forwarding client requests to the domestic model endpoint, so the client still sees the familiar interface while the actual inference is performed by the domestic model.
Core Hands-On Practice: Three Modes and the Three-Step Prompting Method
There are three modes for defining the boundaries of AI behavior: direct local editing, worktree isolation, and rapid cloud execution. The video's practical advice is: when you're just starting out, use the conservative mode, manually approving every step the AI takes, for the sake of safety; once things are running smoothly, switch to the rapid cloud mode to unleash compute, and focus only on the final code review yourself.
There are also techniques for feeding the AI. Thinking depth can be adjusted at any time—crank it to the max for complex architecture questions. Multimodal input lets you use the @ symbol to precisely name a code file, or drag a screenshot straight into the chat box for "look and tell"—when you hit a bizarre error, there's no need to copy and paste; the AI can read the screenshot and issue a fix at lightning speed.
For prompting, the video recommends the official three-step method: first, give the materials—clearly tell the AI which files to look at, so it doesn't grope in the dark; second, set the rules—establish red lines, such as "only modify the frontend, don't touch the logic code"; third, define acceptance—explain what counts as success. Strictly control this three-step funnel, and output quality will improve markedly.
Worktree isolation borrows from Git's branch workspace mechanism: the AI modifies code in a separate directory copy, the main branch stays clean, and changes are merged only after they're confirmed correct. This brings two benefits—first, failures can be discarded with a single click without polluting existing code; second, multiple tasks can proceed in parallel without interfering with each other. In contrast, direct local editing mode lets the AI operate in the original directory—fast but risky, suitable for small, low-risk changes; rapid cloud execution puts the execution environment in a remote sandbox, suitable for tasks with complex dependencies or long runtimes, at the cost of some delay in environment initialization.
Advanced Productivity: Plan Mode and Goal Mode
There are two ways to delegate long-running tasks. Plan mode looks before it leaps: the AI first presents a complete implementation plan, confirms the logic through dialogue, and only then starts, greatly reducing rework. Goal mode fully frees your hands: once a goal is given, the AI automatically enters a self-correction loop, advancing round after round, and you can intervene at any time, but there's basically no need to urge it on sentence by sentence.

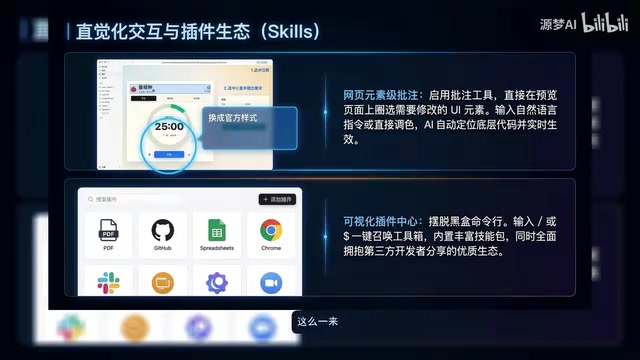
The safety net for fully automated operation is equally important. The review panel meticulously annotates every line changed, and if you're not satisfied, you can click the plus sign next to it to have the AI rewrite it; the built-in browser environment lets you preview frontend code the moment it's generated, with console errors visible at a glance. In addition, element-level annotations on the page free interaction from the command line entirely—circle the UI element you want to change on the preview page and say "make this button bigger," and the AI can locate the underlying code and apply the change in real time. The visual plugin ecosystem can also summon a toolbox with one click, making it intuitive to read PDFs and connect GitHub repositories.
Expert Mastery: Setting House Rules for the AI
The core of the advanced playbook is the agents.md configuration file, which is essentially a set of house rules for the AI: you can set global guidelines (such as mandating a certain design pattern be preferred), or define technical specs for a specific project. This is effectively an inheritable memory system—when idle, the AI automatically archives and summarizes, and when it takes on a new task, it seamlessly retrieves the prior background, transforming from a generic assistant into a tailor-made "project veteran."
Even more geeky is the breakthrough of visual understanding beyond the sandbox. On a Mac, for example, the AI can directly take over the mouse and keyboard to operate external systems: set up a scheduled task that automatically inspects the codebase every morning at 9 a.m. and generates a daily report, and it wakes up and executes on time. This goes beyond writing code—it's close to an automated assistant with a physical body.
Why can configuration files like agents.md form "inheritable memory"? Because they are automatically injected into the context window at the start of every session, becoming the system-level instructions the model reads first. This is fundamentally different from passing background through chat history: historical messages get truncated or compressed as the window rolls, whereas configuration files remain stably present and can be version-controlled and evolve along with the project. When designing them, keep them concise and write only high-value constraints (tech stack, naming conventions, directories that must not be touched); piling on too many rules will crowd out the context and dilute the weight of key instructions.
The Four-Layer Pyramid: Tools Lower the Bar, Thinking Sets the Ceiling
The video closes with a higher-level summary—a four-layer pyramid: at the bottom is zero-threshold removal of usage barriers; above that is fine-grained code control at the control layer; further up is dimensionality reduction of interaction through natural language; and at the top is expert-level autonomous agents driving the whole picture.
The core insight that follows is this: AI has reduced the physical effort and barrier of writing code to an extremely low level, but at the same time it has multiplied the value of architectural thinking. The tool works for you, but the ideas in your head are the engine that determines whether a product ships. Whether you continue to be a "code coolie" laying bricks the hard way, or transform into a super architect calmly seated in the command tent—the choice is in the developer's own hands.
(This article is based on content from the Bilibili creator "AI拆解局"'s video; all views and cases come from the original material.)
Related articles

AI Can Read Neural Network Weights Directly: Do Models Already Exceed Expectations?
A Reddit developer experiment shows language models can directly read neural network weights and infer their function. Astra, Opus 5.5, and Muse Spark 1.3 all passed the test, sparking discussion on model generalization and training sources.

India's Microdrama Market Explodes: EloElo Secures $80M Investment from NBCUniversal
EloElo secures $80M from NBCUniversal to boost StoryTV, its microdrama platform with over 33M monthly active users, as India's microdrama market draws global capital.

Acoustic Detection of Multi-Rotor UAVs: Fusing Handcrafted Features with Pre-Trained Embeddings
Study reveals data leakage from random splits in UAV acoustic detection, proposes source-disjoint protocol with stacked ensemble of handcrafted features and YAMNet embeddings, achieving 95.29% accuracy for low-cost drone detection.