Cursor Practical Tutorial: A Complete Guide from Installation to Efficient Workflows

A complete guide to mastering Cursor AI editor from setup to advanced rule-based workflows.
This tutorial covers everything you need to know about Cursor, the AI-native IDE built on VS Code. From installation and privacy settings to structured prompting, model selection (Auto mode recommended), precise context referencing, and the powerful Rules system for creating reusable workflows, it shows how developers and content creators can chain multiple AI tasks into automated pipelines.
Introduction
As one of the most talked-about AI programming tools today, Cursor is transforming how developers and content creators work. Unlike traditional ChatGPT conversations, Cursor embeds AI capabilities directly into the editor, eliminating the need to copy and paste between chat windows and code files. This article systematically covers Cursor's core features and efficient usage techniques, from installation and configuration to advanced workflows.
From a technical standpoint, Cursor is a deep customization (fork) of Microsoft's open-source VS Code, inheriting its rich plugin ecosystem and editor experience while natively integrating large language model (LLM) invocation capabilities at the architectural level. This "AI-native IDE" design philosophy is fundamentally different from traditional "IDE + AI plugin" approaches (such as GitHub Copilot as a VS Code extension): Cursor can directly perceive a project's file structure, code context, and editing state, sending this information as part of the prompt to the model for more precise code generation and modification. This trend represents a paradigm shift in development tools from "assisted completion" to "conversational collaborative programming."
Cursor Installation and Basic Setup
Download and Installation
Cursor supports macOS, Windows, and Linux. Visit the official website and click the download button to get the installer—the installation process is the same as any standard software.
Privacy Settings (Important)
After installation and registration, the first thing to do is go to Settings in the upper right corner, find the Privacy section in the General sidebar, and confirm that Privacy Mode is enabled. Once enabled, data passing through Cursor's servers will not be used for model training, protecting your code and information.
Privacy concerns with AI programming tools have been one of the top issues for enterprise users. Major LLM providers typically use user interaction data for model fine-tuning and improvement, meaning your code snippets, business logic, and even API keys could be stored and reused. In 2023, Samsung experienced a data leak incident when employees pasted internal code into ChatGPT. Cursor's Privacy Mode is essentially a data processing protocol commitment—when enabled, user data is only used for real-time inference and will not be persistently stored or used for training. For teams handling commercially sensitive code, this is a critical evaluation dimension when choosing AI tools.
Basic Operations: Efficient AI Conversations
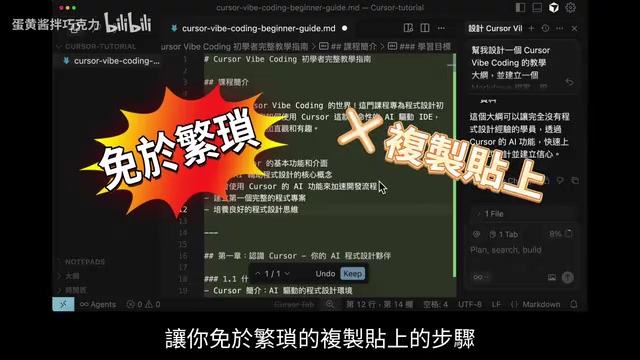
Cursor has an AI chat panel on the right side where you can make requests to the AI using natural language. Prompting techniques are essentially the same as with ChatGPT, but Cursor's core advantage is: AI-generated content can be written directly to files without manual copy-pasting.
Structured Prompting Techniques
A high-quality prompt should include the following elements:
- Goal: Clearly tell the AI what you want (e.g., "Design a course syllabus")
- Format: Specify the output format (e.g., Markdown file, English filename)
- Constraints: Restrictions on the content (e.g., clear structure, accessible language)
- Context: Provide background information (e.g., tool description, audience background)
As long as the prompt is sufficiently clear, you can get high-quality responses in the first conversation. The AI will generate a corresponding to-do list and execution roadmap, and directly create files in the left file panel.
Key Differences Between Cursor and ChatGPT
The biggest difference with Cursor is that you can edit directly in files, or continue chatting with the AI on the right side to modify and create files, eliminating tedious copy-pasting. However, note that when switching between different topics, it's recommended to click Clear all chat to clear the memory, preventing incorrect context from degrading response quality.
Cursor Model Selection and Pricing Strategy
Pricing Overview
After registration, you get a two-week free Pro trial (with usage limits). Heavy users might exhaust the free quota in a single day. The Pro plan costs $20/month, which is excellent value for users who see significant productivity gains.
Model Configuration
In Settings, click the Model menu to see all models supported by Cursor, including ChatGPT, Gemini, Claude, and other mainstream models. Those marked with a brain icon are reasoning models, suitable for complex tasks but with longer execution times; others are non-reasoning models with faster responses.
These two types of models differ fundamentally in their working mechanisms. Standard models (like GPT-4o, Claude Sonnet) use single-pass forward inference, receiving input and directly generating output. Reasoning models (like OpenAI's o1/o3 series, Claude's extended thinking mode) perform an internal Chain-of-Thought reasoning process before generating the final answer, decomposing complex problems into multiple sub-steps to solve sequentially. This makes reasoning models significantly better at mathematical proofs, multi-step logical reasoning, and complex architecture design, but at the cost of longer response times and higher token consumption.
Practical advice: Select Auto mode for each conversation, letting the AI automatically determine the most suitable model and saving you the trouble of manual selection. The value of Auto mode is that it automatically routes to the appropriate model based on task complexity—using fast models for simple code completion and reasoning models for complex refactoring tasks, achieving the optimal balance between efficiency and quality.
Advanced Tips: Limiting Reference Scope to Improve Response Quality
Although Cursor can search through an entire project, the larger the scope, the longer the execution time and the higher the error rate. It's recommended to limit the reference scope:
- Drag a folder into the chat panel → reference the entire folder
- Drag a single file in → reference a specific file
- Select text and click Add to chat → pinpoint specific paragraphs

This precise referencing approach allows the AI to read and modify content more targeted, significantly improving response quality.
The importance of limiting scope is closely related to the Context Window mechanism of large language models. Each model has a fixed context length limit (e.g., 128K tokens for GPT-4o, 200K tokens for Claude 3.5 Sonnet). When input exceeds the limit, earlier information gets truncated or compressed. Even within the window, research shows that LLMs exhibit a "Lost in the Middle" phenomenon—the model remembers information at the beginning and end of input best, while middle portions are easily overlooked. When processing large projects, Cursor uses techniques similar to RAG (Retrieval-Augmented Generation), first finding relevant code snippets through vector retrieval, then injecting them into the prompt. But retrieval itself can introduce noise, so manually specifying precise reference scopes essentially helps the model reduce irrelevant information interference and improve the signal-to-noise ratio.
Cursor Rules: Making AI Better Understand Your Needs
User Rules (Global Rules)
In Settings, find the Rules and Merits menu to set global rules. These rules apply across all projects and are suitable for universal preferences, such as:
- Language preference (e.g., Traditional Chinese/Simplified Chinese)
- Code style preferences
- Work habits and general requirements
Project Rules
In reality, each project has different goals, and cramming all rules into global settings can actually confuse the AI. Instead, you should design dedicated rules for each project.
Steps:
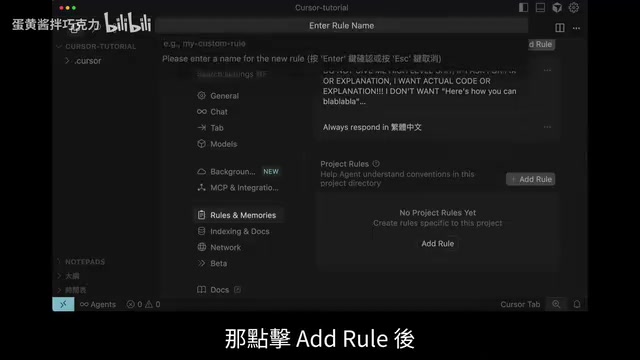
- In Settings, select Project Rules → Add Rule
- Enter a rule name (e.g., "Article to Script")
- A
.cursor/rulesfolder will be automatically generated on the left - Set trigger timing: Always Apply, AI auto-determines, for specific files, or manual invocation
Cursor's Rules system is essentially a structured System Prompt management framework. In the LLM invocation architecture, the System Prompt is the highest-priority instruction layer, defining the model's role, behavioral boundaries, and output specifications. When traditionally using ChatGPT, users need to manually input these constraints at the beginning of each conversation; Cursor's Rules persist them as configuration files that are automatically injected into the System Prompt of every conversation. User Rules serve as the global System Prompt, while Project Rules implement project-based prompt isolation. This design borrows from the software engineering concept of "Configuration as Code"—making AI behavioral specifications versioned, reusable, and collaboratively shareable. Team members only need to share the .cursor/rules folder to unify AI output standards.
Using AI to Write Your Rules
The rules themselves can also be written with AI assistance. Drag the rules file into the chat panel and tell the AI your requirements:
"You are an expert team specializing in building KOLs. From a practical industry perspective, summarize: when a user inputs 'article to script,' what steps the AI should execute, output constraints, and quality check standards."
With clear steps, constraints, and quality specifications, the AI will generate complete specifications including analysis phases, script architecture design, platform adaptation optimization, and quality check standards.
Practical Case: Completing Multi-Step Workflows with Cursor in One Go

Rule Chaining
You can design multiple rules and chain them together. For example, create a dedicated project for YouTube content creation, including:
- Article to script
- Script to short video
- Short video to transcript
"One-Shot" Command
A more advanced approach is designing a master rule: when the user inputs "one shot," the AI executes all sub-rules in sequence. The actual result is: after AI processing, a single original article automatically generates:
- Long-form video shooting script (with tone and visual cues)
- Short video script (with text cards and sound design)
- Title and thumbnail copy suggestions
- Hashtag recommendations
- Series content overview
This "one-shot" rule chaining is essentially a lightweight AI Agent workflow orchestration. In the AI field, an Agent refers to an intelligent system capable of autonomous planning, step-by-step execution, and strategy adjustment based on intermediate results. Unlike single-turn conversations, an Agent decomposes a complex goal into multiple sub-tasks and sequentially invokes different tools or models to complete them. While Cursor's rule chaining mechanism isn't as flexible as professional Agent frameworks like LangChain or AutoGPT, its advantage lies in zero-code configuration with deep file system integration—each sub-task's output lands directly as a file, and the next sub-task can immediately reference it. This "file-driven workflow" is particularly suited for content creation scenarios, as the final deliverables are inherently file-based content like documents and scripts.
This workflow allows creators to dramatically shorten the time from ideation to output, overcoming the barrier from zero to one.
Summary
Cursor's core value lies not only in AI programming but in its deep integration of AI capabilities with file operations. Through properly configured Rules, precisely limited reference scopes, and smart use of automatic model selection, both developers and content creators can turn Cursor into a personalized AI work assistant. The key is: Structure your workflow into rules, let AI execute according to those rules, rather than starting every conversation from scratch.
Key Takeaways
Related articles

Researchers Claim AI Agents Being Tested by OpenAI Were Involved in a Cyberattack
Security researchers allege OpenAI-tested AI agents were involved in a cyberattack. We analyze the security risks, accountability gaps, and safeguards the industry needs.

James Webb Telescope Reveals: Extreme Star-Forming Galaxies Masquerading as Faint Quasars
JWST finds some objects mistaken for faint quasars are actually extreme star-forming galaxies, potentially revising estimates of early-universe supermassive black holes.

Why So Many AI Researchers Fear Machines Could Destroy Humanity
Why do so many AI researchers fear machines could destroy humanity? This article breaks down the alignment problem, capability leaps, and interpretability issues driving existential AI risk debates.