DeepSeek Harness from Installation to Plugin Extensions: A Detailed Hands-on Tutorial

DeepSeek Harness hands-on guide: from installing Node.js to three plugin installation methods
The article explains how DeepSeek Harness turns AI from a chat tool into a task execution assistant. Positioned as a task execution layer, it can call tools around tasks, read/write local files, execute commands and run code, and extend capabilities through a plugin architecture inherited from Codex—enabling operations the web version cannot do, such as knowledge base organization, video generation, and chat software integration. Installation has two steps: first install Node.js 22 or above and avoid the C drive, then deploy the Harness client and add local folders. There are three plugin installation methods: letting AI install in the chat window (consumes credits), installing from the plugin marketplace (recommended, no credits), and command-line installation (more abstract). The author suggests beginners install the plugin marketplace first, then gradually expand based on business scenarios.
While others are already using AI Agents to autonomously break down tasks, call tools, and read/write files, many people are still stuck in the "ask—wait for answer" conversation phase. What truly sets people apart isn't who is better at chatting, but who can make AI actually take action. DeepSeek Harness was built for exactly this—it lets models call tools around tasks, process files, execute commands, and even extend capability boundaries through plugins.
Based on a step-by-step tutorial from a Bilibili creator, this article walks through the complete path from zero installation to plugin configuration, helping you turn AI from a chat tool into a work assistant.
Why Harness Is Worth Your Attention: From Chatting to Execution
DeepSeekAd Harness is positioned not as yet another Q&A window, but as a task execution layer. It can call tools around specific tasks, process local files, analyze data, execute commands, search for information, write and run code, and greatly extend its capabilities through a plugin system.
According to the creator's hands-on testing, with good plugins Harness can: read Bilibili content and organize it into a knowledge base, generate videos, create knowledge catalogs, and even connect to chat software for conversations. These operations are impossible on a pure web interface, because the web version cannot directly read or write local folders.
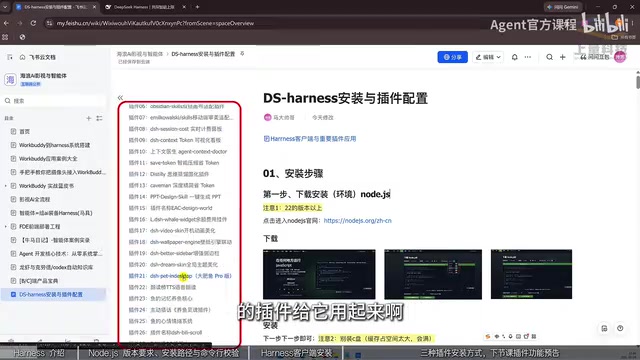
The creator specifically notes that Harness's plugin architecture is inherited from the Codex system, and its real strength lies in plugin integration—which is also the core of further advancement.
AI Agent is the foundational concept for understanding this article. Unlike traditional "question-answer" conversations, an Agent refers to an AI system that can autonomously plan, break down tasks, call external tools, and loop through execution until a goal is achieved. Its core mechanism is "Tool Use": during reasoning, the model determines whether external capabilities are needed (such as reading/writing files, executing commands, or searching the web), issues a structured call request, and the runtime environment executes it and returns the result to the model for continued reasoning. Harness is precisely the shell program that plays the "runtime" role—it turns the model's tool-call requests into real local operations, transforming AI from "able to talk" into "able to do."
Installation Step 1: Set Up the Node.js Environment
Harness depends on Node.js to run. The creator recommends version 22 or above. The official website automatically adapts to your operating system; the MSI installer can be clicked to install directly, while the ZIP package requires manual extraction.
There is one key detail during installation: do not install Node.js on the C drive. There are two reasons—the installation itself takes up space, and running it also generates many temporary files, which can easily fill up the system drive. In the demo, the creator changed the path to the D drive and clicked Next all the way through.
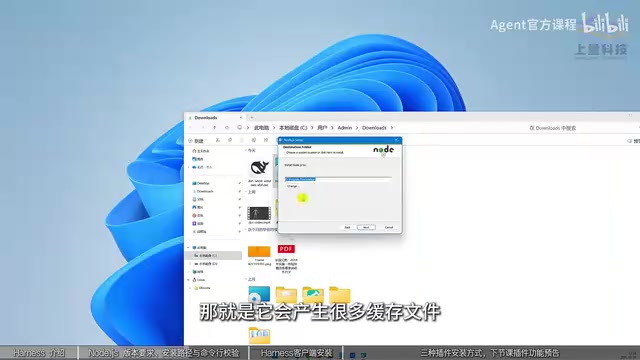
After installation, you need to verify it. Open CMD and type node -v (note the space between node and -v). If it returns a version number not lower than 20, the environment is ready.
Node.js is a JavaScript runtime built on the Chrome V8 engine that allows JavaScript code to run directly on the operating system outside the browser. Many AI clients, command-line tools, and plugin ecosystems are built on top of it, so it is often used as a prerequisite dependency. Version numbers (such as 22, 20) correspond to different Long-Term Support (LTS) branches; newer versions usually include updated APIs and security patches, but some older plugins may not yet be compatible—downgrading to the previous LTS version is a common troubleshooting step when compatibility issues arise. The node -v command is used to check the current runtime version and confirm whether the environment is correctly installed.
Installation Step 2: Deploy the Harness Client
Once Node.js is ready, visit the Harness download page and select the installer for your system. The creator also recommends installing to the D drive; click Install Now, and once complete, you can open the DeepSeek Harness interface.
The interface looks similar to a web chat window, but adds a key capability: you can add local folders. Harness can read and modify folder contents, or save generated files to a specified directory. The model selection area lists several DeepSeek models, which you can switch between later.
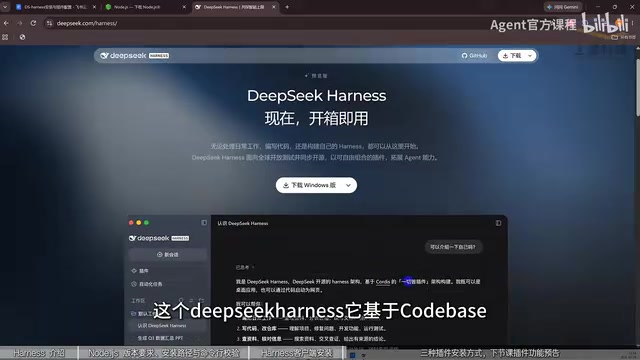
The creator emphasizes that Harness is based on Codex's plugin architecture, which means its extension ecosystem can reuse existing plugin resources.
Plugin architecture refers to a host program reserving standardized interfaces that allow third parties to add functionality as independent modules without modifying the main program. The article mentions that Harness inherits from the Codex system, meaning it follows the plugin protocol and directory conventions defined by the latter, and existing plugin resources can theoretically be migrated and reused. Plugins usually consist of two parts: a declaration file (describing name, permissions, and trigger method) and execution logic; the host loads and registers these capabilities at startup. The advantage of this design is that capabilities are pluggable and the ecosystem can accumulate, while the cost is uneven plugin quality—before installing, pay attention to permission scope, especially for plugins involving file reading/writing and command execution.
Three Ways to Install Plugins: From Chat to Command Line
Plugins are the key to amplifying Harness's capabilities. The creator summarizes three installation approaches, each with its own use case.
Method 1: Let AI Install Directly in the Chat Window
Once you know the plugin name or GitHub link, simply send the link to Harness in the chat window and let it install itself. This is the most effortless approach, but it consumes tokens and credits.
Method 2: Install from the Plugin Marketplace (Recommended)
In the interface, click "Add Plugin," enter the plugin name (such as DSH Market), and after installation click "Launch Now" to enter the plugin marketplace. The marketplace entry is under "Settings" in "More"; it contains tens of thousands of plugins, filterable by category, with featured slots—such as a little whale widget or desktop pet—that can be installed with one click. This method does not consume credits and is the creator's top recommendation.
Method 3: Command-Line Installation
Some plugins provide an "Install with skill" installation command on their GitHub page; copy it and execute it in CMD. The creator demonstrates with "the most powerful DeepSeek Harness visual plugin on the internet"—native DeepSeek cannot read local images, but with this plugin installed it can recognize image content, such as how many people are in a picture and who is wearing what.
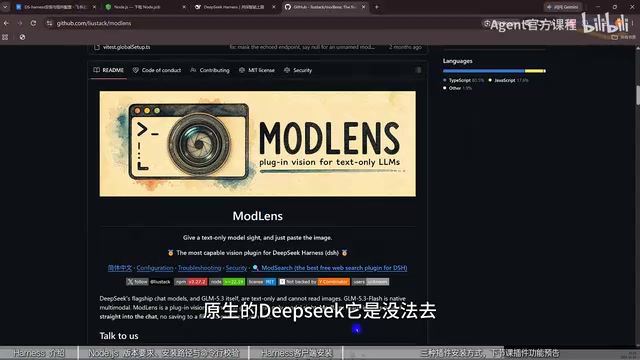
The creator admits that the command-line approach is somewhat abstract for beginners and recommends prioritizing the first two methods. If you don't know which plugins to install, you can simply ask DeepSeek to recommend a list of popular and useful plugins, then pick what you need.
Command line (CMD) is the text-based interface provided by the Windows system, where users operate the computer by typing instructions rather than clicking buttons. "Executing installation commands in CMD" mentioned in the article essentially means calling a package manager or installation script to deploy plugins. Things to note: commands must be executed in the correct directory, and paths containing spaces must be wrapped in quotes; some commands require administrator privileges, otherwise they will fail due to insufficient permissions. For beginners, if a command produces red error output, first check the Node.js version, network proxy, and whether the complete command (including parameters) was copied—these three points cover the vast majority of common failures.
Getting-Started Advice and Next Steps
For beginners, the most common pitfalls during installation are an outdated Node.js version and insufficient C drive space—two points the creator repeatedly emphasizes in the tutorial. When choosing plugins, install the plugin marketplace first, then gradually expand based on your business scenarios (knowledge base management, content generation, chat integration, etc.)—this is more reliable than piling on plugins all at once.
According to the creator's preview, the next episode will focus on the most commonly used and most useful plugins and their roles in specific business scenarios. For developers who want to make AI truly "take action," Harness's plugin ecosystem is worth following closely.
One-line Summary
DeepSeek Harness hands-on guide: from installing Node.js to three plugin installation methods
Paragraph Summary
The article explains how DeepSeek Harness turns AI from a chat tool into a task execution assistant. Positioned as a task execution layer, it can call tools around tasks, read/write local files, execute commands and run code, and extend capabilities through a plugin architecture inherited from Codex—enabling operations the web version cannot do, such as knowledge base organization, video generation, and chat software integration. Installation has two steps: first install Node.js 22 or above and avoid the C drive, then deploy the Harness client and add local folders. There are three plugin installation methods: letting AI install in the chat window (consumes credits), installing from the plugin marketplace (recommended, no credits), and command-line installation (more abstract). The author suggests beginners install the plugin marketplace first, then gradually expand based on business scenarios.
Related articles

Stop Pasting Error Logs Into AI Chat: Use Failing Tests to Drive Fixes
Pasting error logs to let AI fix bugs often causes unrelated changes and new bugs. DevDeck proposes a reproduction prompt: write a failing test that reproduces with exit code 1, then have the AI make it green without touching other modules, using a binary goal to constrain AI behavior.

AI Daily: GPT-6 Cyber, Claude Finance, and Cursor App Hosting
AI Daily: OpenAI launches GPT-6 Cyber security model, Claude debuts personal finance Beta, Cursor adds app hosting, Together integrates Kimi K3.1 Pro, Firecrawl adds life sciences retrieval.

Tobira Site Agent: Turn Your Website into an AI Salesperson
Tobira Site Agent turns your website into an AI agent that answers questions, negotiates, books calls, and takes orders inside ChatGPT, Claude, and Grok—leads go straight to Telegram or email. Bring your own AI key and use it free.