Getting Started with DeepSeek Harness: An Agent Framework Where Everything Is a Plugin

A beginner-friendly guide to DeepSeek Harness, the plugin-based Agent runtime framework.
DeepSeek open-sourced Harness, an Agent runtime framework built on a radical "everything is a plugin" philosophy. Using a minimal Codis microkernel plus a rich plugin and configuration layer, Harness lets developers freely swap models, tools, sandboxes, and UI without touching core code. This guide covers quick-start installation, source code build and walkthrough, and a hands-on demo generating a Snake game.
Introduction: DeepSeek Launches an Agent Runtime Framework
DeepSeekAd recently open-sourced an Agent runtime framework called Harness (abbreviated as DSH), making both testing access and source code available to developers. Unlike their previous efforts focused on the models themselves, Harness shifts the focus to enabling Agents to "work continuously in real-world business scenarios." Based on a Bilibili creator's course "DeepSeek Harness Source Code Deep Dive & Plugin Hands-On," this article covers the key aspects of the framework across three dimensions—core design philosophy, quick installation, and source code walkthrough—to help developers get up to speed quickly.
To understand where Harness fits in, you first need to understand what an Agent runtime framework is. In traditional AI application development, developers typically only need to worry about calling a model—sending a prompt via API and receiving a response. But this approach only handles single-turn or simple multi-turn Q&A tasks. When we need AI to autonomously complete complex tasks—such as browsing the web, reading and writing files, calling external APIs, maintaining context, and executing multi-step operations—we need a "runtime" to coordinate all these capabilities. Just as Java needs the JVM and JavaScript needs Node.js, Agents also need a runtime environment to manage their lifecycle, resource scheduling, and capability orchestration. Well-known Agent frameworks in the industry include LangChain, AutoGen, and CrewAI, each with their own focus areas. What makes Harness unique is that it takes the "runtime" itself to an extreme level of pluggability.
For developers interested in the AI Agent space, the value of understanding Harness isn't about "yet another tool that can build a Snake game." Rather, it's about its attempt to use a unified plugin-based architecture to abstract models, tools, skills, sandboxes, storage, scheduling, UI, and other capabilities into freely swappable modules. Behind this is an engineering philosophy worth studying closely.
Core Design Philosophy: Everything Is a Plugin
The most prominent statement on the Harness website is "Everything is a plugin." These words aren't marketing fluff—they are the architectural foundation of the entire framework.
Plugin Architecture is a classic design pattern in software engineering. Its core idea is to split a system into a stable core (kernel) and a set of dynamically loadable extensions (plugins). This pattern has numerous successful real-world implementations: VS Code's extension system, Chrome's plugin ecosystem, WordPress's theme and plugin mechanism, and Eclipse IDE's OSGi framework are all classic examples of plugin architecture in practice. The key advantages are: the kernel stays stable and lightweight, new features are added through plugins rather than modifying core code, and different plugins communicate through standard interfaces rather than direct coupling. This dramatically reduces system maintenance costs and enables third-party developers to extend system capabilities without understanding the entire codebase.
According to the official positioning, Harness presents a clear formula:
Agent = Model + Harness
In this formula, the model is the Agent's soul, responsible for understanding and reasoning; while Harness gives the Agent the ability to understand its environment, use tools, and work continuously in real-world business scenarios. Only when combined do they form a truly functional intelligent agent.
The Division of Labor Between the Codis Kernel and Plugins
Harness's architecture can be understood in three layers:
- Codis Kernel: Responsible only for loading, unloading, and managing plugin dependencies. It carries no concrete Agent capabilities itself. This "minimal kernel" design keeps the core stable with a single clear responsibility.
- Plugin Layer: All Agent capabilities—models, tools, skills, sessions, sandboxes, storage, loop scheduling, UI, etc.—are provided entirely by plugins and can be freely swapped and flexibly recombined.
- Configuration Layer: Developers can combine, select, replace, or extend any capability at the configuration layer without modifying source code.
The "microkernel" design philosophy adopted by the Codis kernel has deep theoretical roots in the operating systems domain. Unlike Linux's monolithic kernel, which integrates a large amount of functionality in kernel space, a microkernel retains only the most basic functions—such as inter-process communication and basic scheduling—while all other functions run as external services or modules. In the context of an Agent framework, the Codis kernel is only responsible for plugin lifecycle management (loading, unloading, dependency resolution) and does not presuppose any specific Agent behavior. This means the same kernel can drive a coding assistant Agent or a data analysis Agent—the differences are entirely determined by the plugin combination. Dependency management ensures the correct loading order between plugins; for example, a "tool invocation" plugin might depend on a "sandbox execution" plugin being loaded first.
The biggest advantage of this design is decoupling. When you want to switch models, add a tool, or integrate a new storage solution, you don't need to touch the core code—just reconfigure at the configuration layer. This also explains why the course emphasizes that "everything is a plugin" is the key to understanding the entire source code—only by grasping this main thread can you make sense of Harness's workflow and design philosophy.
Quick Start: Two Ways to Launch
Harness offers two paths for getting started: installed launch (for quick experience) and source code launch (for studying internals).
Option 1: Installed Launch (Simplest)
If you already have Node.js installed locally, launching Harness requires just a single command:
pnpx ai-dsh-web
Here, pnpx is a command-line tool provided by pnpm (Performant NPM), similar in function to npx (npm's counterpart), used to directly execute commands from remote npm packages without global installation. pnpm itself is a high-performance Node.js package manager. Compared to npm and yarn, it achieves global dependency deduplication through a "Content-addressable Storage" mechanism—the same package version is stored only once on disk, with projects referencing it via hard links. This significantly reduces disk usage and speeds up installation. For first-time users, you can install pnpm globally via npm install -g pnpm and then use the pnpx command.
After execution, the first launch will be somewhat slow because dependencies need to be installed, potentially taking 5 to 10 minutes. But from the second launch onward, since dependencies are already cached, startup usually takes 30 seconds to one minute.
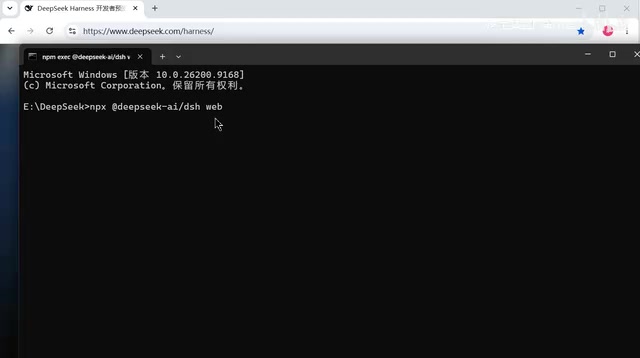
Once startup is complete, the console outputs the access URL. Open the corresponding address in your browser to enter the Harness interface. On first access, you'll need to configure a model API Key by default. The most straightforward approach is to enter a DeepSeek API Key, though other models are also supported.
Option 2: Source Code Launch (For Studying Internals)
If you want to dive deep into Harness's internals, you can clone the source code from GitHub and build locally. The entire process can be summarized in three steps:
# 1. Install dependencies
pnpm install

# 2. Build (compile TypeScript, bundle client and web frontend)
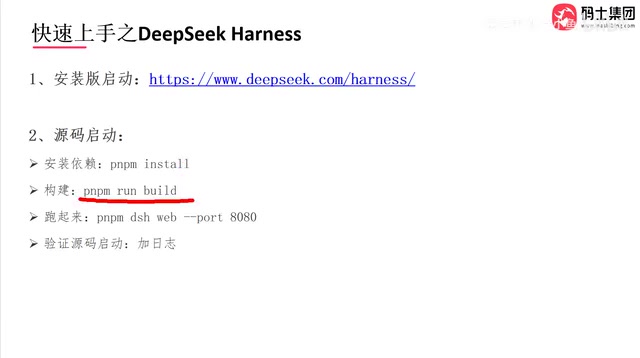
pnpm run build

# 3. Launch
pnpm run dsh-web -- --port 8080
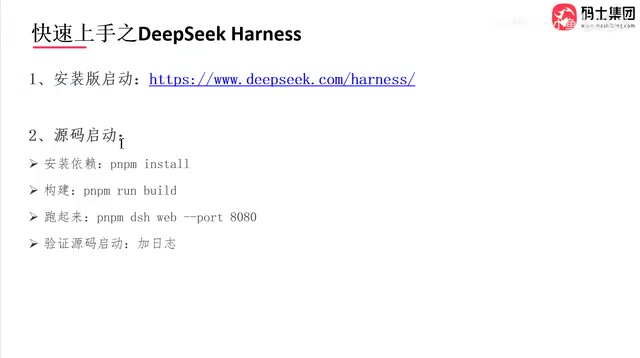
Harness is written in TypeScript, which means the source code cannot be executed directly by Node.js. It requires a compilation (transpilation) step to convert TypeScript into JavaScript. The pnpm run build step actually triggers multiple build tasks: first, the TypeScript compiler (tsc) compiles .ts files into .js files and generates type declarations; then frontend resources are bundled, typically using tools like Vite, Webpack, or Rollup to separately bundle client-side and web-side code into browser-executable bundles. Harness uses a Monorepo (single repository managing multiple packages) code organization approach, and pnpm's workspace feature natively supports this structure, allowing multiple sub-packages like client, web, and core to be developed and built collaboratively within the same repository.
Regarding dependency installation, the course offers several practical tips:
- Harness has a massive number of dependencies—around 900+, totaling approximately 1GB. Harness chose pnpm as its package manager precisely because pnpm's deduplication and caching mechanisms effectively handle such a large dependency footprint.
- Initial installation typically takes 2 to 5 minutes, during which a policy validation checks whether each dependency's published version meets the minimum threshold.
- If network instability causes timeouts, simply re-run the install command. Since most packages are already cached, the second attempt will skip already-installed content and complete much faster.
Source Code Walkthrough: Tracing the Startup Chain from bin.ts
Why is launching from source code worth studying? Because it lets you see the framework's execution chain with your own eyes. The course demonstrates this through a simple experiment.
Locating the Startup Entry Point
The framework's startup entry point is located at:
app/client/src/bin.ts
In this file, the course instructor inserted a log statement:
console.log('Running ... sauce')
After rebuilding (pnpm run build) and relaunching, this custom log indeed appeared in the command line, along with the dsh-web access URL. This small experiment intuitively demonstrates that when running the service from source code, its behavior is entirely determined by the code in your hands—after modifying source code, you must rebuild for changes to take effect. This also explains why modifications to TypeScript source files don't take effect immediately—Node.js runs the compiled JavaScript files, not the TypeScript source files, so every modification requires re-executing the build step.
This is the fundamental difference between source code launch and installed launch: the installed version pulls pre-published packages and runs them directly, while source code launch gives you control over every line of code, making it ideal for plugin development and framework internals research.
Hands-On Experience: Starting a Conversation to Generate a Program
Once startup and configuration are complete, using Harness is very intuitive:
- Create a new session;
- The system will ask you to select a working directory, such as creating a
demo/workdirectory; - Type your request directly in the chat box, for example: "Write a Snake game, web version";
- Click execute, and Harness will automatically begin writing the code.
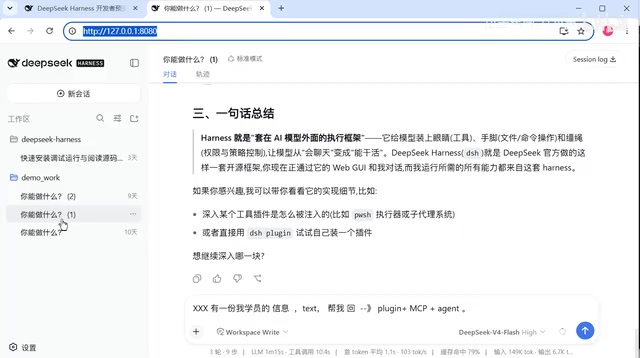
Notably, Harness requires users to select a working directory when creating a new session. This design involves important considerations around Agent security and controllability. The Working Directory defines the boundary for the Agent's file operations—when the Agent performs tasks like code generation or file read/write, all operations are confined to this directory, preventing the Agent from accidentally modifying critical system files. This is closely related to the concept of a "Sandbox": a sandbox is a security mechanism that limits a program's access permissions by isolating its execution environment. In Agent scenarios, a sandbox not only needs to restrict file system access but may also need to limit network requests, process creation, and other system calls. Harness implements the sandbox as a plugin, meaning developers can choose different sandbox strategy levels based on their security requirements—from simple directory isolation to full container-level isolation (such as a Docker sandbox).
This process showcases the core value of Harness as an Agent runtime: it doesn't just call a model to generate text. Instead, it lets the Agent actually read and write files and execute tasks within a specified working directory, transforming "conversations" into "runnable deliverables."
Conclusion: Why Harness Deserves Your Attention
Based on the course content, DeepSeek Harness has a clear positioning—it is an Agent runtime framework with "everything is a plugin" as its core philosophy. Through its three-layer architecture of a minimal Codis kernel + rich plugins + flexible configuration layer, it enables developers to freely combine Agent capabilities without modifying source code.
For developers, several key takeaways are worth remembering:
- If you just want a quick experience, a single command
pnpx ai-dsh-webis all you need; - If you want to study internals or develop plugins, take the source code build route and start from
bin.tsto trace the startup chain; - Harness's true value lies in its decoupled plugin architecture, which is likely why the course instructor called it "the new main battleground."
As large model capabilities become increasingly commoditized, Agent runtime frameworks are becoming a critical piece for real-world business deployment. This trend is no coincidence—as models like GPT-4, Claude, Gemini, and DeepSeek gradually converge in reasoning capabilities, model capability alone is no longer a decisive competitive moat. The industry's competitive focus is shifting from "whose model is stronger" to "whose ecosystem is more complete and whose deployment is more efficient." Drawing an analogy to the mobile internet era, models are like chips, while Agent frameworks are like operating systems: chip performance matters, but what truly determines user experience and developer ecosystems is the OS layer. DeepSeek's choice to open-source Harness at this moment closely aligns with the timeline of OpenAI launching its Agents SDK and Anthropic releasing the MCP protocol, indicating that leading AI companies have reached a consensus: Agent infrastructure will be the core battleground of the next phase.
DeepSeek's decision to open-source Harness and release its source code undoubtedly provides the entire developer ecosystem with a sample worth studying in depth.
Related articles

Amphibious Transforming Drone: Beyond 100x Power Savings, What Are the Real Needs?
Is the amphibious transforming drone just a gimmick? Starting from the 100x power difference of the M4 Morphobot, explore real application scenarios and thesis topic ideas, analyzing boundary conditions where pure drones and pure ground robots both fail.

Warhound Raises $200 Million: Genetically Engineered "War Dogs" Paired with Anduril Gear
Warhound raises $200M, backed by Ben Lamm and Palmer Luckey, to genetically engineer dogs for military and law enforcement use and equip them with Anduril gear. This article analyzes its technology direction, funding logic, and ethical controversy.

Claude API Comes to Google Cloud: IAM Integration and SDK Access Guide
Anthropic hosts the full Claude API on Google Cloud with IAM-controlled permissions and unified billing. This guide covers the Vertex AI and Anthropic-hosted entry points, IAM role configuration, and SDK access.