GitHub Copilot CLI Domain Binding Tutorial: Complete DNS Configuration with Natural Language

Use GitHub Copilot CLI to bind custom domains to GitHub Pages via natural language in just 14 minutes.
This tutorial demonstrates how GitHub Copilot CLI can automate the entire custom domain binding process for GitHub Pages using natural language commands. By leveraging Copilot's skill/extension system to interface with Namecheap's API, developers can skip manual DNS configuration entirely—from domain purchase and A record setup to CNAME creation and HTTPS certificate verification—completing the full workflow in approximately 14 minutes.
Setting up a custom domain for a personal project or blog has long been a pain point for many developers. In the traditional workflow, terms like DNS resolution, A records, and CNAME configuration come with a steep learning curve, are error-prone, and take a long time to propagate globally. A Chinese tech YouTuber demonstrated a workflow leveraging GitHub Copilot CLI that uses natural language commands to complete custom domain binding for GitHub Pages—without ever manually touching DNS configuration. This article breaks down the core approach and practical value of this workflow.
Three Pain Points of Traditional DNS Configuration
Manually binding a domain to a website seems simple but is riddled with hidden challenges. Based on the video summary, there are three main difficulties:
- High terminology barrier: Concepts like A records, CNAME, and TTL intimidate developers without an ops background;
- Manual entry is error-prone: A single mistake in a DNS record renders the site inaccessible, and troubleshooting is tedious;
- Slow global propagation: DNS changes often take hours or longer to propagate worldwide.
To understand these pain points, you need a basic grasp of how DNS works. DNS (Domain Name System) is the internet's "phone book," responsible for translating human-readable domain names (like example.com) into machine-readable IP addresses (like 185.199.108.153). An A record directly points a domain to an IPv4 address; a CNAME (Canonical Name) record points one domain to another, commonly used to direct a www subdomain to the apex domain; TTL (Time To Live) determines how long DNS caches remain valid—shorter TTL means faster propagation but increases DNS query load. The global DNS system uses a hierarchical recursive architecture where changes propagate from authoritative servers down to local recursive resolvers, which is why DNS modifications often take hours to take effect globally.
These issues collectively raise the psychological and operational cost of enabling a custom domain for a project, causing many developers to stick with default domains like xxx.github.io. Copilot CLI's approach is to interface directly with domain registrar APIs through natural language interaction, automatically writing DNS records and handing off the entire tedious process to AI.
Prerequisites and Overall Goal
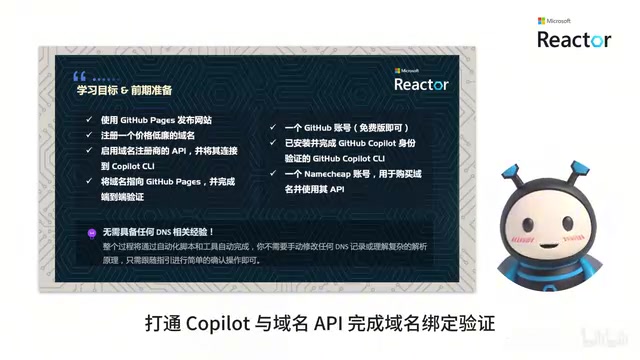
Before starting, you need three things: a GitHub account, an authenticated Copilot CLI, and a Namecheap domain account. It's worth emphasizing that this entire workflow requires zero DNS knowledge.
GitHub Copilot CLI is a command-line AI assistant launched by GitHub in 2023. Built on large language models, it converts natural language intent into executable shell commands or API calls. Unlike the Copilot editor plugin for code completion, it focuses specifically on terminal scenarios. Its core capabilities include: explaining complex commands, generating commands from descriptions, and interfacing with third-party service APIs through a "Skills/Extensions" mechanism. The skills mechanism works like a plugin system, allowing Copilot CLI to directly call APIs from domain registrars, cloud providers, and other platforms after user authorization, enabling cross-platform automation.
The goal of this walkthrough is clear: set up a GitHub Pages site, purchase a low-cost domain, connect Copilot with the domain API, and complete domain binding with HTTPS access.
Step 1: Publish a GitHub Pages Site with Natural Language
The first step is creating the site. The developer simply tells Copilot "I want a website," and the tool automatically completes a series of operations: creating a public repository, generating a homepage, committing code, pushing, and enabling Pages. The entire process is compressed into a single instruction, and the site becomes accessible via the default github.io domain shortly after execution. This "intent-driven" interaction is the core distinction between Copilot CLI and traditional command-line tools.
GitHub Pages is a free static website hosting service provided by GitHub, powered by a global CDN (Content Delivery Network). Users simply push static files like HTML, CSS, and JavaScript to a designated branch or directory, and GitHub automatically builds and deploys the site. Pages supports the Jekyll static site generator and is also compatible with static exports from frameworks like Hugo and Next.js. It assigns a default username.github.io subdomain, while custom domains require placing a CNAME file in the repository root and configuring DNS resolution. GitHub Pages' server IP address group (185.199.108-111.153) is public—A records need to point to these addresses.
Low-Cost Domain Purchase and API Integration
Step 2: Register a Cost-Effective Domain
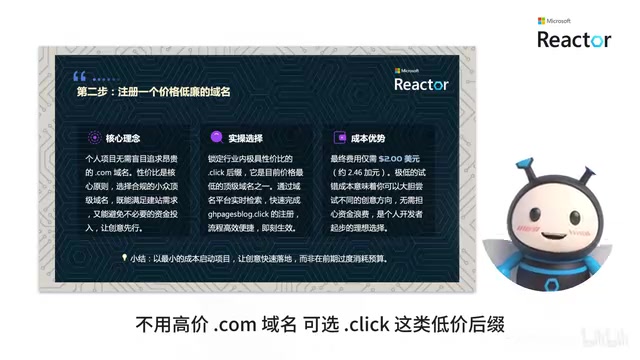
For personal projects, there's no need to pay premium prices for a .com domain. The video demonstrates choosing a low-cost TLD like .click—the domain in this test cost only two dollars, enabling you to set up a personal project site at minimal cost.
Step 3: Enable the Namecheap API and Install the Dedicated Skill
The domain binding step is the key to the entire workflow. Traditionally, manual DNS configuration has a high barrier and complex details, but Copilot handles all the underlying operations. Users only need three steps:
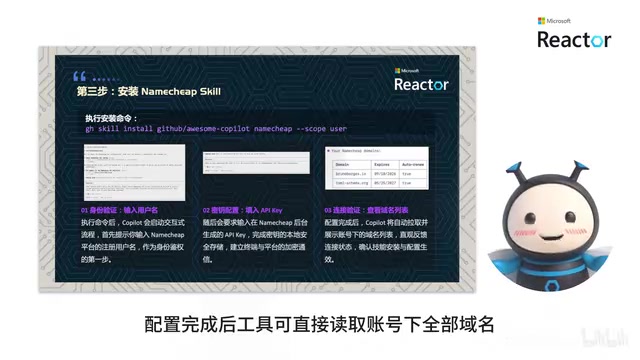
- Enable the Namecheap API: Log into the domain dashboard, toggle the API switch, add your local IP to the whitelist, and save the generated API key. The IP whitelist acts as a security barrier, ensuring only authorized devices can call the API;
- Install the Namecheap dedicated skill: Run the installation command and enter your domain account and API key. Once configured, the tool can directly read all domains under your account and verify connectivity;
- Send a natural language command to complete the binding.
Namecheap is one of the world's leading domain registrars, offering comprehensive RESTful API interfaces that allow developers to programmatically manage domain registration, DNS resolution, SSL certificates, and more. Its API uses an IP whitelist mechanism for access control—only pre-registered IP addresses can make API requests, adding a network-layer security guarantee beyond simple API Key authentication. Similar API capabilities are available from Cloudflare, GoDaddy, Google Domains, and other registrars. As Copilot CLI's skill ecosystem expands, it could theoretically cover more domain service providers in the future.
AI Automatically Completes DNS Configuration and Deployment Verification
One Sentence Triggers Automatic DNS Configuration
With the skill configured, a single natural language command triggers Copilot to automatically perform a series of DNS operations: replacing the apex domain A records, adding a CNAME for the www subdomain, and generating a CNAME binding file in the repository. A noteworthy detail: the tool displays a confirmation prompt before executing, keeping things safe and controlled to prevent accidental operations.
Step 4: Automated Deployment Verification
After binding is complete, the tool automatically verifies three items:
- Whether DNS resolution records are correctly written;
- Whether site access connectivity is normal;
- Whether the HTTPS certificate has been successfully issued.
GitHub Pages' custom domain HTTPS feature relies on free TLS certificates from Let's Encrypt. Once DNS configuration is complete and resolution takes effect, GitHub automatically initiates a certificate issuance request to Let's Encrypt, proving domain ownership through HTTP-01 or DNS-01 validation. The entire process typically completes within minutes to an hour. Let's Encrypt is a nonprofit certificate authority operated by the Internet Security Research Group (ISRG). Since launching in 2015, it has issued billions of certificates, significantly driving global HTTPS adoption from under 40% to over 90%.
Once verification passes, the custom domain with HTTPS is officially live, giving the site a more professional appearance.
Entire Process Takes Only 14 Minutes: Efficiency Gains Summary
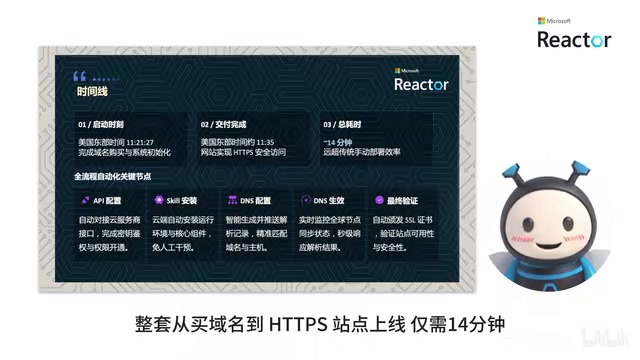
Reviewing the entire workflow reveals that from domain purchase to HTTPS site going live, the entire process takes approximately 14 minutes. From API activation and DNS configuration to certificate issuance, everything is automated, eliminating manual waiting and troubleshooting time.
Practical Value and Usage Recommendations
The significance of this workflow isn't in technical complexity—it's in reducing tedious, error-prone, slow-to-propagate DNS configuration to a natural language conversation. Developers only need to confirm requirements while AI handles the underlying repetitive configuration.
This also represents a typical application paradigm for AI Agent tools: not replacing developer thinking, but absorbing the repetitive configuration work that "nobody wants to do but everyone has to do," thereby lowering barriers and freeing up creativity. AI Agents are a major development direction in current AI applications, characterized by their closed-loop "perceive-plan-execute" capability. Unlike simple chatbots, Agents can call external tools (APIs, databases, file systems) and autonomously decompose tasks into steps for sequential execution. The Copilot CLI workflow in this article is a classic Agent pattern: the user only expresses the final intent (bind a domain), and the Agent automatically plans the execution chain of "create repository → configure A records → add CNAME → generate binding file → verify deployment." This pattern is expanding from DevOps into data analysis, content creation, customer service, and many other fields.
Of course, in actual use, you still need to pay attention to secure storage of API keys and IP whitelist management to avoid risks from credential leaks.
If you've been putting off enabling a custom domain for your project because DNS configuration is too cumbersome, this Copilot CLI workflow might be worth trying on your next project.
Key Takeaways
Related articles

CSS Anchor Positioning: A New UI Positioning Approach Without JavaScript
A deep dive into CSS Anchor Positioning: from anchor-name and position-anchor to the anchor() function, position-area shorthand, position-try-fallbacks, anchor-size, and upcoming anchor queries.

New AI Chart Interaction: Continuous Follow-up Questions and Visualization in Conversation
Explore a new AI interaction method for continuously generating charts in conversation. Use the /visualize command to ask follow-up questions and visualize answers in the same chat window, improving data analysis efficiency.

Cursor Merges Into X Subscription: Paid Plans Share Unified Usage Pool, Grok Model Coding Usage Doubled
Cursor joins The X Subscription with a unified usage pool and doubled Grok coding quota. Third-party models shift to API pricing. Existing users can keep or migrate plans.