Llama.cpp Windows Local Deployment Guide: Run LLMs in Three Steps Without Compiling

Deploy Llama.cpp on Windows in three steps using pre-compiled packages — no compilation required.
This guide walks you through deploying Llama.cpp on Windows without any compilation. Download the pre-built main program and CUDA dependency packages from GitHub, grab a GGUF quantized model from Hugging Face, extract everything into one folder, and run a single command to start chatting with an LLM locally. Covers GPU acceleration, VRAM optimization, web UI setup via llama-server, and multi-GPU configuration.
Introduction
If you want to run large language models locally, Llama.cpp is a lightweight inference framework you can't ignore. It was created by developer Georgi Gerganov in March 2023, with the original goal of running Meta's LLaMA model on pure CPU environments. The project is built on the author's custom ggml tensor computation library, written entirely in C/C++ with no dependencies on heavy deep learning frameworks like PyTorch or TensorFlow. This makes the compiled output extremely lean — a single executable file can handle model loading and inference. It's precisely this "zero-dependency" design philosophy that has made Llama.cpp one of the most popular open-source projects for local LLM inference, with over 80k GitHub Stars. The supported model architectures have expanded far beyond the original LLaMA to include dozens of mainstream open-source models such as Qwen, Mistral, Phi, Gemma, and more.
However, many people get discouraged the moment they hear the word "compiling" — setting up environments, installing dependencies, troubleshooting errors — any of these steps can scare off non-developer users.
The good news is that the Llama.cpp team already provides pre-compiled Windows packages. The entire deployment process requires zero compilation — just download, extract, and run. This article walks you through the complete compilation-free Llama.cpp Windows local deployment workflow, helping you get a large language model up and running in the shortest time possible.
Preparation: Downloading Required Files
Download the Llama.cpp Main Program and CUDA Dependencies
Go to the official Llama.cpp GitHub repository and navigate to the Releases page. In the Assets list at the bottom of the page, the team has compiled packages for different platforms and GPU types — just download what you need.
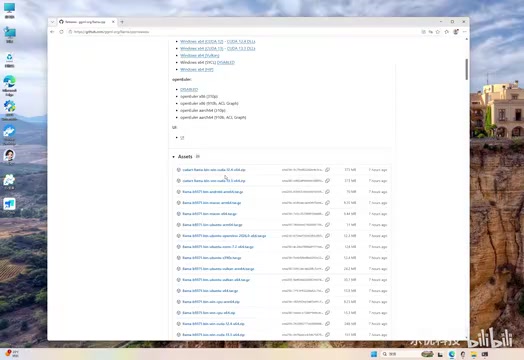
If you have an NVIDIA GPU and want CUDA-accelerated inference, you'll need to download these two archives:
- CUDA dependency package (cudart-llama-bin-win-cuXX): Contains the DLL files required by the CUDA runtime
- Main program package (llama-bXXXX-bin-win-cuda-cuXX): The core Llama.cpp executables
Background on CUDA: CUDA (Compute Unified Device Architecture) is NVIDIA's parallel computing platform and programming model that allows developers to leverage the thousands of computing cores on a GPU for general-purpose computation. The core operation in LLM inference is massive matrix multiplication, and GPUs are inherently excellent at this kind of highly parallel math — a mid-range GPU can easily achieve tens to hundreds of times the matrix computation throughput of a CPU. The cudart (CUDA Runtime) package you're downloading contains dynamic link libraries like cublas64_XX.dll and cudart64_XX.dll, which serve as the bridge for Llama.cpp to call the GPU for matrix operations. Without these DLL files, even if your GPU supports CUDA, the program cannot offload computation tasks to the GPU.
Important: The CUDA version numbers of both packages must match. For example, both should be cu12.4 — mixing different versions will cause compatibility issues. If you're unsure which CUDA version your GPU supports, run nvidia-smi in the command line. The top-right corner will display the maximum CUDA version supported by your driver — just download a package that doesn't exceed that version.

Download a GGUF Quantized Model
Next, you need to prepare a model file. Here we'll use the Q5_K_M quantized version of Qwen 3 32B as an example, downloaded from Hugging Face in GGUF format.
What is the GGUF format? GGUF (GPT-Generated Unified Format) is a model file format designed specifically for the Llama.cpp ecosystem, evolved from the earlier GGML format. In August 2023, the community upgraded from GGML to GGUF, with key improvements including: support for embedding model metadata (such as tokenizer configuration, model architecture parameters, etc.) in the file header, achieving the design goal of "single file = complete model"; and a more flexible key-value storage structure for better forward compatibility. In short, a single .gguf file contains all the information needed to run a model — no additional tokenizer configuration files or parameter mapping tables required.
A Brief Introduction to Quantization: Original LLM weights are typically stored in FP16 (16-bit floating point) or FP32 (32-bit floating point). A 32B parameter model in FP16 requires about 64GB of storage — far exceeding the VRAM capacity of consumer-grade GPUs. Quantization technology compresses weights from high-precision floating-point numbers to low-bit integer representations (such as 4-bit, 5-bit, 8-bit), dramatically reducing model size and VRAM usage while preserving inference quality as much as possible. The K-quant scheme used by Llama.cpp is a mixed-precision quantization strategy — rather than compressing all layers uniformly, it assigns different quantization bit-widths based on each layer's impact on model output quality. More important layers retain higher precision, while less sensitive layers are compressed more aggressively, achieving better inference quality at the same average bit count.
Differences between quantization versions:
- Q5_K_M: Approximately 5.3 bits per weight on average, a good balance between precision and file size — recommended for most users
- Q4_K_M: Approximately 4.8 bits per weight on average, smaller file size and lower VRAM usage, with slightly reduced precision
- Q8_0: 8 bits per weight, close to original precision, but with large file size and high VRAM requirements
For a 32B parameter model, Q5_K_M quantization results in roughly 20-24GB of storage, with corresponding VRAM requirements at runtime. If VRAM is limited, consider Q4_K_M first or choose a model with fewer parameters.
Environment Setup: Extracting and Organizing Files
Create a new folder in the root of your C drive and name it llamacpp. Avoid Chinese characters and spaces in the path to prevent path parsing errors during runtime.
Extract all three sets of files into this directory:
- Contents of the CUDA dependency package
- Contents of the main program package
- The downloaded GGUF model file
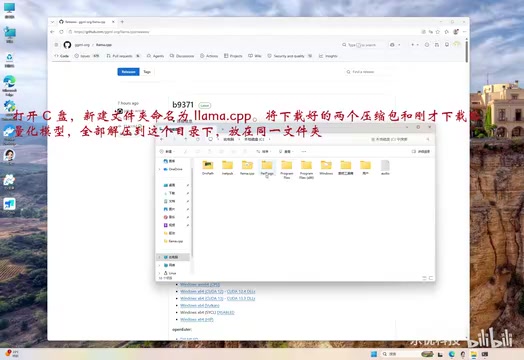
Make sure all files (executables, DLL files, model files) are at the same folder level — don't leave any extra nested subdirectories. This is the most common pitfall for beginners — an extra folder layer after extraction causes the program to fail because it can't find the required libraries. The reason for this requirement is that Windows, when loading an executable, searches for required DLL dynamic link libraries in the program's directory first. If llama-cli.exe and the CUDA DLL files aren't in the same directory, the system will throw an error like "cublas64_12.dll not found."
Running the Model: Command Line Operations
Navigate to the Working Directory
Open Windows PowerShell and enter the following command to switch to the Llama.cpp directory:
cd C:\\llamacpp
Verify Files Are Ready
Use the dir command to check the directory contents and confirm the model file is correctly placed:
dir *.gguf

If you can see the model filename in the output, the preparation is complete.
Launch llama-cli for Conversation
Use the llama-cli command to load the model and enter interactive conversation mode:
.\\llama-cli.exe -m qwen3-32b-q5_k_m.gguf -ngl 99 --conversation
Parameter explanations:
-m: Specifies the path to the GGUF model file-ngl 99: Offloads as many model layers as possible to the GPU — the higher the number, the greater the GPU utilization--conversation: Enables interactive conversation mode
How the -ngl parameter works: The core structure of a large language model consists of multiple stacked Transformer layers. For example, the Qwen3-32B model contains 64 Transformer decoder layers. The -ngl (number of GPU layers) parameter controls how many layers are placed in GPU VRAM for processing, with the remaining layers staying in system RAM for CPU processing. Setting it to 99 means "put as many layers as possible on the GPU" — if VRAM is sufficient, all 64 layers will run on the GPU for maximum inference speed; if VRAM is insufficient, Llama.cpp will automatically fall back the overflow layers to the CPU, creating a hybrid GPU/CPU inference mode. You can also manually set a specific value, such as -ngl 40 to place only the first 40 layers on the GPU, which helps avoid OOM (Out of Memory) crashes when VRAM is tight. Generally speaking, more layers on the GPU means faster inference but higher VRAM usage — you'll need to find the right balance based on your hardware.
If VRAM isn't enough to load all layers, reduce the -ngl value to let some computation fall back to the CPU. Speed will decrease, but the model will still run normally.
Common Issues and Recommendations
What If I Don't Have Enough VRAM?
- Switch to a more aggressive quantization version, such as Q4_K_M or Q3_K_M
- Lower the
-nglparameter value and use hybrid CPU + GPU inference - Choose a model with fewer parameters, such as a 7B or 14B version
As a reference, here are rough compatibility guidelines for different VRAM capacities: 8GB VRAM is suitable for running 7B models with Q4/Q5 quantization (all layers on GPU); 12GB VRAM can handle 14B models with Q4 quantization or 7B with Q8; 24GB VRAM (e.g., RTX 4090) can run 32B models with Q4_K_M fully on GPU, or most layers of Q5_K_M on GPU. If your VRAM is only 6GB or less, consider starting with 3B or 1.5B small models to experience the workflow first.
How Do I Get a Web Interface?
Replace llama-cli with llama-server, which launches a local web service providing a ChatGPT-like web chat interface:
.\\llama-server.exe -m qwen3-32b-q5_k_m.gguf -ngl 99
Once started successfully, visit http://localhost:8080 in your browser to start using it.
More capabilities of llama-server: Beyond providing an out-of-the-box web chat interface, llama-server also exposes a set of REST endpoints compatible with the OpenAI API format (listening by default at endpoints like http://localhost:8080/v1/chat/completions). This means you can use it as a local API server, directly connecting with any third-party client or development framework that supports the OpenAI API — for example, using Open WebUI for a richer chat interface, Chatbox as a desktop client, or calling the local model directly from Python code via the openai library by simply pointing base_url to http://localhost:8080/v1. This compatibility design greatly expands Llama.cpp's use cases, making it not just a command-line tool but a complete local inference service backend.
Performance Optimization Tips
- Update your NVIDIA GPU driver to the latest version
- Close other programs that consume VRAM before running (games, video editing software, etc.)
- If you have multiple GPUs, use the
--split-modeparameter to configure multi-GPU parallel inference
Multi-GPU inference explained: If your machine has multiple NVIDIA GPUs installed, Llama.cpp supports two multi-GPU split modes. --split-mode layer (the default) splits by layer, assigning different Transformer layers to different GPUs, similar to pipeline parallelism; --split-mode row splits by row, distributing the matrix operations within a single layer across multiple GPUs for parallel computation, similar to tensor parallelism. For most users, the default layer mode works well enough. You can also use the --tensor-split parameter to precisely control the allocation ratio for each GPU — for example, --tensor-split 3,7 means the first GPU handles 30% of the workload and the second handles 70%, which is particularly useful when mixing two different GPU models.
Summary
The entire Llama.cpp Windows local deployment process can be summarized in four steps:
- Download the main program package and CUDA dependency package from GitHub Releases (keep version numbers consistent)
- Download a GGUF quantized model from Hugging Face
- Extract all files into the same directory
- Run the command in PowerShell to load the model
No Python installation, no compilation environment setup, no Docker hassle — truly zero-barrier deployment. If you want to experience large language models locally without being scared off by complex environment configuration, Llama.cpp's pre-compiled solution is one of the most hassle-free options available.
It's worth noting that the Llama.cpp community maintains a very rapid update cadence, with new versions released almost every week, continuously optimizing inference performance, adding support for new model architectures, and fixing various bugs. It's recommended to regularly check the GitHub Releases page and update to the latest version for the best experience.
Related articles

What Is Vibe Coding? The AI Programming Skill Every Developer Needs
What is Vibe Coding? Learn how AI programming is reshaping dev teams, why traditional programmers face displacement, and why Cursor & Claude Code matter.
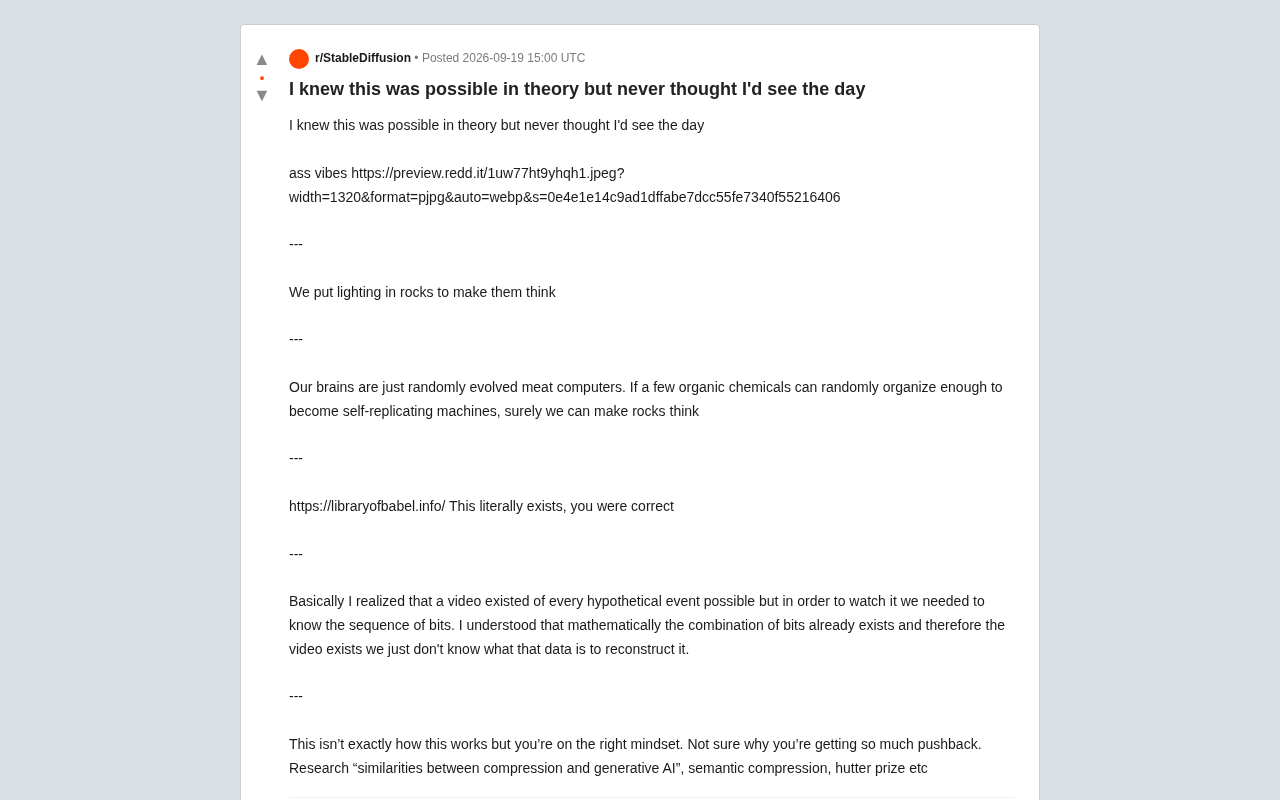
Making Rocks Think: A Philosophical Exploration of Generative AI and Information Compression
From a viral Reddit post to deep AI theory: why compression equals understanding, the Library of Babel thought experiment, semantic compression, and the Hutter Prize.

Irregular Warns: Four AI Lab Security Breaches Traced to the Same Root Cause
Irregular reveals four AI lab security breaches share a single root cause, exposing systemic risks from technology stack homogeneity across the AI industry.