Reproducing GitHub Projects from Scratch: A Practical Step-by-Step Guide

A practical methodology for reproducing GitHub open-source projects from zero, from due diligence to debugging.
This guide walks through the complete workflow for reproducing GitHub projects: starting with due diligence (Stars, Issues, README), setting up isolated virtual environments with Conda, installing dependencies, interpreting .sh scripts for manual execution in PyCharm, and using breakpoint debugging to resolve common errors. Ideal for grad students and junior developers.
For graduate students and junior developers, reproducing an open-source project from GitHub is practically a rite of passage. Whether you're replicating paper results, running baseline experiments, or learning engineering best practices, your ability to successfully run someone else's code directly determines your research and work efficiency. This guide systematically covers the complete methodology for reproducing GitHub projects from zero, based on a practical live walkthrough, helping beginners avoid common pitfalls.
Do Your Due Diligence Before Reproducing
Many people's first instinct when they find a GitHub project is to download and run it immediately — but that's actually the least efficient approach. The smart move is to first do "due diligence" and assess whether the project is worth your time.
Check Stars and Forks First
When you open a project page, the first thing to look at isn't the code — it's the Star and Fork counts. Think of it like checking sales volume before buying something online: the more people use it, the more likely the project is high-quality and actively maintained with bug fixes.
Star and Fork counts aren't just popularity metrics — they carry deeper engineering implications. Stars represent users "bookmarking" a project, reflecting community recognition; Fork counts better indicate how many developers are actively building on or contributing to it. A project with far more forks than stars is often a core component of an active ecosystem. GitHub's algorithm also surfaces high-star projects on the Trending page, creating a positive feedback loop — more attention means more incentive for maintainers to fix bugs and update docs. For paper reproduction, also check the "Watch" count and the date of the most recent commit. If a project hasn't had any commits in two or three years, even with a decent star count, its dependencies may be severely outdated.
Here are some rough benchmarks:
- Large open-source projects: Generally need 1K+ Stars
- Paper companion code: Given the smaller audience, 100+ Stars is already a good sign
If a project only has single-digit or low double-digit stars, it likely has limited reach and may contain many errors — skip it.
Read Through Issues: The Project's "Real Review Section"
Before investing significant debugging time, always scan through the project's Issues. Think of it as the user review section for a product — it lets you spot any fundamental problems before you're in too deep.
GitHub's Issues system is essentially a lightweight bug-tracking and community discussion platform, drawing inspiration from tools like Jira. Each issue has a Label system with common tags like bug, enhancement, question, and help wanted, letting you filter for specific types of problems. Beyond checking Closed Issues first, a pro tip is to search by keyword (like an error message you've encountered) for targeted lookup of historical discussions. Active projects often pin a "FAQ" issue summarizing common problems — that's the most efficient resource to check. Also note: if a project has a huge number of Open Issues and very few Closed ones, it often means the maintainers are unresponsive, and you may not get official support when you run into trouble.
A practical tip for reading Issues: prioritize Closed Issues over Open ones. Closed issues typically mean someone replied and a solution was provided — far more useful as a reference.
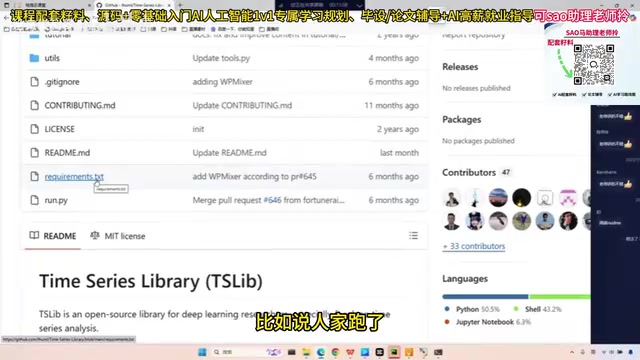
If you plan to use a model as a long-term backbone or paper baseline, it's worth reading through every single issue from start to finish, so you know in advance what problems others have hit and whether their results matched the paper. That way, when you run into an error yourself, you'll have some memory of it and can diagnose faster.
If the Issues are full of complaints like "this project doesn't run at all" or "results are completely inconsistent with the paper," cut your losses and move on to a different project.
Read the README Last
The README is like the official product description — the more complete and well-formatted it is, the more care the author put in, and the higher the code quality tends to be. READMEs typically include changelogs, experiment comparisons, model leaderboards, links to cited papers, and crucially, the required environment (e.g., Python version) and usage instructions.
Environment Setup: Recreate the Author's Runtime Environment
One of the most common reasons reproduction fails is environment mismatch. Differences in Python version, dependency versions, and even CUDA version can all cause results to diverge from the paper. Recreating the author's original environment as closely as possible is the key to successful reproduction.
Create a Dedicated Virtual Environment
If the README specifies the author used Python 3.8, the safest approach is to use Anaconda to create a fresh, isolated environment with that exact version — avoiding any contamination of your existing setup:
conda create -n py38_timesnet python=3.8.0
conda activate py38_timesnet
Anaconda's virtual environment mechanism is built on Python's environment isolation design. The core idea is to create an independent Python interpreter copy and package directory for each project, completely preventing dependency conflicts between projects. This is especially important in deep learning, where different paper codebases often depend on different versions of PyTorch, NumPy, and even the CUDA toolchain — version mixing can easily cause subtle numerical computation errors. Conda has a key advantage over Python's native venv: it can manage non-Python binary dependencies (like CUDA libraries and the MKL math library), which is critical for GPU-accelerated deep learning projects. The command conda create -n <env_name> python=<version> creates a fully isolated subdirectory under Anaconda's envs folder, and conda activate switches the current shell session to that environment by modifying the system PATH — your original environment is completely unaffected after you exit.
If the project doesn't specify a Python version, you can make an educated guess based on the release date, or dig through the Issues for clues. Fortunately, mainstream libraries like PyTorch generally have decent backward compatibility, so you can often just try something reasonable.
Install Dependencies with One Command
Most projects provide a requirements.txt file listing all dependencies and their versions. Once your environment is activated, a single command handles everything:
pip install -r requirements.txt

There are a few critical pitfalls to watch for:
- PyTorch installs the CPU version by default. The
torchandtorchvisionpackages specified inrequirements.txtare typically CPU-only. If you need GPU acceleration, you'll need to manually reinstall the GPU version of PyTorch matching your CUDA version.
Matching PyTorch and CUDA versions is the trickiest part of deep learning environment setup. CUDA (Compute Unified Device Architecture) is NVIDIA's parallel computing platform, and PyTorch's GPU build must correspond exactly to the CUDA driver version installed on your machine. There are three levels of version relationships: your NVIDIA driver version determines the maximum CUDA version supported (check with nvidia-smi), the CUDA Toolkit version determines what code can be compiled, and PyTorch's prebuilt packages are built against specific CUDA versions. The PyTorch website (pytorch.org) provides an interactive install command generator — just select your OS, package manager, Python version, and CUDA version to get the correct install command. A common mistake is simply running pip install torch, which installs the CPU-only version even if you have a GPU. The correct approach is to copy the full install command from the PyTorch website, which includes a suffix like +cu118 for the appropriate CUDA version.
- Watch out for distribution-related packages. Before installing, skim through
requirements.txtand check for any packages that won't run on Windows. Any distributed training packages (like DeepSpeed) are essentially incompatible with Windows. Projects using these are best run directly on a Linux server.
On that note: GPU cloud rental is highly competitive right now, with a 3090 available for just over a dollar per hour. Renting a server for a couple of days to run experiments is quite affordable and ideal for Windows users.
Running the Project: Read the Script, Execute Manually
Many beginners get stuck at the final step — the project provides a .sh script file that can't be run directly on Windows, and they assume they're stuck. There's no need to worry.
Understanding What .sh Scripts Actually Are
.sh scripts (Shell Scripts) are automation scripts for Unix/Linux systems, widely used in deep learning engineering to manage experiment configurations. Their popularity has deep engineering roots: in large-scale distributed training scenarios, researchers typically connect to remote GPU clusters via SSH and submit jobs through schedulers like SLURM or PBS, which use shell scripts as the native job description format. The backslash \ in scripts is a "line continuation character" telling the interpreter that the next line is part of the same command, making it easier to write commands with many arguments across multiple lines. Common script elements like export CUDA_VISIBLE_DEVICES=0,1 specify which GPUs to use, while nohup keeps jobs running in the background even if the SSH connection drops. Understanding this context helps you accurately translate script parameters into PyCharm run configurations or manual command-line execution.
A .sh script might look complex, but it's fundamentally just a sequence of commands executed in order, and the core is usually a single line like python run.py --args.... Authors use scripts because in research and engineering practice, tasks are commonly submitted to remote servers without a graphical interface, making script-based parameter passing the most convenient approach — not to confuse beginners.
So Windows users simply need to open the .sh file, identify the Python entry point (e.g., run.py) and its arguments, then manually configure those arguments in PyCharm.
Configuring Run Parameters in PyCharm
Here's how: in PyCharm, switch to the virtual environment you just created (select "Existing environment" and point it to the new environment's python.exe), then copy the parameters from the script into the run configuration.
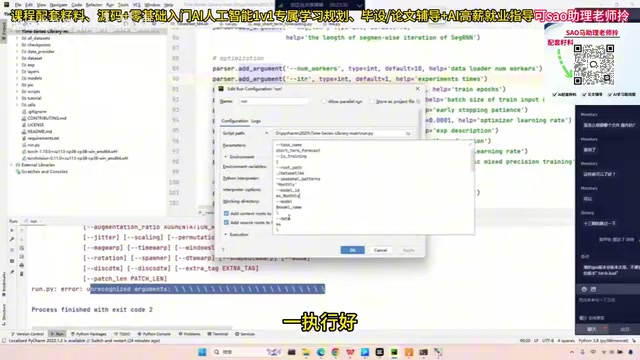
One detail worth noting: when copying parameters from a script to PyCharm, formatting issues may arise. For example, extra backslashes \\ need to be removed manually (backslashes in scripts are line continuation characters and shouldn't be kept in the parameter configuration).
Hands-On Debugging: Errors Are Normal — Use Breakpoints
After setting up your environment and hitting run, encountering errors is completely normal. A principle worth remembering: any problem that throws an error is a small problem. The really hard cases are when the code runs fine but the results don't match the paper — that's when you need to go through the code logic line by line.
Here are some common error types and how to approach them:
KeyError: Typo in Parameters
The first error is a KeyError indicating a key can't be found in a dictionary. On closer inspection, the culprit is an extra quotation mark in the copied parameter string.
How to find it: set a breakpoint at the error location, run in debug mode until it hits the breakpoint, then inspect the actual value of the passed variable and compare it character by character against the dictionary keys in the code. That's how you catch subtle issues like "an extra quote."
Breakpoint debugging is a core feature of modern IDEs, relying on OS-level debugging interfaces (such as Linux's ptrace system call). When execution reaches a breakpoint, the debugger pauses the process and hands control back to the IDE, where you can inspect all current variable values, the call stack, and memory state. In Python, PyCharm's debugger is built on pydevd, which injects checkpoints into the code to enable pausing. For deep learning projects, breakpoint debugging is especially valuable in a few scenarios: setting breakpoints at the DataLoader to verify input tensor shapes; at the model's forward method entry to trace intermediate layer outputs; and at loss function computation to confirm loss values are reasonable (NaN or Inf are common anomalies). Compared to print-based debugging, breakpoint debugging requires no code changes and misses nothing — it's the tool of choice for professional developers.
The same approach applies to issues caused by wrong model_name parameters or loss function names (e.g., an extra quote before smape).
NoneType: CUDA Not Available
The next common error is a torch complaint about CUDA being unavailable — exactly the "pip installed CPU-only PyTorch" issue mentioned earlier. There are two solutions:
- Reinstall the GPU version of PyTorch (recommended if you have a GPU)
- Run on CPU instead: find the
use_gpuparameter in your config and change it fromTruetoFalse
Don't Forget to Download the Dataset
Some errors come from missing data files. Projects typically provide download links (e.g., cloud storage links) for datasets, which you need to download in advance and place in the specified directory (e.g., ./dataset/). How to obtain the data and where to put it should be carefully read from the README and parameter documentation.

The Right Priority Order for Searching Error Solutions
When you hit an error you can't figure out on your own, search in this order:
- Search the project's own Issues first — someone has almost certainly run into the same problem, and the solution will be most relevant to that specific project
- Then Google it — broad coverage with high hit rates for technical questions
- Then ask an LLM (like ChatGPT) — can provide targeted analysis and code fix suggestions
- Baidu as a last supplement
Final Thoughts: Setting Up Environments Is a Worthwhile Investment
Many people complain: "I keep wasting time on environment setup — is it really worth it?" The answer is: absolutely yes.
The vast majority of people's future work isn't about building algorithms from scratch. It's about "adapting open source, running your own data" — companies move fast and constantly need people who can set up environments and debug code. The process of reproducing projects from scratch is the best hands-on practice you can get. The more you do it, the more natural it becomes, and the more experience accumulates.
Another important point to internalize: no company uses Windows as a production environment. Linux's dominant position in servers and production (over 96% market share) isn't accidental — it's determined by technical characteristics. The Linux kernel's scheduling efficiency for multi-process, multi-threaded, and network I/O workloads is significantly better than Windows Server, which matters for long-running deep learning training jobs. NVIDIA's CUDA drivers and deep learning frameworks (TensorFlow, PyTorch) are better optimized on Linux, and some high-performance features (like the NCCL multi-GPU communication library) simply don't work on Windows. Container technology Docker is natively supported on Linux, and production deployment of deep learning systems is almost inseparable from Docker and Kubernetes. For beginners, WSL2 (Windows Subsystem for Linux 2) is a great starting point — it runs a full Linux kernel on Windows with GPU passthrough support and is an ideal bridge to a pure Linux environment. Whether you're currently learning on Windows or Ubuntu, start getting comfortable with Linux workflows early. Master the basic Linux command line (file management, process management, permissions) — it will be an indispensable skill throughout your career.
The complete pipeline for reproducing a project can be summarized as: Due Diligence (Stars/Issues/README) → Recreate Environment → Read Script and Run Manually → Debug Errors with Breakpoints → Run Batch Experiments. Once you've internalized this methodology, even complete beginners can confidently handle reproduction of most open-source projects.
Related articles

Databricks Genie: The AI Analytics Assistant That Tripled a Marketing Team's Data Usage
Databricks' AI analytics assistant Genie tripled marketing team data usage. Discover how this conversational NL2SQL tool lowers the data access barrier and what it means for enterprise AI adoption.

How The Oregon Trail Became a Cultural Icon for Generations
How The Oregon Trail grew from educational software into a multigenerational cultural icon — through classrooms, "You have died of dysentery," and shared childhood memories.

Health Benefits Platform Thatch Hits $1B Valuation as Healthcare Costs Surge
Thatch raises $108M and hits a $1B valuation, backed by a16z, Index Ventures, and General Catalyst, as surging U.S. healthcare costs drive demand for flexible benefits platforms.