Stable Diffusion Agent Edition Hands-On: Complete Guide to Free Local Deployment on a 2060 GPU

Stable Diffusion Agent Edition bundle offers lightweight local deployment on a minimum 2060 GPU, ready to use after unzipping.
This article covers the installation and usage of the popular "Stable Diffusion Agent Edition" bundle on Bilibili. It highlights the lightweight, unzip-and-use design, minimum 2060 GPU support, 488 built-in workflows, and director console feature. It details preparation, main program installation, model deployment, launch and initialization, model import, and creation, while noting caveats about workflow effectiveness, path conventions, and maintenance.
Title
Stable Diffusion Agent Edition Hands-On: Complete Guide to Free Local Deployment on a 2060 GPU
Meta Description
Stable Diffusion Agent Edition bundle tested: minimum 2060 GPU for free local deployment, unzip and use, all-Chinese interface, 488 built-in workflows. This article compiles the complete installation steps, model migration methods, and key path conventions to help beginners avoid common pitfalls.
Article Content
Recently on Bilibili, a bundle called "Stable Diffusion Agent Edition" has sparked quite a bit of discussion. According to the uploader, this version focuses on being lightweight and ready to use after unzipping, runs on a minimum of a 2060 GPU, and comes with 488 built-in workflows and a director console feature. For beginners who want to deploy AI art locally but are intimidated by complex configuration, this sounds like a good entry point.
I've organized the complete installation process and the pitfalls to watch out for based on the video content, with step-by-step explanations accompanied by screenshots. If you also want to run Stable Diffusion locally for free, you might as well follow the steps below.
Preparation Before Installation: Verify the Package and Follow Path Conventions
The video emphasizes that before installing any software, you should first perform an integrity check on the local installation package to confirm that the file wasn't interrupted during download, partially missing, or corrupted. This is often overlooked, but it can prevent inexplicable errors during the subsequent installation process.
Another hard rule: the software installation path, the archive storage directory, and the model storage folder must all use pure English paths. Chinese characters, extra spaces, and special symbols are prohibited. The uploader repeatedly reminds viewers in the video that once the path format doesn't meet the requirements, it can easily lead to model loading failures, rendering errors, or even program crashes.
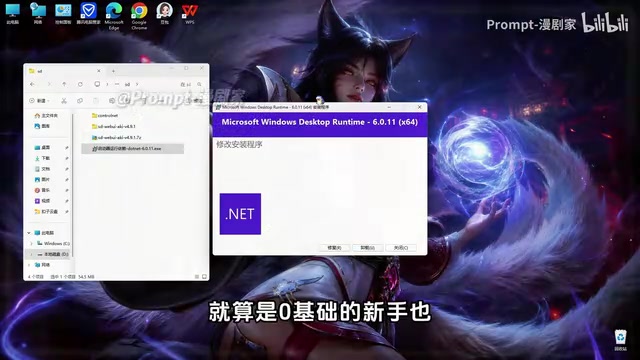
File integrity verification usually refers to comparing the file's hash value (such as MD5, SHA-1, or SHA-256) to confirm that the downloaded file matches the official release. A hash value is a unique fingerprint generated by an algorithm; any tiny change to the file will cause the hash value to change. A common practice is to use a verification tool (such as HashTab or the built-in verification feature of 7-Zip) to calculate the hash value of the local file and compare it with the value provided by the publisher. If the hash values don't match, it means the file may have been downloaded incompletely, tampered with, or the archive is corrupted, in which case you should re-download. For large files like bundles, verification can effectively avoid errors caused by missing files during installation.
Main Program Installation: Minimal Guidance, Zero-Basis Users Can Complete It
Find the main program installation package you saved earlier, right-click and select the install option to bring up the official installation wizard. This software uses a lightweight, minimalist installation mode that runs automatically throughout, requiring no manual parameter tuning and no complicated feature configuration steps.
According to the video demonstration, even a complete beginner only needs to wait for the installation progress bar to finish loading and then click the finish button, and the main program installation is fully complete. The entire process requires no additional installation of various dependency components, nor manual configuration of the runtime environment.
Model Deployment: Copy and Paste, but Mind the Path
After the main program is installed, find the pre-downloaded model archive and right-click to extract it into the storage folder you reserved specifically on your computer. After extraction, the folder will contain a complete set of model files along with a detailed operation guide document. The uploader recommends reading through this document first, as it clearly specifies the standard storage paths for the files; following the instructions can avoid issues such as incorrect directory placement and model loading failures.
Migrating models is very easy: first open the model folder you just extracted, press Ctrl+A to select all files inside, then use Ctrl+C to copy everything; next, find the software installation root directory, open the Models folder and its subfolders in sequence, enter the designated model storage location, and press Ctrl+V to paste the copied files.
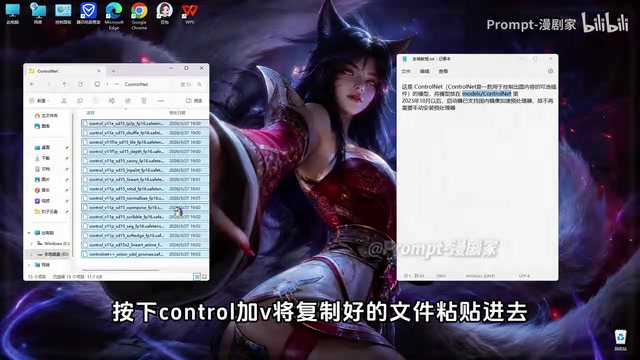
If you've already performed model migration before and the corresponding files already exist locally, there's no need to paste and overwrite again—just skip this step.
Stable Diffusion models are typically stored in .ckpt or .safetensors format. The former is a PyTorch checkpoint file, while the latter is a safer, faster-loading format (containing no executable code). Model files are large; common base models are about 2-7GB, and the storage path is generally models/Stable-diffusion. In addition, there are auxiliary models such as VAE, LoRA, and Embedding, which are placed in subfolders like models/VAE and models/Lora. Bundles usually come with a preset directory structure, so users only need to place files in the corresponding locations as instructed. If the path is wrong, the software won't recognize the model, resulting in a "model not found" prompt during generation.
Launch and Initialization: Automatic Detection with Built-in Practical Auxiliary Features
After all models are deployed, return to the software root directory, scroll down and double-click the program icon to launch the software. This tool focuses on being lightweight and easy to use, and is very beginner-friendly: no manual configuration of the runtime environment is needed, nor additional installation of various dependency components.
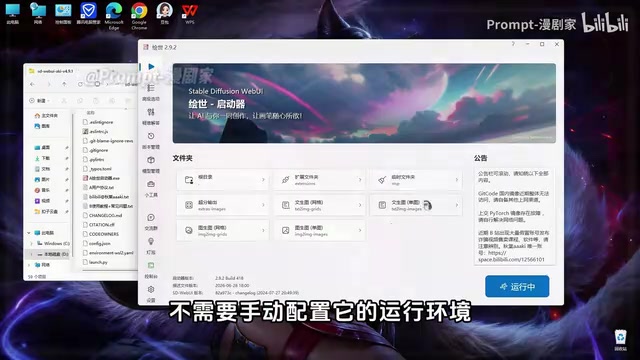
After the software launches, it automatically completes environment detection and initialization, greatly lowering the entry barrier to AI art. The video mentions two practical auxiliary features: first, intelligent hardware recognition, which can automatically read your computer's GPU hardware information and automatically match the optimal rendering parameters; second, an integrated model management module, which lets you add, delete, and update models directly within the software without manually searching local folders.
The console updates the loading progress of various resources in real time. Once the runtime environment and all models are loaded, the browser operation interface will automatically pop up, indicating that the entire installation and deployment work is complete and you can begin formal AI art creation.
Intelligent hardware recognition means that when the software starts, it automatically reads information such as the GPU model, VRAM size, and CUDA version, and recommends appropriate rendering parameters (such as resolution, batch size, and sampling steps) accordingly. For example, a GPU with smaller VRAM (such as 6GB) will automatically lower the default resolution or enable memory optimization mode to avoid running out of VRAM. The integrated model management module provides model listing, loading, unloading, and deletion functions within the software interface, with no need to manually operate the file system. This reduces the risk of users losing models due to accidental deletion or movement, and also makes it easy to quickly switch between models of different styles.
Model Import and Creation: Few Default Models, Add as Needed
Many beginners will find after opening the software that the number of built-in models isn't large—this is normal. The software only pre-installs basic general-purpose models by default; advanced specialty models such as Chinese-style, anime, and creative models need to be imported manually later. It's not an installation problem.
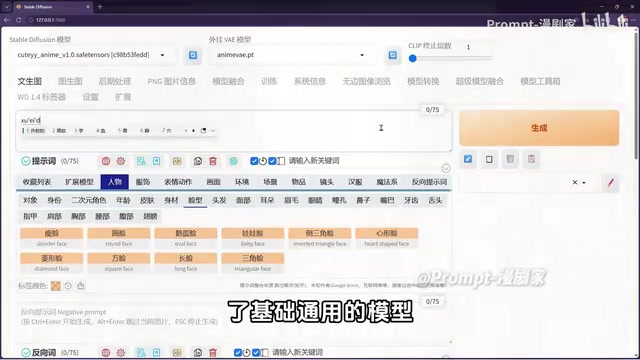
Each imported model demonstrated by the uploader has a corresponding preview image and suits different creative styles and visual needs. You can choose according to your own needs, reducing unnecessary repeated testing and saving creative time.
When creating art, you only need to enter accurate image prompts, adjust the various generation parameters, and after confirming everything is correct, click generate, and the software will automatically render and output the finished image. The entire workflow is simple and clear, and the learning curve isn't steep. As long as you operate according to the standards and avoid various path-related issues, you can set up a stable AI art working environment. After mastering the basic operations, you can also freely combine various models and continuously refine and optimize prompts to further improve the image results.
Prompts are the core input for AI art and are divided into positive prompts (describing elements you want to appear) and negative prompts (describing elements you want to avoid). Prompts are usually separated by English commas and support weight syntax (such as (word:1.2) for emphasis). Generation parameters include sampling method (such as Euler a, DPM++ 2M), sampling steps (usually 20-30), CFG Scale (prompt relevance, generally 7-12), resolution, etc. Adjusting these parameters affects the style and speed of the output. For beginners, it's recommended to start with the default parameters and adjust gradually after getting familiar.
A Few Observations
Judging from the video demonstration, this bundle does indeed push the barrier to local deployment very low—unzip and use, all-Chinese interface, automatic environment detection—saving a lot of hassle for users who don't want to wrestle with the command line. However, there are a few points to keep in mind: first, the specific effects of the 488 workflows and the director console feature weren't demonstrated in detail in the video, so their practical usability remains to be verified; second, although model import is simple, the path convention requirements are still strict, and beginners can easily stumble if they're not careful; finally, the update frequency and long-term maintenance of the bundle version weren't mentioned in the video either.
If you have a 2060-class GPU on hand and want to experience local AI art at low cost, this solution is worth a try. But if you're an advanced user pursuing higher image quality or more complex workflows, you may need to pair it with a more professional deployment approach.
One-line Summary
Stable Diffusion Agent Edition bundle offers a lightweight local deployment solution that runs on a minimum 2060 GPU and is ready to use after unzipping.
Paragraph Summary
This article introduces the installation and usage process of the popular "Stable Diffusion Agent Edition" bundle on Bilibili. The bundle focuses on being lightweight and ready to use after unzipping, supports a minimum 2060 GPU, comes with 488 built-in workflows and a director console feature, and is suitable for beginners deploying AI art locally. The article details pre-installation preparation (verifying the installation package, using pure English paths), main program installation (minimal guidance), model deployment (copy and paste to the designated directory), launch and initialization (automatic hardware detection, model management), and model import and creation (few default models, requiring manual addition). Finally, it reminds users to pay attention to the actual effects of the workflows, path conventions, and maintenance status, and concludes that this solution is suitable for low-cost experimentation, while advanced users may need more professional deployment methods.
Related articles

DSH + Ollama Local LLM Deployment in Practice: Free Chat with Da Fei Yu
Bilibili creator tests DSH + Ollama local LLM deployment end to end: Ollama install, Xunlei-accelerated downloads, ModelScope GGUF model import, DSH custom API address setup, and a comparison of Qwen 3.5 4B, 8B, Gemma, and other models on 8GB VRAM, with advice on choosing local deployment vs. API calls.

Tested: A $899 Mac Mini vs. a $200/Month AI Subscription
Real-world test of whether an M4 Mac mini can replace a $200 AI subscription: 16GB can't fit large models, and both speed and quality fall short—but privacy, no caps, and near-zero running costs make it an ideal host for an always-on agent. Includes buying advice per configuration and money-saving strategies.

RSTGameTranslation: Real-Time OCR Localization + Offline Translation with Local LLMs
RSTGameTranslation is an open-source real-time Windows game translation tool: OCR for English, Japanese, and Korean with Chinese overlays in place, plus Ollama or LM Studio local LLM offline translation and Whisper speech transcription for games, manga, and visual novels.