VS Code Copilot Agent Fully Explained: 36 Concepts in One Go

Copilot Agent mode executes real operations through the tool-calling loop; this article systematically maps out its core concepts and usage.
The article points out that the essential difference between VS Code Copilot's Agent mode and ordinary chat is the Agentic Loop: the model can read files, modify code, run commands, and iterate based on real results rather than guessing. Copilot has three entry points (VS Code chat panel, CLI, GitHub Coding Agent), essentially the same Agent. To master it, you need to understand that Tools grant action capability, Prompt and context references reduce guessing, the context window is limited short-term memory, Instructions/Prompt files/Skills are work rules, MCP connects external services, Hooks trigger automatically, subagents share tasks, Checkpoint provides short-term rollback, and Git/WorkTree handles long-term version management. Finally, it emphasizes that the key to cost control is cutting tasks smaller and keeping context clean, not saving input words.
Why Is Your Copilot Just a Chatbot?
Most people install Copilot for VS Code and only use its autocomplete, at most asking a few code questions in the chat panel. But what truly turns Copilot into an AI Agent is Agent mode in the chat panel.
The fundamental difference between ordinary chat and Agent mode is this: the tasks you hand off become actual operations on your computer. For example, if you say "get all the tests in this project passing," it will first read files, modify code, run tests, see the errors, fix them, and keep going until the tests actually pass. This "read–modify–run–check results–modify again" loop is called the Agentic Loop, and it's the most essential difference between an Agent and a chatbot—it isn't guessing, it's looking at results.
According to a systematic breakdown by a Bilibili creator, this system involves over thirty concepts, but you don't need to learn them all on day one. The key is to first recognize the names, know what each one governs, and when you open the settings panel, know which part of the system you're adjusting.
Three Entry Points, One Agent
Copilot has three entry points, which are essentially the same Agent:
- VS Code chat panel (shortcut CMD+Control+I): file tree on the left, code in the middle, chat on the right—this is the most common view
- Copilot CLI in the terminal: after installation, type
copilotto use it, suitable for server environments or when you don't want to open an editor - Coding Agent on GitHub: assign tasks on the web, it runs in the background and opens a PR to hand back
The step beginners most often miss is the working folder. Whatever you want the Agent to see, open VS Code in that folder. Suppose you want to organize ten customer interviews—first create an interview project folder, put the records in it, then open that folder with VS Code, and tell it to read. By default it only operates within the workspace you have open—get this step right, and most of the confusion later won't happen.
The Key Difference Between the Agentic Loop and Ordinary Code Completion
Copilot was initially known for "Completion": predicting the next line based on the code before the cursor. This approach doesn't execute or verify; it only relies on patterns in the training data. Agent mode introduces the tool-calling loop (Agentic Loop): the model no longer only outputs text—it can issue structured requests like "read file," "modify file," or "run command," and the system executes them and passes the results (success or error) back to the model as new context, which the model uses to decide the next step. This closed loop lets the model correct its behavior based on real feedback instead of one-shot guessing. Understanding this makes it clear why an Agent can "get tests passing" while completion cannot—completion has no execution power; the Agent does.
The Agent's Hands and Feet: Tools
The model itself has no hands or feet—it can talk but can't move your computer on its own. What makes it move is called Tools. To start, knowing three types is enough: read file, modify file, run command. When you see it reading files, modifying code, or running commands, that's it using tools. You don't need to specify which tool to use at each step—state the goal clearly, and it will choose on its own; the tool passes the execution result back, and only then does it know whether the last step succeeded.
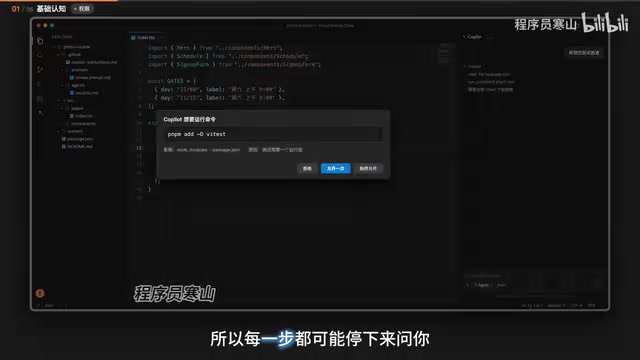
Permission prompts are the most important interaction in Agent mode. The Agent can create files, modify files, delete files, and run commands, so at each step it may stop and ask whether to allow the operation. When you see a permission prompt, first understand what it's about to do and which files it affects, then decide; if you don't understand, just deny it and ask, "What were you trying to do just now? I didn't follow." This way you accumulate your own understanding while using it. Which operations can be auto-approved and which must ask you can all be adjusted in settings.
Prompt and Context: Say It Clearly, Hand It Over
A Prompt is the request you input to the AI. No special syntax is needed, but the more specific the request, the more it knows which direction to go. Saying only "make me a website" is too vague, leaving too many details for it to guess. You could say: make a signup page for a weekend photography class, include the course time, location, and sample works, and link the signup button to my existing form—this not only says what should be there but also what the page is for. If you haven't thought it through yourself, you can ask it in the Prompt to ask you first.
VS Code has a capability ordinary chat doesn't: referencing context. In the input box, typing # lets you directly specify a file, folder, or symbol; typing @ lets you specify the workspace, terminal, or an extension. This isn't a gimmick—its purpose is to keep the Agent from guessing where to find information; you hand the files it should read directly to it, so it won't rummage through the entire project. Typing / in the input box brings up a list of commands, such as explain code, generate tests, fix errors; typing /init makes it read through your project and help you generate an initial custom instructions file.
Context Window: The Agent's Short-Term Memory
The context window can be understood as the Agent's short-term memory—the requirements you give, the files it reads, the command output all go here, and capacity is limited. If you first have it organize interviews, then modify the website, then plan an itinerary, these unrelated pieces of information pile up together and short-term memory gets messy. It's recommended to start a new session when switching to unrelated work.
This capacity is measured in tokens. When the model processes text, it cuts the text into small pieces, and these pieces are called tokens. One token doesn't necessarily equal one Chinese character, nor one English word. The requirements you input, the materials it reads, and the answers it gives you all count. Even if you only type "help me organize these ten interviews," it still has to read those ten files—that's input, producing the report is output, and billing looks at the total of the whole process, not how many words you typed.
Close VS Code and open it tomorrow—the chat history is still there, and you can retrieve previous sessions from the chat panel history and continue. A session gets long if you work on the same thing for a while, and the context fills up quickly—Copilot CLI automatically compresses when it's almost full, condensing the earlier process into a summary; in VS Code you can also start a new session and carry the conclusions over, but summaries will inevitably lose details, so have important things saved as physical files—for example, write the outline and progress into a markdown and have it read that next time.
The Relationship Between Tokens and the Context Window
A token is the smallest unit for the model to process text. In English, about 1 token corresponds to 0.75 words; in Chinese, one character may take 1 to 2 tokens. The context window refers to the maximum number of tokens the model can receive in a single call, usually including the system prompt, conversation history, tool return results, and the output the model is about to generate. Different models have different window sizes—for example, GPT-4o is about 128k tokens, Claude 3.5 Sonnet is 200k tokens. When conversation history or tool output exceeds the window limit, the system must truncate or compress, which explains why long sessions lose details and why you should actively manage context.
Global Settings: Instructions, Prompt Files, and Skills
Copilot Instructions.md in the GitHub directory is the most cost-effective setting—it's the work manual you write for the Agent. If you have to repeat "answer in Chinese" or "this project uses pnpm" every time you start a new session, those words should go into this file; it automatically reads it at the start of every job. It's essentially a plain Markdown text file—no code needed, just write in Chinese. If you don't know what to write, type /init in the chat to have it generate a first version based on the project; after generation, you must read it yourself to confirm its understanding isn't off, then add the rules you care about.
Where this file is placed determines how wide its scope is: put it in the repository's .github directory and it applies to the whole project; you can write a separate instructions file for a specific directory, effective only in that directory—for example, frontend uses React, backend uses Fastify, each writes its own without interfering; personal preferences like "always answer in Chinese" go in user-level settings; project-specific information like "what this client is called, where the original materials are" stays in the project. Distinguish the levels so that when you switch to another project, you won't bring the previous client's rules along.
Some requirements aren't a single sentence but a whole process. For example, every code review has a fixed order: first logic, then edge cases, finally security. This set of steps can be saved as a prompt file in the .github/prompts directory; next time just type a slash in the chat box to bring it up directly. If the process is longer and includes scripts and templates, it should be made into a Skill—a folder containing a SKILL.md that clearly states when to use it, the specific steps, and what each step does. The key is how it loads: the Agent normally only sees a one-sentence description of each Skill, and only reads the detailed content when the task really needs it. This design is called progressive disclosure—because context is expensive, you can't stuff all the manuals in at the start. VS Code directly supports Skill folders, and it uses the same open standard as other tools.
MCP, Hooks, and Extensions: Plugging in Capabilities
The previous section was about what it can do; this section is about what it shouldn't see. Not every file in your workspace is suitable for it to read—some files contain database passwords, some are customer contact information. If this time you're just changing a title on a webpage, it doesn't need to read those at all.
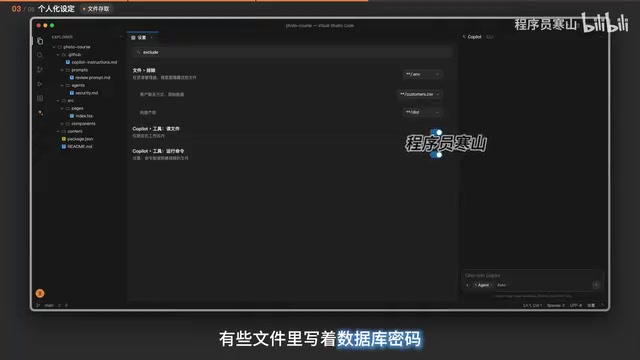
You can exclude these files through settings or block them with permissions. But there's a blind spot: you block the file-reading tool but allow it to run commands, and some commands themselves can print file contents—so don't think blocking one tool makes you safe. For beginners, the most reliable approach is to put only the materials really needed this time into a clean separate folder.
In real work, materials don't all lie obediently in your folder: some are in cloud notes, some on calendars, some in Jira or Linear. For the Agent to truly help you with daily chores, it needs a standard pipeline to connect these services—MCP is that standard protocol. Connecting a Server in VS Code's MCP configuration is like adding a new set of tools: connect a calendar and it can help you summarize next week's schedule; if that service can also create events and you've granted permission, it can even put meetings on your calendar. How deep it can go depends on what tools that service provides and what permissions you allow.
Be especially clear that Skill and MCP are two different things: a Skill is a method—first read the meeting notes, then write the weekly report; MCP is a capability—the tool that actually gets those meeting notes. You can't just write a Skill and suddenly it can log into your calendar account.
Hooks are another category: event triggers. For example, set it so that every time it finishes modifying code, it automatically runs formatting, or force a type check before it wraps up. With Hooks, you don't need to repeatedly type the same request on the side every time. Things requiring judgment go to Skills; things that must be mechanically executed go to Hooks.
The Basic Principles of the MCP Protocol
MCP (Model Context Protocol) is a standardized protocol proposed and open-sourced by Anthropic, designed to let AI applications connect to external data sources and tools in a unified way. It uses a client-server architecture: Copilot acts as the MCP client, connecting to MCP servers (such as calendar services, databases, Jira, etc.) through configuration, and the server declares to the client what tools and resources it provides. The Agent calls these tools when needed, just like using built-in tools. The value of MCP lies in decoupling—the service provider only needs to implement an MCP server once, and any AI client supporting MCP can connect, without developing a separate plugin for each client.
Subagents, Checkpoints, and Version Management
A Subagent can be understood as a little assistant it assigns to you, suitable for tasks that are good but don't need you watching the whole time. For example, the main conversation is writing a long report, and halfway through it needs to look up three very long documents—rather than stopping the main conversation to read, it's better to send a subagent to do this drudgery. The subagent has its own independent context window; the messy materials it reads and the detours it takes stay on its side, and the main conversation only receives its final conclusion.
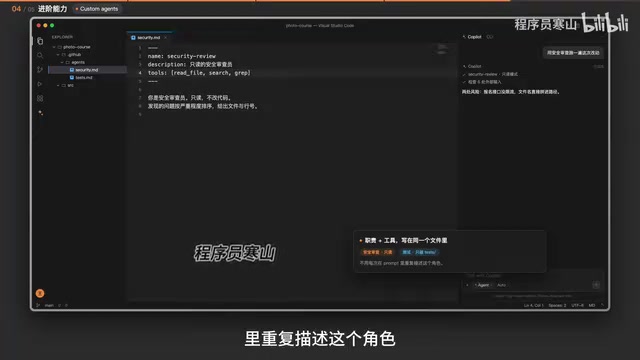
But when assigning the task, be sure to specify what to hand back. If you say "read this material," it might actually paste the whole original text back, and the context still explodes; say "only return bullet-point key points, sources, and places where contradictions are found," and what the main conversation receives will be clean. If several things are completely independent, you can even send several out in parallel at the same time. If a certain type of task is always handed to the same role, you can fix it—write a file in the .github/agents directory specifying its responsibilities and which tools it can use, for example, a security review specialist that only reads and doesn't modify, or a test-writing specialist that only touches the test directory.
The first life-saving feature is checkpoints. You've surely had this experience: you let it make a big overhaul, only to find the direction completely wrong, and you just want to return to the state that was working a moment ago. VS Code leaves revertible states in the background when the Agent modifies files; you can revert to a previous step in the conversation, restore the files, and then try again with a clearer Prompt. But it's not a time machine for the whole computer—it can only restore content it modified through editing tools; if it modified through commands, or other software also touched these files, it can't be undone.
For short-term regret use checkpoints; for long-term version management use Git. When you get the project to a satisfactory state, save a commit with a note; a few days later when a feature breaks, you can compare history to see which change broke it, and if it really can't be fixed, switch back to the previous working version. Many beginners confuse Git and GitHub: Git is a tool installed on your computer, GitHub is the website for hosting code; you can absolutely use Git quietly on your own computer without registering any account.
Sometimes you want to work in two sessions at once—one changing the homepage layout, one fixing a bug in the signup form. If both sessions operate on the same folder, they will likely modify the same file, overwriting each other's changes, and the project gets messy. WorkTree solves this: the same repository grows several independent working directories, each responsible for an independent development line, called a branch in Git; each side modifies its own, merges when done, and they share the same history. But remember, WorkTree only isolates files on your local machine—if both sides connect to the same online database, changes there won't be isolated.
The Mechanism of Git WorkTree
Git WorkTree allows the same repository to check out multiple working directories at the same time, each corresponding to a different branch. Traditionally, switching branches requires stashing or committing current changes, while WorkTree lets files of different branches exist simultaneously at different paths on disk without interfering. For example, the main working directory at ~/project corresponds to the main branch; you can run git worktree add ../project-feature feature-branch to create the ~/project-feature directory and check out feature-branch. The two directories share the same .git object database and history, but the working files are independent. This solves the file conflict problem when multiple sessions modify the same repository in parallel, but as the original article says, it only isolates local files, not shared external services (like databases).
Model Selection and Cost Control
Behind Copilot is not one model but a row of models; you can switch at any time in the model selector above the chat panel. Fast models are cheap, but sometimes they don't understand human language and make you redo three times, which may not be worth it in the end. Beginners can just use the default; once you have fixed, frequently done tasks, run the same sentence through different models and compare the results—compare not just speed, but more importantly whether what it delivers can be used directly.
Some places give you a reasoning effort option: just renaming a file doesn't require it to think long; if it's a recurring bug that needs analyzing clues and comparing causes, it's worth turning up. Higher is slower and more expensive, and doesn't guarantee more correct; beginners use the default, and turn it up when encountering problems that really need careful judgment.
Finally, the most realistic issue: money. Copilot currently has two main ways to spend: one is a subscription with a monthly fee for a certain quota, the other is pay-as-you-go based on usage. Quotas are now often converted by usage—one Agent task run may involve dozens of tool calls behind the scenes, so one request you see may be dozens of model calls behind it, which is why people feel Agent is much more expensive than chat. To control costs, the most effective way is not to save a few lines of text, but to cut tasks smaller and keep context clean—making it take fewer detours saves more money than making it talk less.
One Map: What Each of These Concepts Governs
Let's string today's things together: the chat panel is your entry point for giving instructions, Tools are the hands that let it actually act, context is what's in its head at the moment, instruction files, prompt files, and Skills are the work rules you stuff into it before starting; if built-in capabilities aren't enough, connect MCP; if the task is too big, send a subagent; if code gets messed up, use checkpoints short-term, Git and WorkTree long-term.
You absolutely don't need to learn all of this on day one. First recognize these names and know what each governs; later when you watch advanced tutorials or open the settings panel, you'll know which part of the system you're adjusting—that's what this video really wants to give you: a map.
Related articles

DeepSeek Harness in Detail: DIY Your Own Software Like Building with LEGO
What is DeepSeek Harness? Using the metaphor of a car assembly platform, this article explains this equipment system of freely combinable functional modules, analyzes its spatiotemporal composability technical foundation, and shows how ordinary users can DIY exclusive software that does not exist on the market at extremely low cost.

DeepSeek Harness Step-by-Step Tutorial: Master DSH and Its Plugin Ecosystem in 50 Minutes
DeepSeek Harness step-by-step install tutorial: from Node.js environment setup to client installation, covering three plugin install methods — chat, marketplace, and command line — plus practical uses of local file access and plugin extensions.

DeepSeek Open-Sources Super-agent Architecture: A Turning Point for Proactive AI
DeepSeek's open-source Super-agent architecture proposes a new proactive AI paradigm: a central Agent dispatches tasks, sub-Agents execute autonomously, and humans only decide and accept. This article analyzes the watershed between passive and proactive AI, and the implementation logic of proactive Agents in scenarios like short-video lead generation.