AI Game Development in Practice: Letting Agents Fix Their Own Bugs, Clean Up Pixel Art, and Repair 3D Models

Using MCP loops, script cleaning, and version locking to plug AI into a reproducible game dev workflow.
The article uses a Bilibili creator's demo to show AI's complete game-dev loop: Godot's text scenes and headless errors let Agents self-fix code over three real rounds via MCP; AI pseudo-pixel art is cleaned in seven steps from 30K+ colors to a 9-color 32x32 sprite; image-to-3D models are repaired by headless Blender scripts, cutting 48K faces to 2,800 and fixing normals and origins. It stresses version locking, stage-gated MCP, script QC, and runtime screenshot checks, concluding that a one-page brief plus runtime verification beats piles of design docs.
Title
AI Game Development in Practice: Letting Agents Fix Their Own Bugs, Clean Up Pixel Art, and Repair 3D Models
Meta Description
AI Game Development in Practice special edition: using Godot MCP to let an Agent fix its own bugs in three rounds, a seven-step script that cleans a 30,000-color AI pixel image down to a 9-color 32x32 sprite, and a headless Blender script that reduces a 40,000-face dirty model to 2,800 faces while fixing normals and origin points. Includes a budget checklist for enabling MCP by stage and cleaning 3D assets.
Article Content
When AI learns to run the game itself, read error messages, and modify code, the way game development teams collaborate changes. The special edition from Bilibili creator "AI Game Development in Practice" demonstrates a complete closed loop: using Godot MCP to let an Agent automatically fix syntax errors within three rounds, using a script to clean a 30,000-plus-color AI pseudo-pixel image down to a 9-color 32x32 sprite, and then using a headless Blender script to reduce a 40,000-face dirty model to 2,800 faces while correcting normals and origin points. This is not a concept demo — it is a reproducible workflow.
1. Engine Choice Determines the Ceiling for AI Collaboration
Godot's Text-Based Scenes Are a Natural Interface for Agents
Godot's .tscn scene files are pure text, with nodes and properties laid out line by line, so AI can read and modify them directly. Want to crank up the collision kernel? Just change that one line — you won't disturb unrelated configuration. By contrast, Unity scenes are text but rely on heavy ID cross-referencing, making hand edits by AI extremely error-prone; Unreal's Blueprints are binary, completely invisible to general-purpose Agents.
The creator's division-of-labor principle is clear: Godot is the first choice for the full pipeline — the headless command starts up within a second and spits out errors, perfectly matching the Agent's debug loop; web engines suit Vibe Coding, with the most JavaScript training data, paired with Playwright for automatic screenshot verification; for Unity, have AI write only C# and leave scene manipulation to Unity MCP; for Unreal, focus on C++ and connect a dedicated bridge.
Version Locking Is the First Lesson You Can't Skip
General models' training data still contains plenty of Godot 3-era syntax, frequently producing things like KinematicBody2D.export, which throws errors immediately in Godot 4. The correct form is CharacterBody2D and @export, and move_and_slide no longer takes arguments. The solution is to place an agents.md file in the project root specifying 4.x syntax locked in, and hook up Context7 to pull official docs in real time. Claude Code's CLAUDE.md, Copilot's instruction file, and Cursor's rules all reference this one file, so switching tools doesn't require rewriting the rules.
2. MCP: Giving Agents Hands and Eyes
Agents can write code but can't see what the game looks like when it runs — what the creator calls "runtime blindness." MCP (Model Context Protocol) is the remedy: launch the engine, read errors, modify scenes, forming a closed loop. In the demo, all three rounds of fixes came from real Godot 4.6 output: in round one, the export keyword had been removed, and the Agent changed it by line number; in round two, KinematicBody2D couldn't be found, so it was changed to CharacterBody2D; round three passed. The original error text is automatically returned, no manual copy-paste needed.
Each engine has ready-made MCPs: for Godot beginners, start with cod-in-solo's Godot MCP — commands weld on as an external add-on with zero intrusion; when you need to collaborate with the editor, switch to an MCP Bridge with an undo system. For Unity, Coplay Dev's Unity MCP is the first choice, and Blender has MCP for Blender that can directly run Python modeling. Two more are near-essential: Context7 to pull the latest docs and prevent hallucination, and Playwright to automatically open the browser and take verification screenshots.
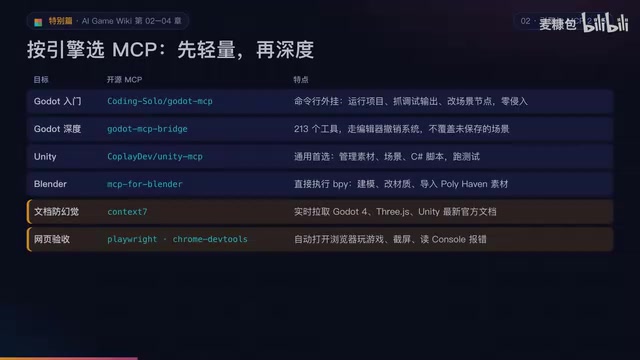
The most common mistake after installing many MCPs is enabling them all at once. Each MCP server stuffs dozens or even hundreds of tool descriptions into the context, wasting tokens and making the model more likely to pick the wrong tool. The correct approach is to enable by stage: for 2D, only enable Godot and Context7; for 3D assets, enable Blender; for web verification, enable Playwright.
Hands and eyes aren't enough — AI also needs domain expertise. awesome-game-dev-agent-skills collects 76 skills, loaded on demand via a router — ask about jump feel and only the game feel, physics tuning, and platformer skills are loaded, with the other 70-plus not occupying context.
3. The 2D Pipeline: Tune Feel First, Then Clean Pixels
Coyote Time and Hit Feel: The Invisible Forgiveness Mechanics
The first step of the 2D pipeline is not generating images, but tuning feel with blocks. In the interaction lab the creator references, coyote time is set to 120 milliseconds: press jump 0.08 seconds after walking off a cliff — with coyote time at 0, you fall straight into the pit; within the window, you still jump. Hit feel works the same way — hitstop, white flash on hit, slight screen shake, instant knockback, particles and damage numbers, each lasting only tens of milliseconds to a fraction of a second, stacking together to produce that "cutting into flesh" feeling. All of this is tuned during the gray-box stage, and the feel isn't lost when you swap in final art later.
"Coyote Time" is named after the coyote in Tom and Jerry that always hovers at the cliff edge for half a beat before falling, referring to the brief grace window during which a character can still jump after walking off a platform edge. It pairs with "Jump Buffering" (pressing jump slightly before landing still takes effect) as a classic pair of compensation mechanics designed to mask millisecond-level misalignment between player input and character state.
The value of these mechanics: players subjectively believe they "clearly pressed jump," and without forgiveness, it gets judged as an input error, producing the frustration of "this game feels bad." Common industry values are coyote time 80–150 ms and jump buffering 100–150 ms, adjusted based on character speed and gravity. They must be tuned with fixed values during the gray-box stage and written into the character controller parameters, because swapping art or animations won't change the physical feel, but changing values will — tuning feel before doing art avoids rework later.
Seven-Step Cleaning: From 30,000 Colors to Nine
Pixel art drawn by general large models is actually "a high-res illustration that looks like pixel art." A 1024x1024 AI original counted 30,671 colors, with pixel block sizes ranging from 6 to 10 pixels, a skewed grid, and 1,058 semi-transparent edge pixels remaining after keying out the magenta background.

All seven cleaning steps are handled by script: remove background (flood fill sampling color from the four corners) → measure grid (count color-block boundary distances; the most common 18 pixels is the real grid in the AI's mind) → downsample by taking the mode per cell → quantize to an Indexed32 palette (235 colors down to 9, no dithering) → binarize transparency (below 128 goes to zero) → fix isolated specks → place on a 32x32 canvas with feet aligned to the Y=31 baseline. Final result: 0 semi-transparent pixels, 0 colors outside the palette. Importing into the engine has its own iron rules: set texture filtering to nearest neighbor, disable MIPmaps and lossy compression.
Texture filtering's "Nearest Neighbor" and "Linear" are two sampling methods: linear filtering interpolates between pixels, blurring edges when scaled up; nearest neighbor takes the closest texel directly, preserving hard-edged blocks when scaled up — a prerequisite for pixel style. MIPmap is a set of pre-generated textures downscaled by powers of two, used to reduce shimmering on distant objects, but it blurs pixel art into mush at reduced viewing angles, so pixel games usually disable it.
Lossy compression (like WebP or JPEG-style block compression) introduces color noise at block edges, destroying palette purity, so pixel assets should use lossless formats or have compression disabled in-engine. Together, these three settings determine whether a "data-clean" pixel image is still pixel art on screen — the cleaning script guarantees the source data, import settings guarantee the rendered result, and neither can be skipped.
Three Routes for Sprite Sequences
When a general model generates a run cycle without reference, the helmet and sword keep changing and the two legs smear into a blob. The industry has converged on three routes: pixel-specific tools that lock a standing frame and generate from a template, then hand-fix; image-to-video frame slicing, running a green-screen loop then extracting frames, keying, and aligning center of mass; and the most thorough — upscaling to 3D then downscaling back to 2D — a headless Blender script rotates a rigged character through 8 directions with 8 frames of running per direction, scales to 64x64, quantizes, and adds outlines, eliminating sprite flicker at the root.
On the discipline side, AI-generated originals always go into the ArtSource staging area first, with .gdignore placed in Godot to prevent automatic import; only assets that pass cleaning and layout QC are allowed into assets. If using local ComfyUI, workflow files should also be committed to Git.

4. The 3D Pipeline: White-Box First, Script Cleaning
Four Iron Rules for Image-to-3D
The four main tools each have their positioning: Tripo generates fastest, with smart low-poly and auto-rigging, suited for batch calls by Agents; Meshy is the most complete all-in-one but has limits on the free tier; Tencent Hunyuan 3D has high fidelity and open-source weights that can be deployed locally; Trellis and TripoSR produce meshes quickly, suited to static small props.
Image-to-3D beats text-to-3D because 2D reference images are cheap and can lock in style first. Four iron rules for input images: pure white or neutral gray background, object centered with no shadow; characters in A-pose or T-pose, weapons generated separately and attached to bone sockets; even lighting with "no harsh shadows" specified in the prompt; for protagonists and vehicles, produce front, side, and back three-view sheets first. When the result comes back, turn off textures first and look at the white mesh; if there are holes or fusion artifacts, rerun individually.
Blender Scripts Fix the Three Common Ailments
Dropping image-to-3D results directly into the engine runs into three common ailments: sparse topology with inflated face count (the demo model had over 48,000 triangles); flipped normals causing lighting holes, plus over 800 overlapping vertices; and the origin not at the feet — the model stood 1.1 meters above the origin, floating in mid-air when placed in the scene.
The Agent writes a Blender Python script to run headlessly: merge overlapping vertices, recalculate normals outward, Decimate down to budget, move the origin to the center of the bounding-box bottom. Measured result: over 48,000 faces down to 2,800 (94% reduction), zero flipped faces, foot height from 1.1 meters down to 0. Budget reference: low-poly protagonist 2,000–5,000 faces, small props 100–800 faces, total on-screen for web under 200,000 faces, colliders always simple shapes like capsules.
There's a clever approach to style consistency: discard the messy AI-generated textures, keep only the decimated mesh, apply uniform flat shading with a solid palette color, and use the same set of environment lights. Even if models come from three different AI tools and free asset packs, they blend seamlessly in the same scene.

Finally, assemble and verify in the engine: set up three test cameras — front view, 45-degree top-down, and character close-up — and automatically screenshot and send to an independent multimodal Reviewer Agent to check proportions, exposure, and UI readability against concept art. Unify formats to GLB, which has the best compatibility with Godot, three.js, and Unity.
Decimate is Blender's built-in mesh simplification modifier; its core algorithm is edge collapse: repeatedly finding the edge whose merging has the least impact on shape, collapsing two vertices into one, until reaching the target face count or ratio. It has three modes — Collapse simplifies by ratio/face count and is most commonly used; Un-Subdivide targets regular meshes produced by subdivision modeling; Planar merges coplanar regions by angle, suited to hard surfaces.
For dirty AI-generated models, using Collapse directly tends to over-collapse in detail-dense areas (fingers, weapon edges). The safe approach is to first merge overlapping vertices, recalculate normals, then use Decimate with "preserve boundaries" enabled, and use vertex weights to protect key areas if necessary. After decimation, also check whether UVs are still usable — if you follow the article's route of "drop textures, uniform solid-color flat shading," UV problems resolve themselves, which is why this stylized approach is especially hassle-free on AI asset pipelines.
5. The Most Common Mistake: Piles of Documentation, Ungameable Game
The creator tested a counterintuitive conclusion: the standard mode of first having AI write 30 design documents scored last in blind tests; the minimalist mode of writing a one-page brief, immediately writing code, and verifying with runtime screenshots performed best. Documentation is for aligning boundaries — the running screen is the only truth.
Three practical recommendations: enable MCP configuration by stage; write debugging rules in prompts and set a round limit (e.g., max 5 rounds, stop and report if exceeded); sprite post-processing scripts should print color count, semi-transparent pixel count, and out-of-palette color count — the latter two must be 0 — and also output a QC layout sheet with grid lines — scripts can check numbers, but whether the legs are actually striding needs eyes; run the Blender cleaning script on one model first to show you, then batch.
One sentence tying it all together: lock the version, hand scenes to MCP, enable MCP by stage, use nearest neighbor for pixels, don't expect scripts to handle legs, and don't generate an entire level with one large model. You are the director; AI is your team.
Background
MCP (Model Context Protocol), proposed by Anthropic in late 2024, is an open standard that defines how AI applications connect to external tools and data sources. Think of it as the "USB-C port of the AI world": previously, each Agent connecting to a new tool (launching Godot, reading files, calling a browser) required dedicated adapter code; with MCP, tool providers only need to implement an MCP server exposing "tools," "resources," and "prompts," and any MCP-compatible client (Claude Desktop, Cursor, Cline, etc.) can plug and play.
In game development, an MCP server is essentially a local process communicating with the Agent via standard input/output or HTTP. The Agent sees tool names, parameter descriptions, and return values, so "run the engine and get the error" becomes a single tool call. This is the precondition for the article's "three-round fix" to close the loop automatically — errors are no longer text on a screen but structured tool return results that feed directly into the next round of reasoning.
One-line Summary
Using MCP closed loops, script cleaning, and version locking to plug AI into a reproducible game development workflow.
Paragraph Summary
Using a Bilibili creator's hands-on demo as a thread, the article shows the complete loop of AI in game development: Godot's pure-text scenes and headless error output let Agents automatically read errors and fix code, with MCP enabling three real fix rounds; AI pseudo-pixel images go through seven script-cleaning steps, converging from 30,000-plus colors to a 9-color 32x32 sprite; image-to-3D models are fixed by headless Blender scripts for the three common ailments of inflated face count, flipped normals, and floating origins, going from 48,000 to 2,800 faces. The author emphasizes version locking, enabling MCP by stage, script-based QC, and runtime screenshot verification, and offers a counterintuitive conclusion: a one-page brief plus runtime verification beats piling up design documents.
Related articles

9 AI Subscription Plans Compared: The Real Cost Per 100M Tokens Revealed
Bilibili creator tests 9 AI subscription plans from Volcano, Alibaba, Tencent, Baidu, Zhipu, Xiaomi, MiniMax and more, converting them all to real cost per 100M tokens, breaking down fixed-quota vs. three-tier coefficient billing and how caching, time-of-day discounts, and window limits affect actual quota.

Vibe Coding for Beginners: Expressing Intent Instead of Handwriting Code
What is Vibe Coding? A 137-episode Bilibili course defines it: the core is expressing intent, not writing code. This article analyzes Vibe Coding's productivity logic, target audience, and entry expectations to help beginners decide if it's worth learning.

LangChain Beginner's Guide: An Agent Development Roadmap from LangGraph to Deep Agents
Clarify the encapsulation relationship among LangChain, LangGraph, and Deep Agents, and master the learning path and selection logic for agent development frameworks—suitable for beginners in large model development.