Cherry Studio + MCP + Ollama: The Complete Guide to Building a Local AI Agent and Private Knowledge Base

Build a fully local AI agent and private knowledge base with Cherry Studio, MCP, and Ollama.
This guide walks through setting up a local AI automation stack using Cherry Studio, MCP, and Ollama. It covers configuring online and local LLMs, installing three MCP tools (file system, Firecrawl, and mcp-shell) for web scraping, report generation, and terminal control, and building a fully local RAG knowledge base using Qwen3 and an embedding model — keeping all data on-device.
Article Content
As AI applications become increasingly accessible, more and more people want a dedicated AI assistant to handle tedious daily tasks, or a local knowledge base to support learning and work. This guide provides a hands-on walkthrough of how to use the Cherry Studio + MCP + Ollama trio to build an automated AI agent from scratch, paired with a fully local private knowledge base.
The entire setup is divided into three main sections: Initial Setup, Building the AI Agent, and Building a Personal Knowledge Base. The end result includes three practical tools — web data scraping to generate CSV files, automated research report generation, and remote computer control via terminal — plus an employee handbook Q&A system powered by local large language models.
Part 1: Initial Setup
The first step is installing Cherry Studio. It's a client that supports multi-model integration and the MCP protocol. Simply download and install it from the official website — the process is straightforward and requires no additional configuration.
Configuring Online Model APIs
Even though we'll be deploying the local Qwen3 model later, there's an important caveat: smaller local models may not support MCP tool calls. It's therefore recommended to first configure the online SiliconFlow API.
About SiliconFlow: SiliconFlow is a leading AI inference cloud platform in China, focused on providing developers with cost-effective large model API services. Its core technology is based on a proprietary inference acceleration engine that significantly reduces inference costs through batch optimization and KV Cache reuse. The platform supports mainstream open-source models including DeepSeekAd, Qwen, and LLaMA, and provides an OpenAI-compatible API format for seamless model switching. It offers a free quota of 20 million tokens, making it ideal for agent tasks that require long context windows and tool-calling capabilities — a great starting point for individual developers and learners.
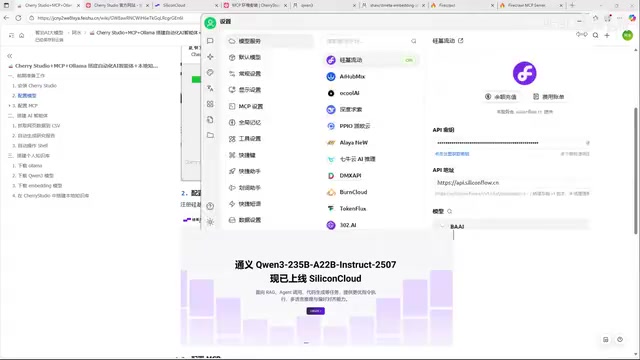
Configuration: Log in to SiliconFlow to get your API key, then go to Cherry Studio's bottom-left Settings → Model Services, find SiliconFlow, paste in the key, and click Test. A "Connection Successful" message means you're good to go.
Configuring the MCP Runtime Environment
MCP (Model Context Protocol) is the core that gives AI agents their "ability to act." It was officially open-sourced by Anthropic in November 2024, designed to establish a standardized communication protocol between large language models and external tools and data sources. Before MCP, every AI application had to build custom integrations for different tools — costly to develop and hard to reuse. MCP acts like a USB standard for hardware: once a tool implements the MCP protocol, any MCP-compatible AI client can call it directly, dramatically lowering the barrier to AI development and ecosystem expansion.
Cherry Studio has UV and Bun environments built in, but they need to be manually downloaded and installed in the MCP settings — they initially show a red X, which turns into a checkmark once installation is complete.
One important note: because the download relies on foreign sources, it will very likely fail. The workaround is to manually download the files via a backup link (GitHub) and place them in the designated path — this step typically requires a VPN. After installation, restart Cherry Studio to make sure the tools take effect.
You'll also need to install Node.js on your computer, as it's the foundational runtime environment for MCP tools. After installation, verify success by running node -v and npm -v in the terminal.
Part 2: Building Three AI Agents
Once the environment is ready, configure three core MCP tools, each corresponding to a different type of automation capability.
Tool 1: Local File Management System
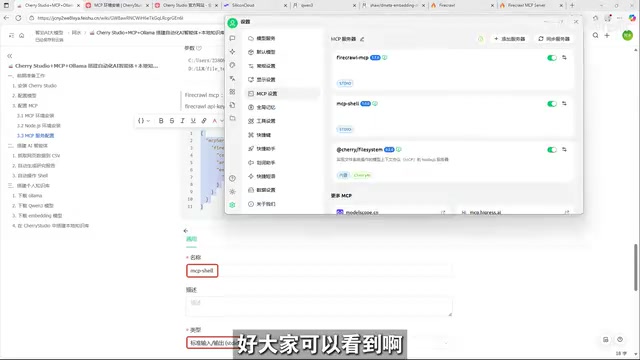
The first tool is the file system MCP built into Cherry Studio, which enables file creation, writing, deletion, moving, and copying. The key configuration detail is specifying the allowed file paths in the parameters.
A very common pitfall here: path separators must use backslashes or double forward slashes — using a single forward slash will cause errors. This is a classic Windows path escaping issue, so pay close attention.
Tool 2: Firecrawl Web Scraping
The second tool is Firecrawl, a web content scraping service designed specifically for AI applications. Its core value lies in converting complex modern web pages (including JavaScript-rendered pages) into clean Markdown or structured data formats that are directly compatible with LLM inputs. Traditional scraping tools like BeautifulSoup struggle with modern sites heavily reliant on frontend rendering. Firecrawl uses built-in headless browser technology to wait for pages to fully render before extracting content, while automatically removing noise like ads and navigation bars — significantly improving accuracy when AI processes web data. After obtaining a Firecrawl API key, go to Add Server → Import JSON and paste in the configuration to complete the integration.
Tool 3: mcp-shell Terminal Control
The third tool is mcp-shell, which lets you operate the command-line terminal — essentially giving AI remote control over your computer without you having to type commands manually. Configure it via Add Server → Quick Create: set the name to mcp-shell, type to stdio, command to npx, and fill in the parameters exactly as specified. A green indicator means it's configured successfully.
Real-World Results and Lessons Learned
With all three tools in place, here's what you can validate:
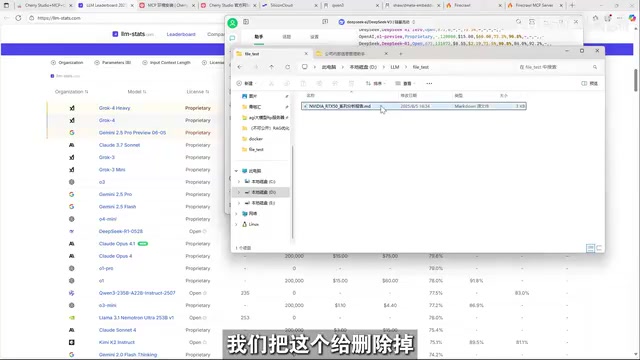
- Web page to CSV: Combine the file system and Firecrawl tools to scrape table data from a webpage and save it as a local CSV. A common issue here — the model may mistakenly try to save the file using a Python approach and fail; switching models and retrying typically resolves this.
- Automated research report generation: Have the agent search for information on a specified topic, generate a Chinese report with visuals, and save it to a designated path.
- Remote terminal control: Use mcp-shell to query the Ollama version, which successfully returns the result.
One key takeaway: model selection directly impacts task success rate. For web tasks involving large amounts of data, DeepSeek-V3 significantly outperforms smaller models due to its longer context window and stronger tool-calling capability. Agent tasks require not just instruction comprehension but also accurate judgment about when and which tool to call — that demands strong model capability.
Another debugging tip: if a specific tool isn't being triggered correctly, try temporarily disabling the other MCP tools to reduce interference, then re-run the task. This often helps the model identify the right tool.
Part 3: Building a Local Private Knowledge Base
The third section is the crown jewel of this setup — a local knowledge base where data never leaves your machine. Both the conversational model and the embedding model run entirely locally, providing fundamental information security.
Deploying Ollama and Local Models
First, install Ollama — one-click installation from the official website. Ollama is an open-source local LLM runtime framework that gained rapid popularity in the developer community in the second half of 2023. It wraps complex model quantization, VRAM management, and inference optimization into simple command-line tools, allowing everyday users to run billion-parameter models on consumer-grade GPUs without needing to understand CUDA, quantization algorithms, or other low-level technologies. Ollama supports GGUF-format quantized models and, through 4-bit or 8-bit quantization, can compress models that originally required tens of GB of VRAM down to a size that fits on a standard gaming GPU.
Next, download two models:
- Conversational model — Qwen3: Search for
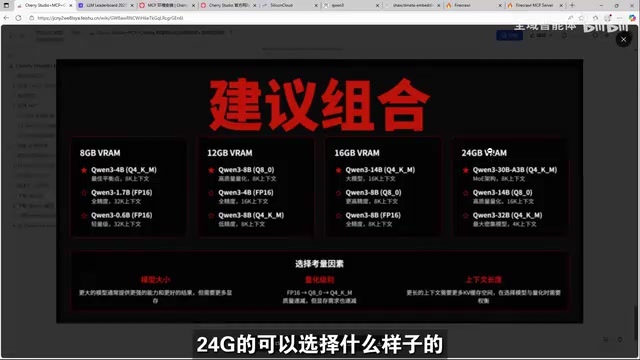
qwen3in Ollama's model library. It comes in multiple sizes: 0.6B, 1.7B, 4B, 8B, and more. With 8GB VRAM, choose a smaller variant; with 12GB/16GB/24GB, larger parameter models are available for better overall performance. - Embedding model: The embedding model is one of the core components of a RAG (Retrieval-Augmented Generation) knowledge base system. It converts text into numerical representations in a high-dimensional vector space, so that semantically similar content is positioned closer together. When a user asks a question, the system first vectorizes the question using the same embedding model, then retrieves the most relevant document chunks from the knowledge base using algorithms like cosine similarity, and finally passes both the retrieved results and the original question to the conversational model to generate the final answer. This RAG architecture effectively addresses LLM hallucination and knowledge freshness issues — it's the foundation of knowledge base Q&A.
Run the download commands directly in the terminal. The first download may take 15–20 minutes depending on your network speed.
Building the Knowledge Base in Cherry Studio
Once the models are ready, add Ollama in Cherry Studio's Model Services section. Its API address is localhost:11434. Then add the two downloaded models in the management panel and test the connection.
Go to the Knowledge Base module, create a new knowledge base, select the local Ollama embedding model, and drag your documents in to complete the vectorization. Finally, create a new assistant and assign both the conversational model and the embedding model to your local models.
In a real test, asking "How should employee absenteeism be handled?" — the system successfully retrieved two referenced passages and accurately returned the corresponding disciplinary procedures for one, two, and three days of absence, with source citations included. The results were accurate and reliable.
Summary and Model Selection Recommendations
The Cherry Studio + MCP + Ollama combination essentially integrates the reasoning capability of large language models with the execution capability of local tools, enabling AI to evolve from "just chatting" to "actually getting things done." Its core value lies in:
- Local deployment protects privacy: The knowledge base runs entirely locally, making it suitable for sensitive data like internal documents and employee handbooks.
- MCP extends capability boundaries: Through file, web scraping, and terminal tools, AI gains genuine ability to control your computer.
- Hybrid online + local strategy: Use online large models for high-demand agent tasks; use local models for privacy-sensitive knowledge base tasks — balancing performance and security.
That said, this setup does come with a learning curve: the MCP environment relies on foreign download sources and is prone to failure, and model selection significantly impacts success rates — all of which require some hands-on experience and debugging skills. But for users looking to build a personalized AI automation workflow, this is undoubtedly a practical path well worth pursuing.
Related articles

@ai-sdk/vue 3.0.306 Patch Release Syncs with [email protected] Update
@ai-sdk/vue 3.0.306 released, synced with [email protected]. A routine patch release for the Vercel AI SDK ecosystem with no public API changes; the Vue adapter layer stays version-aligned with the core package.

Gemini 4 Argon API Launches: The Era of Million-Token Output Begins
Google launches Gemini 4 Argon with sparse MoE architecture, up to 1M output tokens, and a 68.90% Vals Index score, available across API, AI Studio, and the Gemini app.

DukaanAI: Turning Product Photos into Inventory Lists with Open-Source AI
DukaanAI is an AI inventory tool for small retailers that turns product photos into inventory entries using the open-source Gemma 3 model, with local inference, editable fields, and CSV export.