Claude Code Beginner's Guide: Building a General-Purpose Office AI System from Scratch

Build a no-code office AI system using Claude Code, VSCode, and CC Switch with progressive context injection.
This guide walks beginners through setting up Claude Code with VSCode and CC Switch to build a general-purpose office AI system without any programming. It covers environment configuration, project structure, the progressive disclosure context injection mechanism, and how agents, skills, commands, and hooks work together to create deterministic AI workflows.
Why Choose Claude Code Over Codex for Getting Started
For users looking to build a general-purpose office AI system, choosing the right tool is crucial. While many recommend OpenAI's Codex, from a learning perspective, Claude Code (CC) is a better entry point.
Here's why: Codex, as a desktop-level product, encapsulates much of its underlying design internally, making it difficult for users to observe its operating mechanisms. Claude Code's structure is more transparent and intuitive, allowing us to clearly see the underlying logic of context injection, model routing, and more. After mastering CC, migrating to Codex takes only a few minutes — the usage logic is essentially the same, and you can even work with both platforms simultaneously.
More importantly, this tutorial series targets general office scenarios and involves virtually no programming code. We simply use Claude Code as an intelligent assistant's working platform.
Environment Setup: VSCode + Claude Code + Model Routing
Installing VSCode and the Claude Code Plugin
First, install VSCode as the runtime framework. Although VSCode is programming software, we're only using it as a file management system. After installation, you need to install two extensions:
- Chinese: Localizes the interface to Chinese
- Claude Code for VSCode: The official plugin — make sure to verify the publisher is official
After installing the Claude Code plugin, a new icon appears on the left sidebar. Click it to enter the conversation interface.
Configuring Model Routing (CC Switch)
If you're not using Claude's official subscription, you can connect to domestic models through the CC Switch tool. This open-source tool supports not only Claude Code routing but is also compatible with Codex, Crawfish, Hermes, and other platforms.
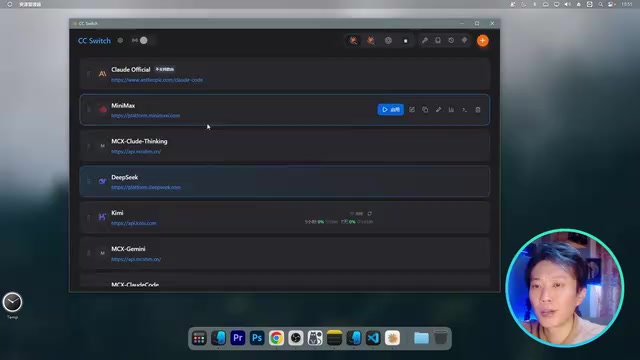
Configuration steps:
- Download the CC Switch portable version and run it
- Select "Cloud Code" routing mode
- Add an API provider (e.g., DeepSeekAd) and enter the API Key
- Assign models to the three model slots: Sonnet and Opus map to V4 Pro, Haiku maps to Flash
- Click "Enable" to select the current API route
Once configured, minimize CC Switch and restart VSCode for changes to take effect.
Project Structure Explained: Understanding the AI System's Skeleton
Creating a Project and Initialization
Create an empty folder as the project workspace — think of it as allocating a "hard drive" for your AI assistant. After opening the folder in VSCode, place the claude.md seed file in the root directory, then use the conversation to have Claude automatically initialize the project structure.
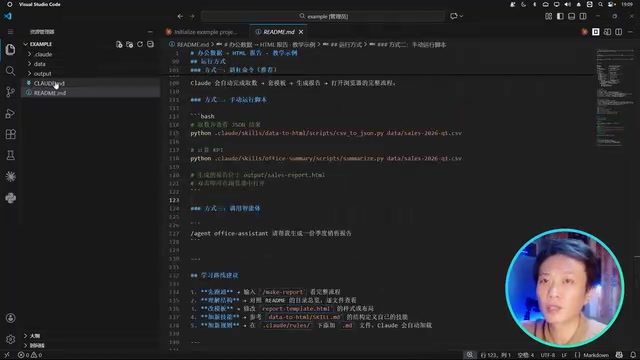
In the VSCode plugin, use the slash / to bring up the command list, and click the plus sign to add files to the context. After selecting a model and sending the initialization command, Claude will automatically generate the complete project files.
Core File Hierarchy
Once generated, the project structure looks like this:
Root directory files:
README.md: Project description, meant for humansclaude.md: The most important file — the initial context for the AI, fully injected into every conversation
Custom folders:
data/: Stores office data (e.g., CSV spreadsheets)output/: Stores generated results
.claude/ directory (core configuration):
agents/: Role definitionsskills/: Skill definitionscommands/: Shortcut commandsrules/: Constraint ruleshooks/: Trigger scripts
Context Injection Mechanism: The Progressive Disclosure Principle
Hierarchical Context Loading
Understanding the context injection logic is key to mastering Claude Code. Document hierarchy ≠ context hierarchy — only a few special files actually affect the context:
- claude.md (fully injected): Loaded on every startup, describes the environment, project structure, and available tools
- Agent (loaded on demand): Fully injected when a role is selected, defining responsibility boundaries and workflows
- Skills (loaded on demand): Detailed instructions for corresponding skills loaded during role execution
- Rules (dynamically inserted): Automatically triggered at specific stages to calibrate execution deviations
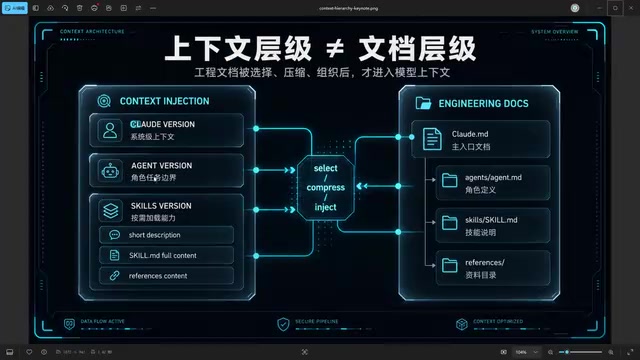
This is the core concept of "progressive disclosure": each file has a "summary" of under 100 tokens at the top, letting the model know what resources are available. The full content is only loaded when activated.
Commands: Shortcuts for Chaining Workflows
Commands essentially chain multiple Skills into a single execution pipeline. For example, the /make command automatically invokes the data extraction skill first, then the HTML generation skill.
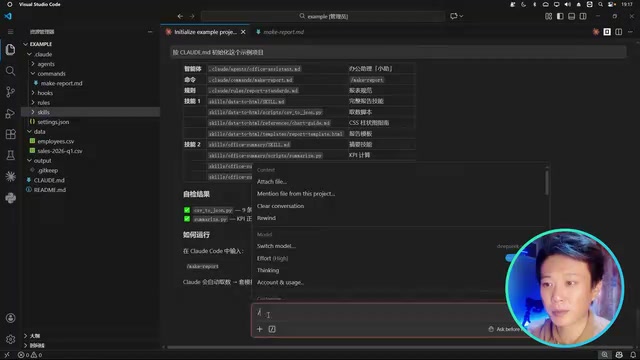
You can describe workflows in natural language without Commands, but Commands make operations more efficient — a single slash launches a complete generation pipeline.
Hooks: Bridging Determinism and Non-Determinism
Hooks are pre-written scripts that automatically trigger at specific moments (before/after commands, before/after conversations). Their core value lies in:
Model generation is random and non-deterministic; workflows are deterministic. The essence of an AI system is using deterministic tools and code on top of the model's generalized uncertainty to make it more stable.
For example, proofreading after each generation would consume massive tokens if done repeatedly by a large model, but calling a script via Hooks accomplishes it at zero cost.
The Stacking Mechanism of Global and Project Configurations
claude.md can be placed not only in the project root directory but also in the .claude folder under the system user directory, serving as a global context. Both stack together:
- Global claude.md: Contains personal habits, conversation style preferences, and other universal settings
- Project claude.md: Contains specific project environment descriptions and work specifications
Similarly, global Skills can be placed in the user directory and called from any project. However, watch out for naming conflicts — Skills with the same name in global and project scopes will cause override issues.
Practical Advice and Learning Path
For beginners, it's recommended to understand Claude Code in this order:
- Prompts: Constructed through natural language — large models can now help us write these
- Context injection rules: The core mechanism you must understand manually
- Execution logic and workflows: Systematically organized on the foundation of understanding context
The claude.md file needs to be "concise yet detailed" — thoroughly explaining the environment and rules, but not so lengthy that it becomes a development document or journal. Otherwise, the context overhead for each conversation becomes enormous.
Once you've mastered this structure, you can start building your own office AI system: define roles (editor, operations, designer), configure skills (data analysis, content generation, image design), set up command shortcuts, and make AI truly your intelligent work partner.
Related articles

Apple HomeView Hands-On Review: Is the $300 Smart Home Hub Worth It?
Apple HomeView hands-on: a $300 smart home hub with facial recognition for quick account switching, but no App Store or voice recognition. Is the wall-mounted version worth it? Should you buy the first generation?

Meta Muse Wonder Launch: What It Means for Meta's Return to the Frontier AI Race
Meta releases Muse Wonder and WonderFull, benchmarks reach the frontier, community feedback is polarized. An in-depth look at Meta's return to the frontier AI race, its personal agent strategy, and Zuckerberg's different path.

Apple Home Smart Home Lineup Leaked: LG and Schneider Team Up, UWB Door Lock on Board
Apple Home ecosystem gains new LG and Schneider devices: UWB smart lock with proximity unlock, 2.5K dual-camera doorbell, privacy indoor camera, and AirPods-like seamless pairing.