Cloudflare Worker Preferred IP Configuration Guide: Boost Access Speed in Three Steps

A three-step guide to configuring Cloudflare Worker with preferred IPs for faster, more stable access.
This guide explains how to optimize Cloudflare Worker access speed by configuring preferred IPs. The process involves three steps: obtaining low-latency preferred IPs from aggregation tools, binding a custom domain to your Worker, and setting up a two-layer DNS structure with a relay record and a proxy-disabled access record. No programming skills or extra costs required.
Why Cloudflare Workers Need Preferred IP Configuration
Cloudflare Worker is a serverless computing service running on edge nodes, widely favored by developers for its generous free tier and simple deployment. Workers run on the V8 engine, and once deployed, code is distributed to Cloudflare's edge nodes across over 300 cities worldwide. The free plan provides 100,000 requests per day, and developers don't need to manage underlying server infrastructure. However, many users experience unstable access speeds when using Workers, primarily because Cloudflare's default-assigned IP nodes may not be the closest or lowest-latency nodes for your location.
Cloudflare uses an Anycast network architecture, where the same IP address is broadcast to multiple data centers globally, and user requests are automatically routed to the nearest node in the network topology via BGP routing protocol. But "nearest in network topology" doesn't equal "lowest latency" — factors like ISP routing policies, international gateway bandwidth, and cross-border fiber congestion all affect actual connection quality. In mainland China, default-assigned nodes may have latency exceeding 200ms, while optimally selected nodes can achieve latency as low as 50-80ms.
"CF Preferred IP" (Cloudflare Preferred IP) refers to the practice of mass-scanning and speed-testing Cloudflare's IP ranges (such as 104.16.0.0/12, 172.64.0.0/13, etc.) to identify edge node IPs with the lowest latency and least packet loss from your network environment, then binding them to your own domain to significantly improve Worker access speed and stability. Due to Cloudflare's Anycast nature, all edge nodes can handle requests for any domain, so pointing DNS to any Cloudflare IP will work correctly — the only difference is connection quality. This article outlines a simple, easy-to-follow configuration process that can be completed even without a programming background.
Step 1: Obtain Preferred IPs or Preferred Domains
The first step in configuring CF Preferred IP is finding a usable source of preferred IPs. You can visit preferred IP aggregation websites like cf.090227.xyz, which provide numerous speed-tested Cloudflare preferred IPs and preferred domains.
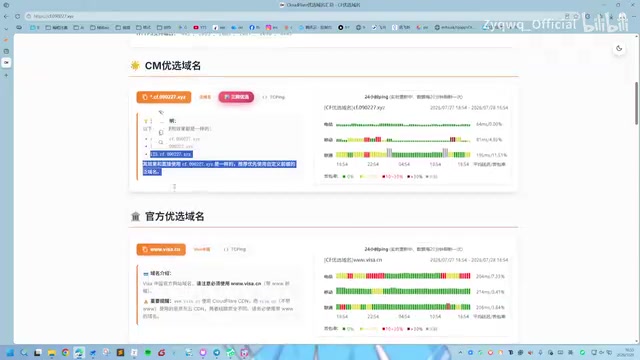
These websites typically list multiple preferred sources — you can use their dedicated preferred domains or choose other third-party preferred nodes (such as those from certain CDN providers). The core selection principle is simple: use whichever has the fastest connection speed. Before configuring, it's recommended to compare latency performance of several nodes using ping or speed-test tools to find the one best suited for your network environment.
Preferred IP tools work by performing TCP handshake speed tests and HTTP download speed tests on thousands of Cloudflare IPs, then sorting by latency and bandwidth combined to output the optimal results. Some preferred domain services also dynamically update resolution results, automatically switching to the current best node, which is more convenient than using a fixed IP.
Step 2: Bind Worker to a Custom Domain
With your preferred IP ready, the next step is handling Worker domain binding. Enter the Cloudflare Dashboard, find "Compute (Workers)" → "Workers and Pages" in the left menu, and click on the Worker project you need to configure.
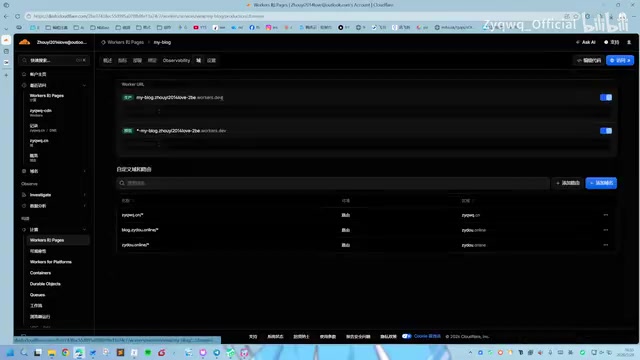
In the Worker's settings page, find the "Domains and Routes" (also called Triggers) option and click to add a custom domain. Enter the domain you wish to bind. Once added successfully, Cloudflare will automatically create the corresponding route and DNS record for that Worker, establishing an initial association between the Worker and your custom domain.
Important Notes for Domain Binding
When binding a domain, make sure the domain is already hosted under your Cloudflare account (i.e., DNS is managed by Cloudflare). If the domain hasn't been connected to Cloudflare yet, you'll need to first add the site in the Dashboard and complete the NS (Name Server) modification — change the NS records at your domain registrar to the addresses provided by Cloudflare (typically something like xxx.ns.cloudflare.com), then wait for DNS to propagate (usually anywhere from a few minutes to 48 hours) before proceeding with Worker domain binding.
Step 3: Configure DNS Records for Preferred IP Acceleration
This is the most critical step in the entire CF Preferred IP workflow. Return to the domain's "DNS Records" management page, where we'll use a "nesting" approach to chain the preferred IP with the final access domain.
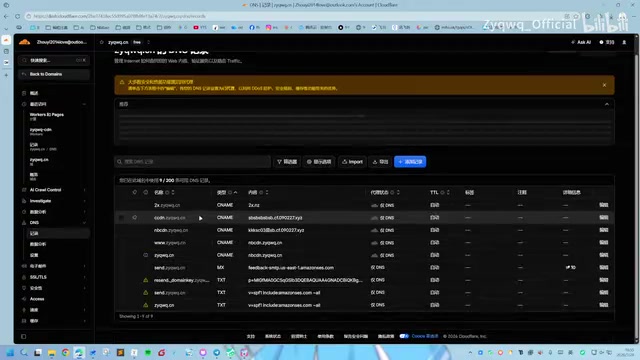
Using a two-layer structure of relay record + access record has technical reasoning behind it: the custom domain bound to a Worker automatically creates a proxied DNS record internally within Cloudflare, and its proxy status cannot be modified. Therefore, a separate record is needed to make the preferred IP take effect. The specific operation involves two layers:
Create a Relay DNS Record
First, create a subdomain for relay purposes, for example named 123. In this DNS record, the type field is crucial — select an A record if the preferred target is an IP address (mapping the domain to an IPv4 address, such as 104.16.132.229), or select a CNAME record if it's a domain (mapping the domain to another domain, essentially an alias). The advantage of using CNAME is that the preferred service provider can dynamically update resolution results without you needing to manually modify anything. This record carries the connection information for the preferred node.
Create an Access Record and Disable Cloudflare Proxy
Next, create the domain you'll actually use for external access, for example 321. This record's target should point to the relay subdomain 123 you just created. Here's an extremely important detail: you need to disable the proxy status (the orange cloud icon) for this record, changing it to "DNS only" (gray cloud) status.
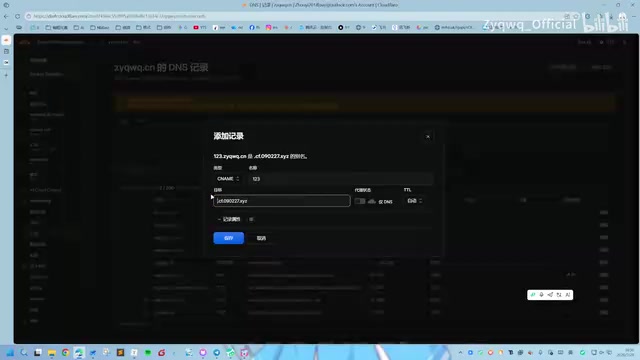
The reason for disabling the proxy requires understanding how Cloudflare's proxy mode works: when proxy mode is enabled (orange cloud), DNS resolution returns Cloudflare's automatically assigned Anycast IPs, and all traffic passes through Cloudflare's reverse proxy for processing. While this provides WAF firewall, DDoS protection, and other security features, the IP is not controllable. When the proxy is disabled, DNS directly returns the target IP or CNAME resolution result you specified, and traffic doesn't go through Cloudflare's proxy layer for redistribution. This is why your manually specified preferred IP can only take effect with the proxy turned off — that's the fundamental technical reason for disabling the orange cloud.
Verifying Configuration and Common Issues
After completing and saving the above configuration, when accessing through the final domain 321, requests will first resolve to the relay record 123, which then directs to the preferred IP node, ultimately reaching the Worker service. The entire chain uses the high-speed nodes you carefully selected.
You can verify the configuration using these methods:
- Use
nslookupordigcommands to check domain resolution results, confirming the returned IP is your preferred IP rather than Cloudflare's default IP - Use
curl -Ito check response headers, confirming requests are properly reaching the Worker - Compare ping latency and actual page load speeds before and after configuration
The entire CF Preferred IP configuration process can be summarized in three steps:
- Select preferred IP: Choose a fast node from a preferred IP aggregation website
- Bind Worker: Add a custom domain in Worker settings
- Configure DNS: Create a relay record with the preferred IP, then create an access record pointing to the relay record with proxy disabled
The entire process requires no programming background and no additional costs, fully leveraging Cloudflare's free resources. For users building self-hosted services, accelerating access, or deploying lightweight applications, mastering CF Preferred IP techniques can bring noticeable experience improvements.
It's worth noting that preferred IPs are not a set-and-forget solution. Node quality changes over time (ISP routing adjustments, node load fluctuations, etc. all affect connection quality), so it's recommended to periodically re-test speeds and update the preferred target in DNS records to maintain optimal access speeds. Some users pair this with scheduled scripts to automate speed testing and DNS updates, achieving fully automatic preferred IP rotation through the Cloudflare API.
Key Takeaways
Related articles

Apple HomeView Hands-On Review: Is the $300 Smart Home Hub Worth It?
Apple HomeView hands-on: a $300 smart home hub with facial recognition for quick account switching, but no App Store or voice recognition. Is the wall-mounted version worth it? Should you buy the first generation?

Meta Muse Wonder Launch: What It Means for Meta's Return to the Frontier AI Race
Meta releases Muse Wonder and WonderFull, benchmarks reach the frontier, community feedback is polarized. An in-depth look at Meta's return to the frontier AI race, its personal agent strategy, and Zuckerberg's different path.

Apple Home Smart Home Lineup Leaked: LG and Schneider Team Up, UWB Door Lock on Board
Apple Home ecosystem gains new LG and Schneider devices: UWB smart lock with proximity unlock, 2.5K dual-camera doorbell, privacy indoor camera, and AirPods-like seamless pairing.