Complete Guide to Deploying Dify Locally on Windows: WSL + Docker Setup and Troubleshooting

A step-by-step guide to deploying Dify on Windows using WSL and Docker with common fixes.
This guide walks through the complete process of deploying Dify locally on Windows, from enabling WSL and installing Docker Desktop with domestic mirror acceleration, to generating the .env config file and connecting local Ollama models. It also addresses the most common issue — database connection failures caused by missing extra_hosts configuration in docker-compose.yaml.
Why Deploying Dify Locally on Windows Has a Learning Curve
Dify is a popular LLM application development platform, and more developers want to set it up locally to build AI agents, workflows, and connect to private large language models. Dify is open-sourced and maintained by the Langgenius team, offering visual Prompt orchestration, RAG (Retrieval-Augmented Generation) pipelines, an Agent framework, and model management capabilities — allowing developers to rapidly build LLM applications without writing complex AI code from scratch. It supports multiple model backends including OpenAI, Anthropic, and local Ollama, and enables complex business logic automation through workflow orchestration.
However, for Windows users, installing Dify locally isn't as simple as downloading and running an installer — it involves a complete dependency chain: WSL → Docker → Dify.
This article is based on hands-on experience, outlining a complete workflow for deploying Dify from scratch on Windows, with a focus on solving the two most common pitfalls for beginners: missing installation components and database connection failures.
Understanding the Dependencies: The Relationship Between WSL, Docker, and Dify
Before getting started, you need to understand how these three components relate to each other — otherwise it's easy to get stuck midway:
- Dify runs on Docker containers
- Docker depends on the Linux kernel at its core
- On Windows, the Linux environment is provided by WSL (Windows Subsystem for Linux)
Therefore, the correct installation order is to enable WSL first, then install Docker for Windows, and finally deploy Dify. Many people fail at the first step because their Windows system is missing the necessary feature components.
Step One: Enable WSL Components
Open the Windows Control Panel, go to "Programs," and find "Turn Windows features on or off." In the popup list, check "Windows Subsystem for Linux" — commonly known as WSL.
WSL (Windows Subsystem for Linux) is a compatibility layer technology introduced by Microsoft starting with Windows 10. The current mainstream WSL 2 uses a lightweight virtualization approach, running a real Linux kernel based on Hyper-V technology, rather than the system call translation layer of the earlier WSL 1. This means WSL 2 has full Linux kernel compatibility and can support kernel features that Docker depends on, such as cgroups (control groups) and namespaces. It's also recommended to check "Virtual Machine Platform" in the Windows features list, as this is a prerequisite for WSL 2 to function properly.
This step is the prerequisite for the entire installation chain. If you install Docker directly without enabling this component first, Docker will typically prompt you to install WSL anyway, which ends up taking more time.
Installing and Configuring Docker Desktop for Windows
Once the WSL component is enabled, you can download and install Docker Desktop for Windows from the official website. Docker is an OS-level virtualization technology that uses Linux kernel namespace and cgroups mechanisms to achieve process isolation and resource limits. Unlike traditional virtual machines, containers share the host's kernel, resulting in faster startup times and lower resource usage. Docker Desktop is Docker's official desktop client for Windows and macOS — on Windows, it runs Linux containers through the WSL 2 backend and integrates the complete toolchain including Docker Engine, Docker CLI, and Docker Compose.
The installation itself isn't particularly difficult, but configuring a China-based mirror accelerator is absolutely critical.
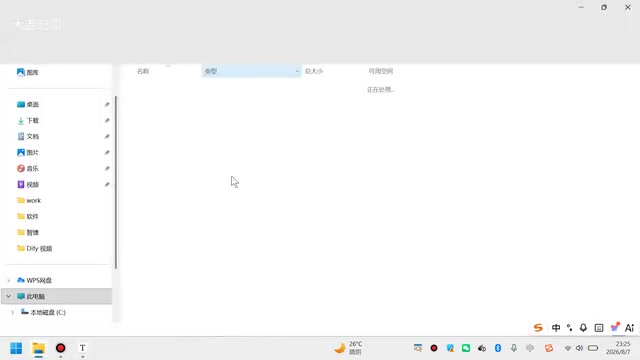
Docker pulls images from the overseas Docker Hub (registry-1.docker.io) by default, which results in extremely slow download speeds or even failures under China's network conditions. A mirror accelerator is essentially a reverse proxy cache service — it deploys nodes within China, fetches and caches image layers from Docker Hub on first pull, and distributes subsequent identical requests directly from domestic nodes, drastically reducing latency. The solution is to replace the image source in Docker settings:
- Open Docker Desktop and click the gear (Settings) icon in the upper right corner
- Find "Docker Engine" in the left sidebar
- Replace the default external address with a domestic mirror address, and optionally configure DNS resolvers
- Click "Apply & Restart"
Tip: You can use AI tools to look up the latest available domestic mirror addresses. Adding multiple domestic mirrors and DNS entries will significantly speed up subsequent container image pulls. Common acceleration services include Alibaba Cloud Container Registry (requires login for a dedicated address), Tencent Cloud Mirror Acceleration, and USTC Mirror.
Deploying Dify: Configuration Files Are Key
With the Docker environment ready, it's time to deploy Dify itself. As a complex application, Dify typically includes multiple components: API service, Web frontend, Worker (async task processing), PostgreSQL database, Redis cache, and Weaviate/Qdrant vector database. Docker Compose, as a multi-container application orchestration tool, defines all service containers and their dependencies, network configurations, and volume mounts in a single YAML configuration file, allowing all components to be started and managed with a single command.
The entire deployment process revolves around configuration files.
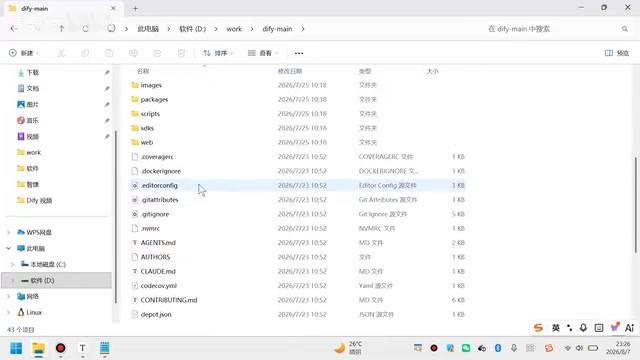
Generating the .env Configuration File
After extracting Dify, navigate to the docker folder in its root directory. On first extraction, you'll find a template file named .env.example. The service actually reads from a .env file at startup, so you need to:
- First copy and paste
.env.exampleas a backup in case of mistakes - Rename the new copy to
.env
This seems simple, but it's why many people can't get the service running — the startup script only recognizes .env and won't read the template file. The .env file contains critical parameters such as database passwords, secret keys, service ports, and storage paths. Docker Compose automatically reads the environment variables from this file at startup and injects them into each container.
Connecting a Local Model (Ollama)
If you've deployed a local model on your machine using Ollama and want Dify to call it directly, you'll need to add an additional configuration section in the .env file specifying Ollama's API address and base URL.
Ollama is a lightweight tool designed specifically for running large language models locally, supporting mainstream open-source models like Llama, Mistral, and Qwen. It packages model downloading, quantization, and inference into simple command-line operations, and starts a local HTTP service compatible with the OpenAI API format (listening on localhost:11434 by default). Through this standardized API interface, Dify can call local models just like cloud-based ones, keeping data on your machine for privacy protection.
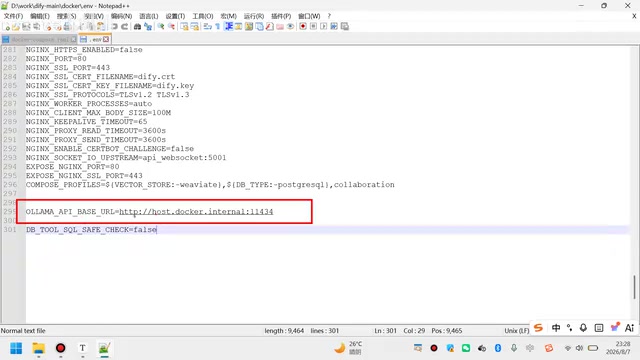
Note that since Dify runs inside a Docker container, localhost within the container points to the container itself rather than the host machine. Therefore, Ollama's address should not be set to localhost:11434 — use host.docker.internal:11434 or the host machine's actual IP address instead.
If you only plan to connect to online model services, you can skip this configuration section without any issues.
Starting and Stopping Dify Services
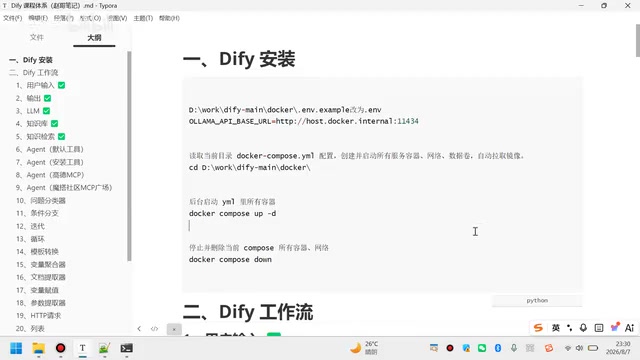
Once configuration is complete, navigate to the docker directory and use the command line:
- Start command:
docker compose up -d - Stop command:
docker compose down
The up -d flag starts all service containers defined in docker-compose.yaml in detached (background) mode. Docker Compose automatically pulls images, creates networks, and starts containers in dependency order. The down command stops and removes all related containers and networks (but does not delete persistent data volumes).
These two commands are used as a pair — restarting means "stop first, then start."
On Windows, it's even more convenient — since Docker Desktop provides a GUI, you can right-click containers in the list and select stop, start, or restart without typing commands. After the first successful startup, you can access Dify's Web interface by default at http://localhost or http://localhost:80 in your browser to complete the initial setup.
Common Pitfall: What to Do When Database Connection Fails
This is one of the most frequently asked questions about Dify: when using Dify's Agent feature to connect to a MySQL database, it repeatedly shows connection failed errors.
Root Cause: DNS Resolution Inside the Container
The reason is that Dify's database connection tool (Agent tool) runs inside the container. Docker containers operate in an isolated network namespace and communicate with the host through bridge network mode by default. Processes inside a container cannot directly access host services via localhost, because the container's localhost points to the container's own network stack. Docker provides the special domain name host.docker.internal for this purpose, which automatically resolves to the host machine's IP address.
When Docker is installed locally, Windows automatically generates a host mapping (local IP on the left, Docker domain name on the right) — this step is handled automatically by the system.
However, what actually needs manual verification is the domain name mapping configuration (the extra_hosts field) in the docker-compose configuration file. This configuration injects the mapping between host.docker.internal and the host IP into the container's /etc/hosts file, allowing applications inside the container to resolve and access MySQL services running on the host. Different versions of Dify may be missing this configuration, causing tools inside the container to fail when resolving the host's MySQL service.
Solution
- Open the
docker-compose.yamlfile in Dify'sdockerdirectory - Check whether it contains the appropriate domain mapping configuration section (typically something like
extra_hosts: ["host.docker.internal:host-gateway"]) - If missing, manually add this configuration under the service sections that need to access host services (such as api and worker)
- You must restart the services after saving (stop first, then start) for changes to take effect
Additionally, ensure that the host's MySQL service has remote connection permissions enabled, and that the firewall is not blocking access requests from the Docker network segment (typically 172.17.0.0/16).
After completing the above configuration, Dify's Agent tools will be able to connect to the MySQL database normally.
Summary
The overall workflow for deploying Dify on Windows can be broken down into three phases:
- Prepare the environment: Enable WSL components (and Virtual Machine Platform) in Control Panel
- Set up the container platform: Install Docker Desktop and configure domestic mirror acceleration
- Deploy Dify: Generate the
.envfile, configure local models and database mappings as needed, then start the services
For beginners, the two most easily overlooked steps are — WSL components not being enabled causing Docker installation to fail, and missing docker-compose domain configuration causing database connections to fail. As long as you handle these two points in advance, the entire deployment process will go much more smoothly.
The greatest value of local deployment lies in data privacy and flexible use of local models. Once set up, you have a fully controllable AI application development environment where you can confidently connect private data and intranet model services. Compared to using the cloud-based SaaS version, local deployment not only eliminates the risk of data leakage but also allows free customization of model selection, storage strategies, and access controls based on business needs — making it particularly suitable for enterprise scenarios involving sensitive data.
Related articles

Uber Deploys ChatGPT Work Company-Wide: AI in the Workplace Enters the Scaled Implementation Phase
Uber deploys ChatGPT Work to 30,000+ employees, extending it from engineering to all roles. We analyze its expert-engineer pairing, end-to-end automation, and questions of AI control and power concentration—insights for scaling AI in the workplace.

Shift at Midnight Hands-On: When "ID Verification" Becomes Alien Hunting
Shift at Midnight blends ID verification with horror survival in a four-player co-op game. We break down its inspection mechanics and chaotic humor.

Zelensky Recounts the Outbreak of War: I Need Ammunition, Not a Ride
Zelensky recalls the first day of war in a YouTube interview: farewell to family, rejecting Biden's evacuation offer with "I need ammunition, not a ride," and how Bucha shaped his stance on compromise and peace talks.