Complete Guide to Local LLM Deployment: Ollama + Qwen for Privacy-First, Zero-Cost AI
Deploy Qwen LLM locally with Ollama for a free, private AI assistant — no data leaves your machine.
This guide walks through a complete local LLM deployment using Ollama as the runtime engine, the open-source Qwen 2.5 model (14B Q8, ~15 GB), and a free GUI client built with Trae AI. The four-step process covers installing Ollama, importing the model via command line with a Modelfile, verifying the setup, and installing the client. The client supports conversation management, Word export, a floating widget, and math formula rendering. The guide also honestly notes that local small models have limited capability, recommending smaller versions for modest hardware and cloud models for complex tasks.
Why Deploy a Large Language Model Locally
Cloud-based AI tools like Doubao and Tongyi Qianwen are genuinely useful, but they come with two unavoidable drawbacks. First, there's the data privacy issue — everything you type gets uploaded to ByteDance's or Alibaba's servers, where it may be used to train future models and could expose personal information. Second, heavy usage can rack up costs over time.
For anyone dealing with sensitive documents, internal materials, or simply not wanting their conversations to leave their own machine, running an LLM locally is the safer choice. This guide is based on a hands-on tutorial from a Bilibili creator, distilled into a zero-cost local deployment setup: Ollama as the model runtime engine, the open-source Qwen model, and a custom-built GUI client that delivers a Doubao-like experience.
According to the creator's tests, even an ordinary laptop can handle a local model well enough for everyday use.
What You'll Need
The setup requires three core components:
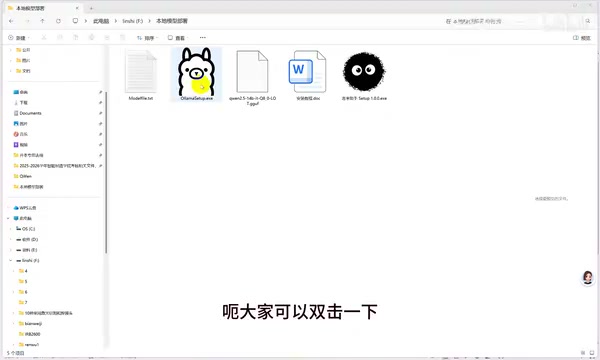
- Ollama: An open-source LLM runtime engine that loads and runs models locally
- Model file + Modelfile config: The tutorial uses Qwen 2.5 at 14B (Q8 quantization), approximately 15 GB in size
- GUI client: A free interface app called "机密助手" (Confidential Assistant), built by the creator using Trae AI, with a look and feel similar to Doubao and Tongyi Qianwen
A note on model selection: the 14B Q8 model has fairly steep hardware requirements and consumes significant VRAM and RAM. If your machine has high specs and plenty of memory, you can go with a larger version. On more modest hardware, a smaller model (such as 7B or a lower quantization level) is strongly recommended — otherwise performance will be painfully slow.
Parameter count (B) and quantization level (Q) are the two most important factors when choosing a model. A higher parameter count (e.g., 14B = 14 billion parameters) means stronger language understanding and generation, but also higher memory and VRAM demands. Quantization is a compression technique that reduces numerical precision to shrink model size and memory usage: Q8 uses 8-bit quantization with minimal quality loss but larger file size; Q4 uses 4-bit quantization, roughly halving the size with a slight performance trade-off. Running 14B Q8 typically requires at least 16 GB of RAM (fully RAM-dependent without a discrete GPU); with a dedicated GPU, the combined VRAM + RAM must meet the requirement. If you're on a typical laptop with 8 GB of RAM, the 7B Q4 version (~4 GB) is a much more practical starting point.
Step 1: Install Ollama
Installing Ollama is straightforward. Download the latest installer from the official open-source website, double-click to run it, and click "Install" through the prompts. It installs to the C drive by default, and no manual configuration is required.
Once installed, you can minimize the window. Note that Ollama runs at startup — it will launch in the background every time you boot your machine to keep the local model service running. After a successful install, the Ollama icon will appear in the system tray, confirming the service is active.
Step 2: Import the Model Files
Create a new folder on a drive with enough free space (the tutorial uses the D drive, named "千问" — you can use any name), then copy the downloaded model file and Modelfile config into it.
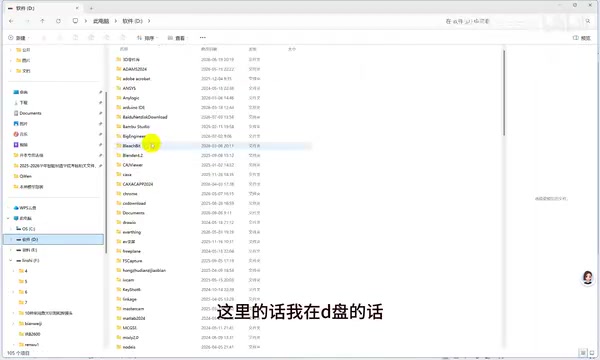
The Modelfile is the critical piece here. It's a configuration descriptor that must match the specific model version you're using. The creator mentions generating this file with the help of Doubao — if you're using a different model version, just send the model details to an AI assistant and ask it to generate the corresponding Modelfile for you.
Next, click into the folder's address bar, type CMD to open a command prompt in that directory, and run the model creation command:
ollama create qwen14B -f Modelfile
Here, qwen14B is a custom name you assign (feel free to use anything), and Modelfile is the config file mentioned above. Press Enter and the system will begin importing the model — this takes a few minutes.
Modelfile is Ollama's model configuration descriptor, similar in syntax to a Dockerfile. Key fields include FROM (specifying the local model file path), PARAMETER (setting inference parameters like temperature and context length), and SYSTEM (defining the system prompt that controls the model's role and behavior). A minimal Modelfile only needs two lines: FROM ./modelname.gguf pointing to your downloaded model file, and an optional system prompt. Since model filenames and formats vary by version (GGUF is currently the standard), the Modelfile must match the exact model — which is why having an AI generate it for you is so convenient. Just provide the model name, version, and filename.
Step 3: Verify the Model Is Running
Once the import is complete, test the model with:
ollama run qwen14B
When it starts successfully, the terminal will display a "send a message" prompt. Type "你好" and the model will respond. If it replies normally, your LLM is running locally.
That said, chatting in a terminal isn't a great experience — which is exactly why you need a GUI client.
Step 4: Install the GUI Client
The creator built a client called "机密助手" (Confidential Assistant) using Trae AI. Its interface takes inspiration from Doubao and Tongyi Qianwen, and it's free to use.
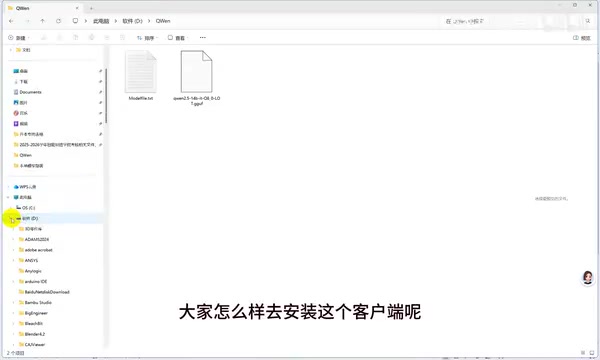
Installation is again a simple double-click. During setup you can choose "Install for all users on this computer," then set where the app and personal data are stored. The tutorial puts both on the D drive. After installation, open the client and click "Detect" — if your local model is ready, the app will automatically find it.
Real-World Client Experience
Once you open a new chat window, you can start asking questions just like you would in Doubao. The tutorial prompts it to "write a classical poem about West Lake," and the model produces a result without issue. At this point you'll clearly hear the laptop fans spin up — all AI inference is happening locally, with both GPU and CPU running at full tilt.
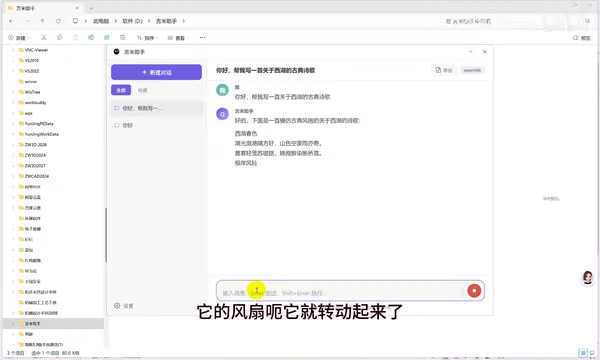
The client comes with several practical features:
- Conversation management: Name conversations (e.g., "West Lake in Spring"), bookmark them, or delete them
- Export: Export conversations as Word documents for easy archiving
- Floating widget: After closing the window, the app stays accessible as a floating button for quick access
- Math formula rendering: When used as a math assistant, equations are rendered in a readable, properly formatted style. In testing, it handled step-by-step solutions for quadratic equations
It's worth being realistic: local deployment means running a smaller model with limited capability. It won't match the performance of large cloud-based models, and complex tasks will show the difference. But for everyday Q&A, writing assistance, and privacy-sensitive use cases, this setup is more than adequate.
Summary and Recommendations
The core value of running an LLM locally is full data ownership with zero ongoing cost. The entire workflow boils down to: Install Ollama → Import model and Modelfile → Verify in terminal → Install GUI client.
A few recommendations for different users:
- If your hardware is average, don't start with the 14B model — try a smaller version first for a smoother experience
- The Modelfile is a common sticking point; use an AI assistant like Doubao to generate it for you
- Local models have real limitations; for high-quality output on complex tasks, consider using cloud models alongside your local setup
For users who prioritize privacy and want an offline-capable AI assistant, this is a low-barrier solution well worth trying.
Related articles
Waymo Restarts San Antonio Operations: Back on the Road Five Months After Flood Incident
Waymo resumes San Antonio Robotaxi service ~5 months after a vehicle was swept away in flooding. A look at what happened, why it took so long, and what it means for AV safety in extreme weather.
What Is AIOps? How AI Is Reshaping IT Operations
AIOps applies AI and machine learning to IT operations for anomaly detection, alert noise reduction, and root cause analysis — shifting teams from reactive to proactive.
CCC Sends Its Invitation: 40C3 Hacker Congress Themed "Model Citizens"
CCC announces its 40th Chaos Communication Congress (40C3) under the theme "Model Citizens," inviting hackers worldwide to examine surveillance and algorithmic governance.