Complete Tutorial: Building an AI Programming Environment with OpenCode + MCP

Complete guide to setting up an AI coding environment with OpenCode, DeepSeek, and MCP protocol.
This tutorial walks through building a complete AI programming development environment using the open-source tool OpenCode combined with DeepSeek's large language model and MCP (Model Context Protocol) services. It covers mainstream AI coding tool comparisons, model selection strategies focusing on context windows and cost-effectiveness, step-by-step installation and configuration, and the Plan/Build dual-mode workflow for effective AI-assisted development.
As AI-assisted programming becomes increasingly mainstream, choosing the right agent tools and large language models, and setting up a comfortable development environment, has become a critical step for developers to boost productivity. Based on educational content from the GoFly development community, this article systematically reviews mainstream AI programming agent tools, model selection strategies, and provides a detailed walkthrough on using the open-source tool OpenCode combined with the DeepSeek large language model, configuring MCP (Model Context Protocol) services to build a complete AI programming development environment.
Overview of Mainstream AI Programming Agent Tools
The current landscape of AI programming agent tools is quite rich, spanning international and domestic options, from terminal command-line interfaces to graphical UIs, each with different strengths. Based on practical usage experience, mainstream tools can be categorized as follows.
International Open-Source and Commercial Tools
OpenCode is the primary recommended tool in this tutorial, with its core advantage being that it's completely open-source. It offers multiple usage forms: a ready-to-use desktop version (supporting Windows, macOS, and Linux), a terminal command-line version installable via npm, and an official VS Code plugin. This "desktop + terminal + IDE plugin" trinity allows it to accommodate virtually any developer's workflow preferences.
Besides OpenCode, there are two other heavyweight contenders from abroad: Codex (from OpenAI) and Claude Code (from Anthropic). Both are powerful tools that also offer VS Code plugin support, but for users in China, accessing their official websites and processing payments require additional network proxy configuration, raising the barrier to entry.

The Rise of Domestic AI Programming Tools
Domestic tools have natural advantages in access speed and localization support. Trae (by ByteDance) provides both a desktop client and VS Code plugin, with its distinguishing feature being separate Chat mode and Build mode, plus support for Build with MCP—calling configured MCP tool capabilities while constructing code.
Additionally, DeepSeekAd's newly launched Harness tool is worth noting. Currently available only as a terminal command-line tool, it runs with a single command after installing the Node environment, returning a web access URL where developers can configure settings through a web interface.
Model Selection: Cost-Effectiveness and Scenario Matching
Tools are the vehicle; the large language model is the real "brain." In AI programming scenarios, model selection requires balancing context length, code comprehension ability, cost, and support for specific technology stacks.
Why Context Windows Matter
The context window refers to the maximum number of tokens a large language model can process in a single inference. For AI programming scenarios, the context window size directly determines how much code the model can "see" simultaneously. A medium-sized project might contain tens or even hundreds of thousands of lines of code. If the context window is too small, the model cannot understand cross-file dependencies, and generated code may be inconsistent with the project's existing architecture. Current mainstream programming models offer context windows ranging from 32K to 1M tokens, with DeepSeek-V3 supporting 128K context and some Qwen series models supporting up to 1M. Larger context windows mean higher computational costs, so developers need to find a balance between cost and capability.
Comparison of Mainstream Programming Models
- Alibaba Tongyi Qwen: Longer context window, stable overall performance, suitable for handling large project codebases. API Keys can be created on the official website with corresponding subscription plans.
- MiniMax: Has certain advantages in image processing-related tasks.
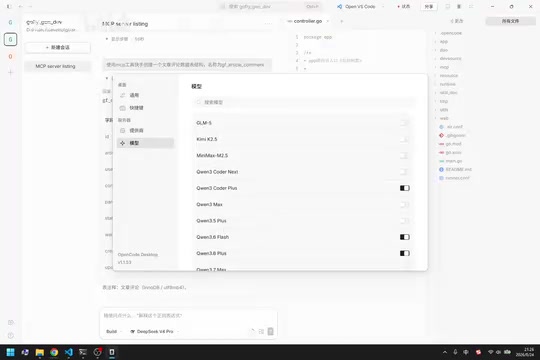
- DeepSeek: The primary model in this tutorial, offering outstanding cost-effectiveness. Developers simply need to top up their account on the official website and create a Key. An important note: Keys are hidden after creation and must be copied immediately when generated.
The Unique Value of Volcengine ARK
Volcengine ARK is ByteDance's model integration platform, aggregating its own Doubao models along with DeepSeek and other models. The tutorial specifically mentions that for Go language development scenarios, Volcengine ARK provides more accurate and timely support for ByteDance's own technology stack (such as frontend UI components and the Agent development framework Eino).
A deeper reason for choosing it: the latest model versions used by Doubao and ByteDance's internal AI agents are simultaneously open-sourced and shared on this platform, giving developers first access to the newest capabilities.
Current State of Go Language Agent Development Frameworks
In the AI Agent development field, Python's ecosystem boasts numerous mature frameworks like LangChain, CrewAI, and AutoGen, but Go language Agent framework options are relatively limited. ByteDance's open-source Eino framework is currently one of the more active Agent development frameworks in the Go community, providing core capabilities including Tool calling, Chain orchestration, and Memory management. Its design philosophy references LangChain but optimizes for Go's concurrency characteristics. Google supports Gemini model Agent development through its official Go SDK. Go's unique advantage in the AI Agent field lies in its high concurrency performance and low memory footprint, making it particularly suitable for building production-grade Agent services that need to handle large volumes of requests simultaneously—which is why ByteDance chose Go as the primary development language for its internal Agent infrastructure.
For developers building Agents with Go, aside from ByteDance's Eino, the main alternative is Google's official framework, leaving relatively limited choices. This makes Volcengine ARK a priority consideration.
OpenCode Environment Setup: Practical Steps
Now let's move to the hands-on section, using the OpenCode + DeepSeek combination as an example to demonstrate the complete environment setup process.
Installing OpenCode and Opening a Project
Desktop installation is straightforward—download from the official website and click through the installer, selecting your installation path. The terminal version requires installing the Node environment first, then running the npm global install command as administrator.
When first opening the desktop version, the interface is empty. You need to select the project directory you want to work with (e.g., a backend Task project or GoFly project). Once opened, the left side displays the project file tree, the center allows creating sessions to communicate with AI, and the right side shows specific file contents. Session records from previous conversations are also preserved here, facilitating multi-turn dialogue continuity.
Configuring DeepSeek and Other Models
After installation, you must configure large language models before the tool can function properly. In the "Model Providers" settings, click "View More Providers," find your target model (e.g., DeepSeek, Alibaba, MiniMax), enter the corresponding API Key, and save.
Since each provider offers multiple model versions, you also need to check the specific versions you want to use in the model list (e.g., DeepSeek's Fast, Tongyi Qwen's Plus). Only checked models will appear in the dropdown selection during use—unchecked ones won't be displayed.
MCP Service Configuration in Detail
MCP (Model Context Protocol) is the key protocol that enables AI agents to call external tool capabilities. To use MCP in OpenCode, you need to first start the MCP service, then configure the connection.
Technical Background of the MCP Protocol
MCP is a standardized protocol open-sourced by Anthropic in late 2024, designed to solve the connection problem between AI large language models and external data sources/tools. Before MCP, every AI application needed to write separate integration code for each external tool, resulting in massive duplication of effort. MCP adopts a client-server architecture, defining a unified communication specification that allows AI models to discover and call external tools, access databases, read file systems, and more in a standardized way. MCP supports two transport methods: stdio (standard input/output, suitable for local inter-process communication) and HTTP with SSE (Server-Sent Events, suitable for remote service calls). MCP has now gained support from major AI vendors including OpenAI and Google, and is becoming the infrastructure protocol for the AI agent ecosystem.
Starting the MCP Service
Run the startup command in your project terminal. Once the service successfully starts, it will display the listening port (port 8899 in the example). This port address will be used in subsequent configuration.
Writing the MCP Configuration File
The core of configuration involves creating a .opencode directory in the project root and creating an opencode.json configuration file within it. The configuration primarily includes:
- MCP Name: Name the MCP service so the frontend can identify and discover it.
- Access URL: Enter the service endpoint such as
http://localhost:8899/mcp. - Headers: Since MCP requires authentication verification, you need to configure token-like credentials in the request headers. Only requests carrying valid credentials are permitted to access the MCP service.
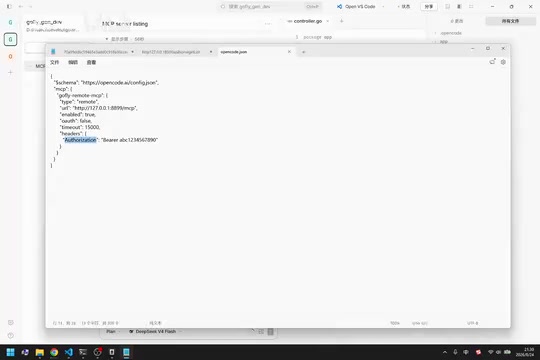
After configuration is complete, ask "MCP service status" in a new session. OpenCode will actively detect the connection, and a prompt saying "MCP connected" indicates successful configuration.
Comparing OpenCode's Three Usage Modes
OpenCode's greatest feature is offering multiple interaction forms, allowing developers to freely choose based on their preferences.
Terminal Command-Line Mode
Open CMD in any project directory and enter the opencode command to enter the terminal interactive interface. The terminal version syncs data with the desktop version, maintaining consistent model selection. Key shortcuts include:
- Tab: Switch Agent mode (Plan mode / Build mode)
- Ctrl + P: Open additional settings, with Switch Model for quick model changes
The terminal mode's advantage is being lightweight and flexible, suitable for quickly switching between multiple projects. However, the drawback is obvious—once you close the window, the current chat history is lost, with no way to save multi-turn conversation history.
Desktop Interface Mode
The desktop version solves the history retention problem. Previous chat records are persistently saved, can be revisited at any time, and new sessions can be created. This makes it ideal for complex development tasks requiring long-term iteration and multi-turn communication.
VS Code Plugin Mode
For developers who prefer completing everything within their IDE, you can install the OpenCode plugin directly in VS Code. It opens an embedded terminal with the same operation style as the command-line terminal, also supporting Tab to switch modes.
Plan and Build Dual-Mode Workflow
It's worth emphasizing OpenCode's two working modes, which reflect the design philosophy of mature AI programming tools:
- Plan Mode: AI only plans and discusses with you, without actually executing code modifications. Ideal for aligning requirements and organizing solutions before taking action.
- Build Mode: After confirming the plan, switch to this mode where AI actually writes code, manipulates files, or calls MCP tools (such as automatically generating database table structures).
Engineering Value of the Separated Design
The separation of Plan and Build modes stems from a classic software engineering practice—decoupling design from implementation. In traditional development, coding directly without design often leads to rework and technical debt. AI programming faces the same issue: if AI modifies code without fully understanding requirements, it may introduce logical errors or architectural inconsistencies. Plan mode essentially has AI generate an execution plan first (similar to Chain-of-Thought reasoning), which developers can review and correct before letting AI execute. This design also echoes the ReAct (Reasoning + Acting) paradigm—reason first, then act. In practice, execution plans generated in Plan mode can also serve as documentation, helping team collaboration by clarifying AI's modification intent.
This "plan before action" separated design effectively prevents AI from rashly modifying code when requirements are unclear, serving as an important mechanism for ensuring AI programming quality.
Conclusion
This article provides a comprehensive review of AI programming agent tool selection logic and environment setup workflow. The core conclusions are: OpenCode, with its open-source nature and multi-form support, is an extremely versatile choice; DeepSeek offers outstanding cost-effectiveness for daily programming; and Volcengine ARK has stronger advantages in Go and ByteDance technology stack scenarios. Through MCP protocol configuration, AI agents gain the ability to call external tools, truly achieving a closed loop from "conversation" to "execution." With this environment set up, the next step is diving into actual AI programming practice, experiencing firsthand the improvements in reasoning capability and development efficiency.
Related articles

CSS Anchor Positioning: A New UI Positioning Approach Without JavaScript
A deep dive into CSS Anchor Positioning: from anchor-name and position-anchor to the anchor() function, position-area shorthand, position-try-fallbacks, anchor-size, and upcoming anchor queries.

New AI Chart Interaction: Continuous Follow-up Questions and Visualization in Conversation
Explore a new AI interaction method for continuously generating charts in conversation. Use the /visualize command to ask follow-up questions and visualize answers in the same chat window, improving data analysis efficiency.

Cursor Merges Into X Subscription: Paid Plans Share Unified Usage Pool, Grok Model Coding Usage Doubled
Cursor joins The X Subscription with a unified usage pool and doubled Grok coding quota. Third-party models shift to API pricing. Existing users can keep or migrate plans.