Cursor Beginner's Guide: A Six-Step Workflow for Managing Changes, Rollbacks, and Validation

A six-step Cursor workflow teaching beginners to review changes, roll back mistakes, and validate results.
This guide breaks down a practical six-step workflow for Cursor beginners using a real project example. It covers setting boundaries with Cursor Rules, using Plan mode before coding, reviewing every change via Diff, rolling back with Checkpoints, and validating in the browser — transforming AI-assisted development from guesswork into disciplined engineering.
Why Beginners Keep "Crashing" with Cursor
When most zero-experience users first try Cursor, the most common frustration isn't "the AI can't write code" — it's "the AI wrote something, but I have no idea what it actually changed." This Bilibili tutorial uses a concrete project — building a "Viral Headline Health Check" web tool — to break down the Cursor development process into a reusable six-step workflow.
What makes this case study clever is that it solves two problems simultaneously: one is the content thread (how to write headlines that retain audiences), and the other is the tooling thread (how to understand changes, control scope, and validate results when building tools with Cursor). For beginners, the latter is the real core skill.
The author clearly defined the tool's boundaries: no data collection, no internet access, no login required — all tested headlines are stored locally on the user's computer. This "pure frontend single-page tool" positioning makes the entire development process controllable and verifiable, an ideal scenario for beginners to practice. A "pure frontend single-page tool" is the lightest application form in web development — it relies only on the browser-side trio of HTML, CSS, and JavaScript, requiring no backend server, database, or network requests. All logic executes locally in the user's browser, with data persisted through native browser APIs like localStorage. This architecture has zero deployment cost — just double-click the HTML file to run it — and there's no risk of data leaks. For Cursor beginners, it eliminates the backend complexities of environment configuration, dependency installation, and API debugging, letting developers focus on learning the AI collaboration workflow itself.
Before You Start: Understanding Cursor's Pricing and Model Selection
Before diving into development, the tutorial first clarifies a question that trips up most beginners — pricing and model selection.
Free Tier vs. Paid Tier
Cursor's free tier provides a certain amount of Agent usage and access to its in-house Composer model, which is sufficient for building a small tool like this. However, the free tier has limited usage, and if you want to manually lock in a specific frontier model, you'll need at least a subscription.
Here it's important to understand the fundamental difference between Cursor's Agent mode and traditional code completion (like GitHub Copilot's inline suggestions). Traditional completion is "complete where the cursor is," generating just a few lines of code at a time. Agent mode, however, is an autonomous agent with planning capabilities — it can understand overall requirements and then create and edit multiple files simultaneously, even executing terminal commands and installing dependencies. The Agent autonomously decides its work steps: first reading existing code to understand context, then formulating a modification plan, and finally executing changes across files. This capability enables zero-experience users to complete entire projects, but it also means the Agent takes more "autonomous actions," requiring users to develop stronger review awareness to ensure the Agent doesn't deviate from requirements.
Personal subscriptions start at $20/month for the Pro tier. There's an important concept here: the subscription includes two independent usage pools — think of them as two wallets. The first wallet holds usage for in-house models, with generous quotas that typically aren't exhausted during daily development. The second wallet holds usage for third-party models, billed in dollars, and high-capability models like Claude Opus consume it quickly.
This dual-pool design reflects the current cost structure of the large model industry. Inference costs vary enormously between models: taking the Claude series as an example, Sonnet-level models cost about $3 per million input tokens, while Opus-level can reach $15 or more — a 5x difference. Cursor's in-house models, fine-tuned and quantized for coding scenarios, have far lower inference costs than general-purpose large models, enabling generous free quotas. Meanwhile, frontier models like Claude Opus and GPT-4o are stronger at complex reasoning and long-context understanding but carry high per-token prices.
Practical Tips for Saving Quota
The tutorial offers a highly practical recommendation: use Auto mode by default, which automatically selects the appropriate model per task, prioritizing in-house model quota. Only when a particular step repeatedly fails should you temporarily switch to a more powerful model — and switch back immediately after. Don't stay locked on a high-consumption model. The core logic of Auto mode is intelligent routing based on task complexity — lightweight models handle simple code completion, while heavyweight models are called only for complex architectural decisions, striking a balance between capability and cost.
Interestingly, domestic Chinese models like GLM and Kimi series are already in the official model list, with documentation specifically noting their "high intelligence, low cost" — a tangible benefit for users in China.
The Six-Step Workflow: From Empty Folder to Validated Tool
The entire process revolves around six steps, with three particularly useful core capabilities of Cursor embedded within them.
Step 1: Open the Project Folder Correctly
Use "File → Open Folder" to select your newly created project directory. This step defines Cursor's workspace. The most common mistake is opening a parent directory (like "Documents" or "Downloads"), causing Cursor to create project files inside a large folder that's hard to clean up later. The simple way to verify: check whether the workspace name displayed at the top of the left-side file tree matches your project name.
Step 2: Set the Rules with Cursor Rules Before Writing Any Code
This is the first core capability. Many people's biggest headache with AI coding is having to repeatedly specify boundaries every time — don't add login, don't connect to the internet, use only plain HTML and JavaScript. Cursor Rules lets you write these requirements as rules stored in the project, automatically loaded with every conversation going forward.
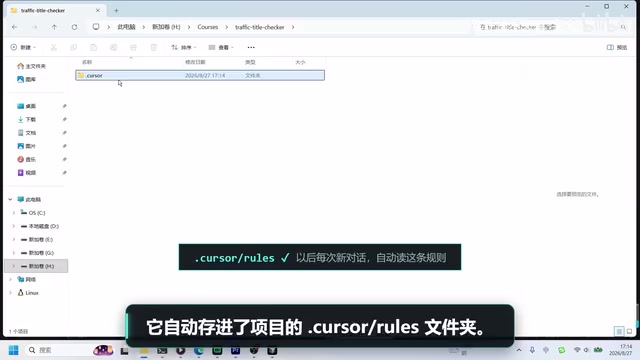
Cursor Rules is essentially a practice of "productionizing system prompt engineering." In large model applications, the system prompt determines the AI's behavioral boundaries and output style, but manually pasting prompts into every conversation is both inefficient and error-prone. Cursor Rules automates this process — rules are stored as .mdc files in the project's .cursor/rules directory, supporting Markdown syntax and glob pattern matching (e.g., rules that only apply to .js files). This mechanism borrows from the software engineering convention of project-level configuration files like .editorconfig and .eslintrc: codifying team agreements as files rather than verbal communication.
The official documentation offers a best practice: when you find yourself repeating the same instruction in conversations, it's time to write it as a rule. Rules come in three types: User Rules (global personal preferences), Project Rules (effective only for the current project), and team-shared rules imported from Git. For project-specific constraints, choose Project Rules. You can write rules in natural language, describing project requirements, style preferences, and prohibitions just as you'd say them in conversation. More advanced usage includes setting different rules for different file types and using the @ symbol to reference other rule files for modular management.
Step 3: Use Plan Mode — Plan First, Execute Second
This is the officially documented Agent workflow — plan first, then execute. In Plan mode, Cursor doesn't write code directly. Instead, it first studies the requirements and produces a complete implementation plan: which files to create, what each file does, and how many steps to take. Only after you review and approve the plan does it actually start coding.
Plan mode's design philosophy directly addresses a core challenge in the large model space — AI hallucination. When AI generates code without fully understanding requirements, it may "confidently" fabricate non-existent APIs, add features beyond the scope, or implement correct-sounding descriptions with wrong logic. Plan mode mitigates this by introducing a "think-confirm-execute" intermediate layer: the AI first outputs its understanding and plan in natural language, humans review whether the intent is correct at this stage, and only then authorize execution. This is similar to "design review" in software engineering — catching directional errors at the high-level design stage costs far less to fix than at the code implementation stage. Research from OpenAI and Anthropic has also shown that having models "think before acting" (e.g., Chain-of-Thought) significantly reduces error rates.
For the "Viral Headline Health Check," the plan explicitly lists creating three files: Index.html for page structure, App.js for scoring logic, and Style.css for styling. When reviewing the plan, verify four things: Are the five scoring criteria included? Are the suggestion words included? Is the character count included? Is the history feature included? And — is there anything extra (login, server, database)? Fixing a direction error by editing a paragraph of text is far cheaper than tearing down a bunch of already-written code.
Validating Code with Diff: See Every Single Change
How do you validate code after it's generated? This is the second core capability — Diff plus source control.
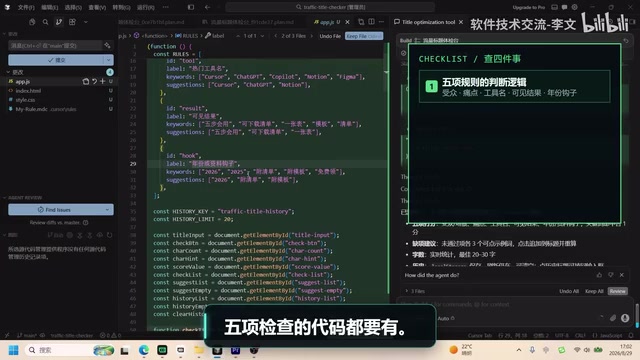
Diff (difference comparison) is a foundational concept of version control systems, traceable back to the diff command on Unix systems in 1974. Its core algorithm is the Longest Common Subsequence (LCS), which compares file contents between two versions and marks added, deleted, and modified lines using minimum edit distance. In Cursor, the Diff view isn't just for viewing Git commit history — more critically, it's for reviewing the results of every AI code generation. This effectively brings the traditional Code Review process down to the human-machine interaction layer — the AI is the "developer submitting code," and the user is the "reviewer examining the code." Even if you can't understand the syntax of every line, the Diff view lets you quickly assess whether the scope of changes is reasonable and whether there are unexpected "side effects."
Click the source control icon on the left sidebar to see which files were created in this round and how many lines were added or removed in each. Click into the Diff for details: green indicates added code, red indicates deleted code — what changed and how much is immediately clear.
During validation, the tutorial suggests asking yourself three questions:
- Are the additions the features we asked for?
- Was anything added that I didn't request (share buttons, analytics tracking, external link requests)?
- Did any deletions accidentally break existing functionality?
Here's a hard rule every beginner should remember: "Cursor says it's done" doesn't mean it's actually done. Before clicking accept, you must review the Diff. You might not understand every line of generated code, but you must know what was changed, how much was changed, and whether there's any extraneous code. Don't just accept whatever it gives you.
Checkpoint Rollback: Don't Panic When Things Break
The third core capability is Checkpoint snapshot rollback. The tutorial deliberately demonstrates a "controlled crash": switching back to regular Agent mode and giving a vague instruction like "make this tool more powerful, suitable for creating viral social media content." The result? Cursor takes the liberty of adding share buttons, extra pages, and external links — none of which were in the requirements.
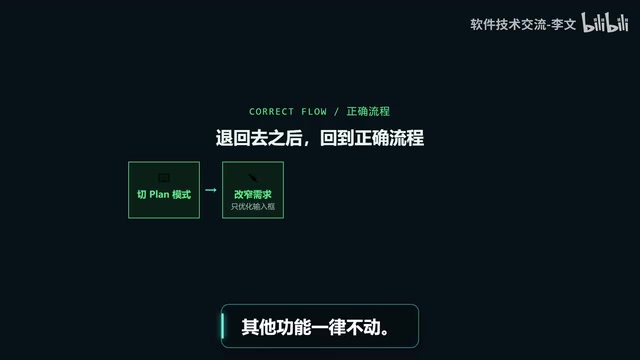
There are two remedies: first, reject changes one by one in the Diff view; second, use Checkpoint rollback — find the message you want to roll back to in the chat window, hover over it to reveal a rollback arrow, click it, and all files revert to the state they were in when that message was sent.
However, the tutorial also emphasizes Checkpoint's limitations: it's a conversation-level rollback — convenient but not fully reliable. Truly reliable version management requires Git. Although both Checkpoint and Git provide "rollback" capabilities, their mechanisms and reliability are fundamentally different. Checkpoint is Cursor's built-in session-level snapshot that records "file states before and after each AI operation," with a lifecycle bound to the current editor session — it may be lost when the project is closed and cannot sync across devices. Git is a distributed version control system where each commit generates an immutable snapshot based on SHA-1 hashing, stored in the .git directory, supporting branching, merging, remote pushing, and complete version management capabilities. The relationship between the two is like "undo button" versus "save file": Checkpoint is suited for quick experimentation and instant rollback, like quick-saving in a game; Git commit is a formal version milestone, ideal for marking stable states that have passed validation. The best practice is to execute git commit immediately after completing and validating each feature module, upgrading Checkpoint's temporary protection to a permanent version record.
The core conclusion from this crash is clear: most failures are caused by overlooked boundaries, unclear requirements, or skipped process steps — not because the model suddenly stopped working. After rolling back to the correct flow, switch to Plan mode, narrow the requirements to only optimizing the input field styling while leaving all other features untouched, and the AI can execute precisely.
The Final Gate: Hands-On Validation in the Browser
No matter how well the code is written, if it doesn't run, it's not done. The tutorial uses a browser to test each of the tool's four features one by one:
- Five-criteria scoring: Pasting "I learned programming today" scores 1 point (missing audience, pain point, tool name, visible result); pasting an optimized headline scores 5 points.
- Missing item suggestions: Whatever's missing, it suggests — with one-click insertion into the headline as a reference.
- Character count: Real-time counting with a prompt indicating whether the headline falls within the optimal 20-30 character range, avoiding platform truncation.
- History: Previously tested headlines are saved with scores in the browser locally — they persist through refreshes and browser restarts.
The "persists through refreshes and browser restarts" feature relies on the browser's native Web Storage API, specifically localStorage. Unlike sessionStorage (which clears when the page closes), localStorage data has no expiration — it persists unless the user manually clears the browser cache. Each domain typically has a 5-10MB localStorage storage limit, with data stored as key-value pairs where values can only be strings, so complex data structures need to be serialized via JSON.stringify() before storage and deserialized with JSON.parse() on retrieval. The advantage of this approach is zero configuration, zero cost, and fully offline capability, making it ideal for small utility applications. But its limitations are equally clear — data only exists in the current browser, is lost when switching devices or clearing cache, and isn't suitable for storing sensitive information.
All four items pass validation — only then is this version truly complete.
Summary: Six Good Habits That Transform Cursor Development from Guesswork to Engineering
The value of this workflow isn't in building a headline tool — it's in distilling six reusable development habits:
- Create the project folder first, then state your requirements
- Set the rules (Cursor Rules) before writing any code
- For complex tasks, use Plan mode first — review before executing
- Confirm changes line by line via Diff — review before accepting
- Checkpoint enables rollback, but reliable version management relies on Git
- Validate in the browser yourself — it's not done until it actually runs
As the tutorial states, following these six steps means you're not relying on luck — you're doing engineering. This echoes what the official documentation repeatedly emphasizes: the more important the task, the more time you should spend on planning. For beginners who truly want to get started with AI-assisted coding, understanding these three things — "seeing what changed, controlling the scope, and verifying the results" — matters far more than pursuing the ability to write complex code.
Related articles

Uber Deploys ChatGPT Work Company-Wide: AI in the Workplace Enters the Scaled Implementation Phase
Uber deploys ChatGPT Work to 30,000+ employees, extending it from engineering to all roles. We analyze its expert-engineer pairing, end-to-end automation, and questions of AI control and power concentration—insights for scaling AI in the workplace.

Shift at Midnight Hands-On: When "ID Verification" Becomes Alien Hunting
Shift at Midnight blends ID verification with horror survival in a four-player co-op game. We break down its inspection mechanics and chaotic humor.

Zelensky Recounts the Outbreak of War: I Need Ammunition, Not a Ride
Zelensky recalls the first day of war in a YouTube interview: farewell to family, rejecting Biden's evacuation offer with "I need ammunition, not a ride," and how Bucha shaped his stance on compromise and peace talks.