Dify Local Deployment: A Complete Hands-On Guide from VM Setup to AI Agent Building
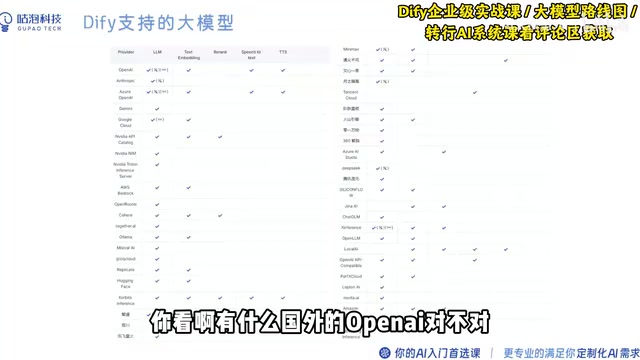
Step-by-step guide to deploying the open-source AI platform Dify locally using VMware, BT Panel, and Docker.
This article provides a complete walkthrough for deploying the open-source LLM platform Dify in a local environment. Dify combines BaaS and LLMOps principles, supports hundreds of models, and includes a built-in RAG engine and prompt orchestration interface. The recommended deployment path uses VMware with Ubuntu 22.04, then installs Dify via Docker through BT Panel's App Store. The guide covers three common beginner issues: specifying version 1.0.0, changing DNS to 8.8.8.8, and configuring Docker mirror acceleration.
As an open-source large language model application development platform, Dify is becoming the go-to tool for developers and enterprises building AI applications. This article, based on a hands-on tutorial, walks through the complete process — from environment setup to local Dify deployment — to help beginners avoid common pitfalls and get their first AI application platform up and running quickly.
What Is Dify: A "Scaffolding" Framework for AI App Development
Dify is an LLM application development platform that combines Backend-as-a-Service (BaaS) with LLMOps principles. It comes with the key technology stack needed to build LLM applications and supports hundreds of models — from Chinese platforms like Wenxin Yiyan, Doubao, Zhipu, Baichuan, iFlytek Spark, and Tongyi Qianwen, to international models like OpenAI, Gemini, and Claude.
Many people compare Dify to LangChain. The tutorial offers a vivid analogy: if LangChain is a "toolbox" full of hammers and nails, then Dify is more like a complete "scaffolding system" — it doesn't just provide tools, it delivers an engineered, software-tested solution that's closer to production-ready.
For developers, Dify's greatest value lies in "skipping the wheel-reinvention process" so you can focus on business innovation. It provides an intuitive prompt orchestration interface and a high-quality RAG (Retrieval-Augmented Generation) engine, enabling both technical and non-technical users to participate in defining and operating AI applications. As an open-source project, Dify means free usage and extensibility — which is the core reason it's worth learning.
What Can Dify Do?
Based on the tutorial, Dify's typical capabilities include: rapidly turning AI ideas into real applications; integrating large language models into existing business systems to enhance capabilities; serving as enterprise-grade LLM infrastructure to accelerate AI adoption; and enabling indie developers to easily create their own AI applications through prompt engineering and Agent techniques.
One detail worth noting is the model capability icons: in Dify's model list, a hammer icon indicates the model supports tool calling, while a glasses icon indicates vision capability. If you want to build an Agent that can call tools, you'll need to choose a model with the hammer icon — such as OpenAI, Moonshot, DeepSeek, and others.
BaaS (Backend-as-a-Service) is a cloud service model where developers can call platform-provided APIs to handle common backend functions — such as user authentication, databases, and file storage — without building and maintaining server-side infrastructure themselves. LLMOps is an extension of the MLOps (machine learning operations) concept into the era of large language models, focusing on the full lifecycle management of LLM applications — from development, testing, and deployment to monitoring — covering engineering practices like prompt version control, model call logging, and performance evaluation. By combining both, Dify hosts the foundational services needed to run AI applications (databases, vector storage, API gateways, etc.) while also providing a built-in LLM-specific operations toolchain, so developers don't need to build this complex infrastructure from scratch.
RAG (Retrieval-Augmented Generation) is currently the most mainstream solution for addressing LLMs' "knowledge cutoff" and "hallucination" problems. The core idea is: before the model generates a response, relevant passages are first retrieved from an external knowledge base (enterprise documents, PDFs, web pages, etc.), and those passages are then included as context for the model to generate answers based on real material rather than fabricating information. Dify has a built-in high-quality RAG engine — users simply upload documents, and the platform automatically handles text chunking, vector storage, and semantic retrieval, dramatically lowering the barrier to building enterprise knowledge base Q&A applications.
Pre-Deployment Environment Setup: Virtual Machine and Linux System
After testing multiple deployment methods — including local source code launch and Docker startup — the tutorial author chose the most beginner-friendly path: deploying via the BT Panel (宝塔面板). This approach first requires setting up a Linux runtime environment.
Two pieces of software are needed: VMware (either Workstation or Player) to run a Linux system, and an Ubuntu 22.04 system image.
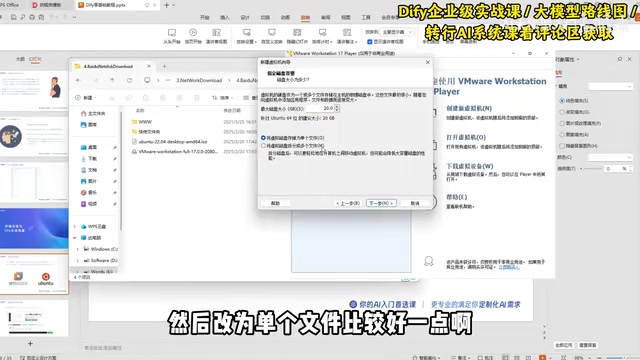
A few key reminders when installing VMware: do not install it on the C drive, as running it generates large amounts of cache files that can easily fill up your system partition — use another drive instead. After installation, open VMware, select "Create a New Virtual Machine," follow the wizard and choose "I will install the operating system later," set the guest OS type to Linux, and choose Ubuntu 64-bit as the version.
Virtual Machine Disk and System Installation
When allocating disk space, 20GB is sufficient if the VM is only used for deploying Dify. It's recommended to choose "Split virtual disk into multiple files." Once created, the virtual machine is still an empty shell and cannot start — you need to mount the system image.
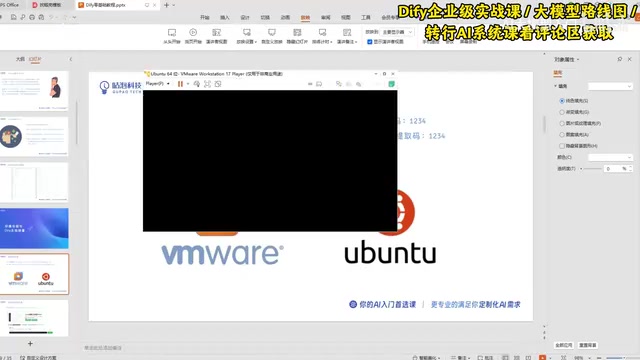
In the virtual machine settings, find the CD/DVD option, select "Use ISO image file," and point it to your downloaded Ubuntu 22.04 image — essentially inserting the installation disc into the virtual optical drive. Then start the VM, select "Try or Install Ubuntu," wait for it to load, and enter the graphical installation interface. Set the language to "Simplified Chinese."
For installation type, if you're only using BT Panel to deploy Dify, "Minimal installation" is sufficient; if you also plan to do other Linux development, choose "Normal installation." For disk handling, simply select "Erase disk and install Ubuntu," leave the timezone set to Shanghai, and finally set your username and password (you can check "Log in automatically" to skip the login prompt each time). After installation, restart and remove the image to enter the system.
Installing BT Panel: A Key Step for Visual Server Management
Once the system is ready, the next step is to deploy BT Panel. The official BT Panel website provides a one-click installation command for Linux panels. Go to the website, select "Linux Panel" → "Install Free Version," and be careful to avoid the ad links at the top of the page.
Copy the installation command corresponding to your system version (Ubuntu), go back to the VM, open a terminal with Ctrl+Alt+T, paste the command, and press Enter. The first execution requires entering the system password (it's normal for characters not to appear while typing). When prompted for directory authorization during installation, type Y to confirm.
After installation, the terminal will display the panel login information, including the external URL, internal URL, username, and initial password. For local deployment, it's recommended to use the internal network address, since the machine's external IP is dynamic. Copy the internal address into a browser to access the BT Panel login page.
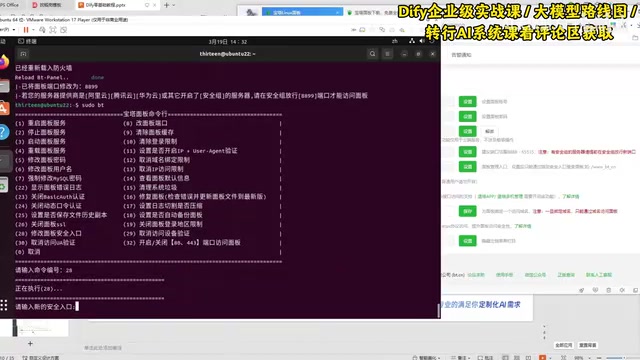
For easier future access, you can use the built-in bt command-line tool to modify panel settings — including changing the username and password, adjusting the port number, and modifying the security entrance path. For example, change the hard-to-remember random port to 8899 and update the security entrance to a more memorable path. Reload the firewall rules afterward for changes to take effect.
Deploying Dify via Docker and Troubleshooting Common Issues
BT Panel integrates a Docker application module, making Dify deployment as simple as clicking through a few screens. First, find the Docker menu in BT Panel and click install (the default installation method is fine) — this step will take a few minutes.
Once Docker is successfully installed, search for "Dify" in the App Store and click install. In practice, however, beginners often run into problems at this stage. The tutorial covers solutions to three common types of failures:
Issue 1: Installation Fails or Version Errors
If the installation gets stuck for a long time and the log shows btfile-type errors, try uninstalling and reinstalling, this time specifying version 1.0.0.
Issue 2: Image Pull Failures Due to Network Issues
If errors persist after switching versions, the problem is likely the VM's network configuration. The fix is to modify the DNS settings: log into the VM, use nano to edit /etc/resolv.conf, change the nameserver to 8.8.8.8, add a new line 8.8.4.4, save and exit, then restart the panel.
Issue 3: Docker Image Acceleration
If images still can't be pulled after changing the DNS, try modifying the acceleration URL in Docker settings. Find available mirror acceleration links through BT Panel's help tutorial page, try them one by one by entering them in the settings, restart Docker, then uninstall and reinstall Dify — it should install successfully.
After installation, refresh the panel to see Dify in "Running" status. Copy its access address, change https to http, change the port to 8088, and append /install to the URL to reach the initialization interface. After setting up your email and username, your locally deployed Dify is officially up and running.
Docker is a containerization technology that packages an application along with all its dependencies (runtime, libraries, configuration files) into a standardized "container image," ensuring it runs in a completely consistent way across any environment — definitively solving the classic "it works on my machine" problem. Dify's official team provides pre-built Docker images, and Docker Compose can start multiple service components at once, including the web frontend, API service, database, vector database, and message queue. BT Panel further wraps Docker installation and the app store in a graphical interface, allowing users unfamiliar with the command line to complete deployments that would otherwise require writing a docker-compose.yml file. Image pull failures are the most common obstacle when deploying Docker applications in China — the root cause is network-level access restrictions to overseas registries like Docker Hub. Configuring a domestic mirror acceleration address or modifying DNS settings are the standard remedies.
Summary
This BT Panel-based local Dify deployment approach graphically streamlines what would otherwise be a complex command-line-heavy process, making it quite beginner-friendly for AI application developers. The entire workflow can be summarized as: VMware + Ubuntu 22.04 to set up the Linux environment → BT Panel one-click installation → Docker deployment of Dify → troubleshooting network and image issues.
Completing the local deployment is just the starting point. Following the tutorial roadmap, you can go on to build intelligent chatbots and Agents on Dify, use the toolbox, design workflows, mount knowledge bases (RAG), and ultimately publish your work as a public website or embed it into your own application via API. For readers looking to get started with LLM application development, getting this local environment up and running is a solid and meaningful first step.
Related articles

A DeepSeek Researcher's Confession: The AI He Trained Is About to Replace Him
DeepSeek V4.1 kernel engineer Liu Shengyu admits the AI he trained will surpass his own skills within a year—yet he keeps pushing forward. Here's why.
n8n Automation in Practice: How AI Workflows Help SMBs Cut Costs and Boost Efficiency
Learn how SMBs use n8n and AI tools to automate multi-platform messaging, AI customer service replies, and bulk exam data entry — real-world workflows for cutting costs.
DeepSeek Harness Hands-On: Build Your Own Coding Agent for Free
DeepSeek Harness hits 190K GitHub stars as a free Claude Code alternative. This hands-on review covers installation, plugin models, full traceability, and driving Claude Code as a subprocess.