Dify Local Deployment in Practice: A Complete Guide with BT Panel + Docker

Deploy the open-source Dify AI platform locally using the BT Panel and Docker—beginner-friendly.
A complete hands-on guide to deploying Dify locally via the BT Panel on a VMware virtual machine, covering Ubuntu 22.04 setup, Docker configuration, and solutions to common issues like image pull failures. Even beginners with no ops experience can complete it, and go on to build chatbots, Agents, workflows, and RAG knowledge bases.
What Is Dify? Why Is It Worth Learning?
Dify is an open-source large language model (LLM) application development platform that combines the concepts of Backend-as-a-Service (BaaS) and LLMOps.
LLMOps (Large Language Model Operations) is an extension of MLOps into the era of large models, covering the full lifecycle management of LLM applications—from development and testing to deployment and monitoring. BaaS (Backend-as-a-Service) is a cloud service model where developers don't need to build and maintain their own server infrastructure but can directly call the backend capabilities provided by the platform. By combining both, Dify allows developers to enjoy out-of-the-box AI backend services while also performing fine-grained operational management over model calls, prompts, and data pipelines.
The Technical Lineage of LLMOps: LLMOps evolved from MLOps (Machine Learning Operations), while MLOps itself is an extension of DevOps concepts into the AI field. Traditional MLOps focuses on model training, feature engineering, and model serving; LLMOps builds on this by adding operational dimensions unique to large models, such as prompt version management, model A/B testing, token usage monitoring, and conversation log analysis. Typical representatives of the BaaS model include Firebase, Supabase, and others, which enable frontend developers to build complete applications without backend knowledge. By fusing these two concepts, Dify essentially provides an integrated "full-stack hosting + fine-grained operations" platform for AI applications.
It's worth noting that the core difference between LLMOps and traditional MLOps lies in the shift of the iteration target: the core iteration unit in traditional MLOps is model weights (improving results through retraining), whereas the core iteration unit in LLMOps is prompts and context engineering (improving results by adjusting the System Prompt, Few-shot examples, and retrieval strategies). This shift makes "prompt version control" and "conversation quality evaluation" first-class citizens in the LLMOps toolchain, and Dify's prompt orchestration and log-tracing features are a direct response to this need.
Its core value lies in the fact that whether you're a professional developer or a non-technical user, you can quickly build production-grade generative AI applications.
For developers, Dify comes with the key technology stack needed to build LLM applications—supporting hundreds of models, providing an intuitive prompt orchestration interface, and featuring a high-quality built-in RAG (Retrieval-Augmented Generation) engine.
Background on RAG Technology: RAG (Retrieval-Augmented Generation) is one of the most mainstream technical paradigms in enterprise-grade AI applications today. Its core idea is: before handing a user's question to the large model to answer, first retrieve relevant content from an external knowledge base (such as enterprise documents or databases), then feed the retrieval results together with the question into the model. This gives the model's answers both strong reasoning capabilities and the ability to incorporate the latest, private knowledge. This approach effectively solves the "hallucination" problem of LLMs and the limitation of knowledge cut-off dates, forming the foundational architecture for building enterprise intelligent customer service and document Q&A systems.
The engineering implementation of RAG involves two key stages: the offline indexing stage (chunking documents, vectorizing them, and storing them in a vector database) and the online retrieval stage (vectorizing the user's question and recalling the most semantically similar text chunks from the database). Dify's built-in RAG engine handles all the details of both stages, including document parsing, chunking strategies (fixed-size/semantic chunking), embedding model selection (such as text-embedding-3-small), and retrieval algorithms (vector search/keyword search/hybrid search). On the vector database side, Dify supports mainstream solutions such as Weaviate, Qdrant, Milvus, and pgvector, allowing developers to choose flexibly based on data scale and performance requirements.
In real-world engineering, the quality of RAG results largely depends on the choice of chunking strategy: Fixed-size Chunking is simple to implement but may cut off content at semantic boundaries; Semantic Chunking splits based on paragraph structure or sentence similarity, preserving more complete semantic units but at a higher computational cost. Additionally, Hybrid Search (combining vector similarity search with BM25 keyword search) generally offers more stable recall quality than a single retrieval method, because vector search excels at handling semantically ambiguous questions, while keyword search is more reliable for exact-match needs such as proper nouns and code snippets.
This means you don't need to "reinvent the wheel" from scratch and can focus your energy on business innovation.
If we compare the common development library LangChain to a "toolbox" (containing various tools like hammers and nails), then Dify is more like a complete set of "scaffolding"—it not only provides tools but has also undergone full engineering design and software testing, capable of directly supporting a complete application. More importantly, Dify is open-source and free, so you can freely extend it.
The Positioning Difference Between LangChain and Dify: LangChain is a Python/JavaScript development framework that provides low-level abstractions such as model calls, chained reasoning, memory management, and tool integration, suitable for developers with programming skills to build customized AI applications with code. Dify, on the other hand, builds a complete product layer on top of low-level libraries like LangChain, offering out-of-the-box features such as a visual orchestration interface, user management, API publishing, and monitoring dashboards. The two are not in competition—Dify's underlying implementation itself uses some LangChain components. A more accurate analogy is: LangChain is the "engine," and Dify is the "complete vehicle." For teams looking to quickly validate a product idea or build internal tools, Dify offers a higher degree of engineering readiness; for scenarios requiring deep customization of reasoning logic, directly using frameworks like LangChain is more flexible.
Which Models Does Dify Support?
Dify offers fairly comprehensive compatibility with mainstream large models both domestic and international:
- International models: OpenAI (GPT series), Google Gemini, Cohere, etc.
- Chinese models: Zhipu, Baichuan, iFlytek Spark, Tongyi Qianwen, Ernie Bot, Doubao, DeepSeek, Moonshot, etc.
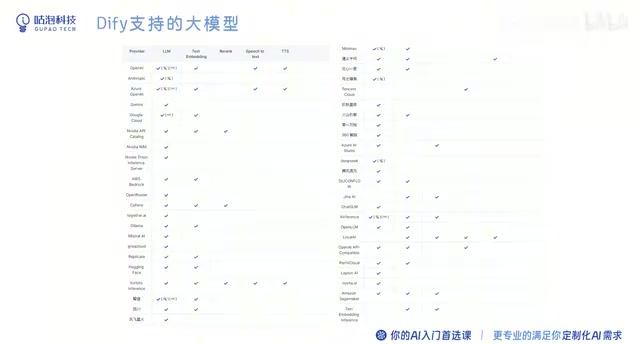
In the model list, Dify uses icons to indicate model capabilities: the hammer icon indicates the model supports tool calling (Function Calling), while the glasses icon indicates support for vision (multimodal) capabilities.
Understanding Function Calling: Function Calling (tool calling) refers to a large language model's ability to recognize user intent during a conversation and proactively call external functions or APIs to obtain real-time information or perform operations. For example, when a user asks "What's the weather like in Beijing today?", a model with Function Calling capability won't make things up but will instead call a pre-registered weather query tool to obtain real data before answering. This is the core capability for building AI Agents—without tool calling, an Agent can only "speak" but not "act." OpenAI first standardized this capability in 2023, and Chinese models like DeepSeek and Moonshot subsequently followed suit.
At the technical implementation level, Function Calling works by injecting tool descriptions (function signatures in JSON Schema format) into the model's System Prompt, guiding the model to output structured JSON call instructions when needed. The caller (such as Dify's Agent module) parses this JSON, executes the corresponding external function, injects the result into the conversation context, and then lets the model generate the final answer based on the real data. This "reason → call → reason again" loop is exactly the core of the ReAct Agent architecture. It's worth noting that different models vary in tool-calling stability and their ability to call multiple tools in parallel, so it's recommended to test based on your actual business scenario when making a selection.
Engineering Background of Multimodal Capabilities: The vision capability represented by the glasses icon (Vision/multimodal) means the model can accept images as input, understand image content, and reason in combination with text instructions. The underlying architecture of such models (such as GPT-4o, Gemini 1.5 Pro, and the Claude 3 series) typically uses a vision encoder (like CLIP or ViT) to convert images into vector representations, which are then fed together with text tokens into the Transformer decoder. In Dify's workflow scenarios, multimodal capabilities can be used to build applications like image content moderation, receipt recognition, and chart interpretation; in chat application scenarios, users can directly upload screenshots or product images to ask the AI questions, greatly expanding the boundaries of interaction.
If you plan to build an Agent that can call tools, you'll need to choose models marked with the "hammer" icon—Chinese models such as DeepSeek and Moonshot also have tool-calling capabilities.
Preparation Before Deployment: Virtual Machine and System Environment
Dify supports multiple deployment methods, including source-code startup and Docker deployment. After hands-on comparison, this article recommends the most beginner-friendly approach—local deployment via the BT Panel.
This approach requires two things:
- Virtual machine software: VMware Workstation or VMware Player (used to run the Linux system)
- Linux system image: Ubuntu 22.04
Background on VMware Virtualization Technology: VMware uses a Type-2 Hypervisor (hosted virtual machine monitor) architecture, running on top of the host operating system and simulating a complete hardware environment (CPU, memory, disk, network card) through software to run guest operating systems. Compared with installing Linux directly on a physical machine, the advantages of the virtual machine approach are: you can create snapshots at any time (saving the current state so you can roll back with one click in case of errors), disk files can be copied and migrated, and it doesn't affect the host system. VMware Workstation Pro has been free for personal users since 2024, while VMware Player has always been a free version. If you're using an Apple Silicon Mac, you can consider UTM or Parallels Desktop as alternatives; if you're operating in a native Linux or WSL2 environment, you can skip the virtual machine step and proceed directly to the subsequent deployment.
Why Choose Ubuntu 22.04 LTS: Ubuntu 22.04 is a Long-Term Support (LTS) version released by Canonical, with an official commitment to provide security patches and maintenance updates until 2027, making it more suitable as a base server system than short-cycle versions. Ubuntu's compatibility within the Docker ecosystem has been the most extensively validated, and the vast majority of Docker images are built and tested with Ubuntu as the benchmark environment. In addition, the Linux kernel version used by 22.04 (5.15 LTS) provides full support for underlying features that Docker relies on, such as cgroups v2 and OverlayFS, effectively avoiding container runtime anomalies found on some older systems.
Installing the virtual machine is very simple—just double-click the installer and click "Next" all the way through. Here's an important reminder: neither the VMware software itself nor the subsequent virtual machine system should be installed on the C drive, because a large number of cache files are generated during operation, which can easily fill up the system drive.
Creating and Installing an Ubuntu Virtual Machine
After opening VMware, select "Create a New Virtual Machine" → "I will install the operating system later" → choose the "Linux" system, and select Ubuntu 64-bit for the version. When allocating disk space to the virtual machine, if it's only used to deploy Dify, 20GB is sufficient, and it's recommended to select "Split virtual disk into multiple files."
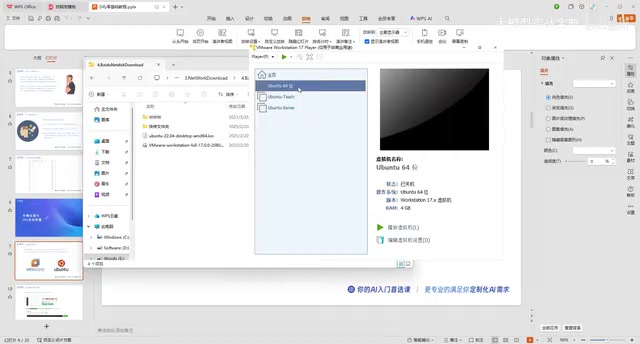
The newly created virtual machine is an "empty shell" and cannot be started directly because there's no operating system inside yet. Next, in the virtual machine settings, find the "CD/DVD" option, select "Use ISO image file," and mount the downloaded Ubuntu image into it—this is equivalent to "inserting an installation disc" into the computer.
After starting the virtual machine, select "Try or Install Ubuntu" to enter the installation interface. Choose "Chinese Simplified" for the language, and keep the keyboard layout at default. Choose "Minimal installation" for the installation type (if you also need to do other Linux development, you can choose "Normal installation").
Don't worry when the system prompts that the disk has no operating system—this just means the allocated 20GB of space is empty. Simply select "Erase disk" and "Install Now." After setting up your username and password (it's recommended to check "Log in automatically" to save the hassle of entering the password each time), just wait for the installation to complete.
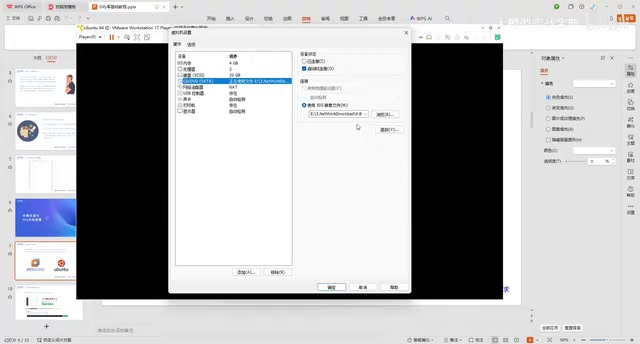
After the installation is complete, the system will prompt you to restart. After removing the image disc, you can enter the brand-new Ubuntu desktop.
Installing the BT Panel
Once you have the Ubuntu system, the next step is to install the BT Panel—it turns the subsequent Docker and Dify deployment into a visual "point-and-click" operation, greatly reducing reliance on the command line.
Technical Positioning of the BT Panel: The BT Panel (Baota Panel) is essentially a web console program running on a Linux server. Written in Python, it manages services such as Nginx, Apache, MySQL, and PHP by calling system commands. It transforms server operations that would otherwise require extensive command-line knowledge (such as configuring virtual hosts, managing SSL certificates, and viewing system resources) into visual web-based interface operations. In VPS operations scenarios for small and medium-sized enterprises and individual developers in China, the BT Panel holds an extremely high market share. Note that the panel itself consumes a certain amount of system resources and may affect performance on machines with less than 1GB of memory; for production environments, it's recommended to change the default port and enable secure entrance verification to improve security.
Visit the BT Panel official website, select "Linux Panel" → "Install Free Version," being careful to avoid the advertising links at the top of the page. Choose Ubuntu based on your system version, then copy the installation command.
Back in the virtual machine, use the shortcut Ctrl + Alt + T to open the terminal, paste the command, and press Enter. The system will ask you to enter your password (note that Linux terminals don't display characters when you type a password—this is normal). After confirming, the installation will begin.
After the installation is complete, the BT Panel will output a set of key information: the panel login address, username, and default password. Since this is a local deployment, simply use the "intranet address" to access it. Copy the address into your browser to open it, and enter the username and password to log in to the BT Panel.
Customizing Panel Security Settings
The first login will require you to read the agreement and bind an account. After entering the panel, it's recommended to change the default login port, password, and secure entrance to make access both more convenient and more secure.

Besides modifying settings on the web interface, you can also run the bt command (short for Baota) in the virtual machine terminal to restart the panel, change the port, and modify the password and secure entrance through the command-line menu. For example, change the default complex port to an easy-to-remember 8899, and change the lengthy secure entrance to an easy-to-remember name like bthou.
Deploying Dify via Docker
Docker is currently the most mainstream containerization platform. Its core idea is to package an application and all its dependencies (runtime, libraries, configuration files) into a standardized "container image." The benefit of this is that no matter which machine runs this image, the application's behavior is completely consistent, thoroughly solving the classic deployment problem of "it works on my computer."
Dify is deployed using Docker Compose, and a single command can simultaneously start multiple service components including the frontend, backend, database, and vector database, greatly simplifying the originally complex process of deploying distributed applications.
The Relationship Between Docker and Docker Compose: Docker solves the packaging and running of a single application, while Docker Compose solves the orchestration of multi-container applications. The full operation of Dify requires multiple independent services working together: Nginx (reverse proxy), the web frontend, the API backend (Python/Flask), Worker for asynchronous task processing, PostgreSQL (a relational database storing user data), Redis (cache and message queue), and a vector database (such as Weaviate). Docker Compose describes the dependencies, network configuration, and data volume mounts of these services through a YAML configuration file (docker-compose.yml). After running
docker-compose up, all services can be started in the correct order with one click, and they are ensured to communicate within the same virtual network.The Underlying Mechanism of Containerization: A Docker container is not a virtual machine—it doesn't simulate complete hardware but shares the host machine's Linux kernel, achieving lightweight isolation through Linux Namespaces (process, network, and filesystem isolation) and cgroups (CPU and memory resource limits). A container's filesystem is built in layers based on OverlayFS: image layers (read-only) + container layer (writable), which allows multiple containers to share the same read-only image layer, greatly saving disk space. Precisely because it doesn't need to simulate hardware, the startup time of a Docker container is usually on the order of seconds, whereas a virtual machine often takes tens of seconds or longer to start. For an application like Dify that contains 7-8 service components, using Docker Compose for unified management is much more concise than installing native services one by one on the system, and it's also easier to migrate and roll back versions.
The BT Panel integrates a Docker module, which makes Dify's local deployment exceptionally simple.
First, find "Docker" on the left side of the BT Panel and click "Install," keeping the installation method at default. Docker installation takes some time, so just wait patiently. After a successful installation, refresh the page to see the Docker-related features.
Next, search for "Dify" in the Docker app store, click "Install," and confirm. The application name can be customized or kept at default.
Common Deployment Issues and Solutions
In actual operation, Dify installation failure is the most common problem beginners encounter. Here are three typical scenarios and their corresponding solutions:
Problem 1: Version Installation Error
If the installation gets stuck for a long time or even throws errors like BTFile, first uninstall it, then search for Dify again, change the version to 1.00, and try installing again.
Problem 2: Docker Image Pull Failure (Network Issue)
If errors persist after changing the version and the image cannot be pulled, it's usually a DNS configuration issue.
Principles of DNS and Image Pulling: DNS (Domain Name System) is responsible for resolving domain names into IP addresses. By default, the virtual machine inherits the host machine's DNS configuration, which in certain network environments may fail to correctly resolve the domain name of Docker Hub (Docker's official image registry), leading to image pull failures. Changing the DNS to Google's public DNS (8.8.8.8 and 8.8.4.4) can improve resolution stability. It's important to understand that
/etc/resolv.confis the DNS configuration file of the Linux system, and thenameserverfield specifies the DNS server address that the system prioritizes when querying domain names; this file may be reset by the network manager after a system reboot. To make it permanently effective, you can persist the settings by modifying/etc/systemd/resolved.confor the NetworkManager configuration.
The solution steps are as follows:
- Run
nano /etc/resolv.confin the virtual machine terminal - Change
nameserverto8.8.8.8, and add a new linenameserver 8.8.4.4 - Save and exit (
Ctrl+Oto confirm,Ctrl+Xto leave) - Run the relevant commands to restart the panel and clear the cache
Problem 3: Still Unable to Pull Images After Changing DNS
Due to network access restrictions, it's a common problem that direct connections to Docker Hub from within China are slow or even fail. You can configure a mirror acceleration address in the Docker settings—its principle is to forward image requests to domestic cache nodes such as Alibaba Cloud and Tencent Cloud, bypassing the direct-connection bottleneck. Click "Help" to enter the BT Panel tutorial, find the acceleration links, fill them in and test them one by one, and after modification, restart Docker to pull normally.
How Docker Image Acceleration Works: A Docker image consists of multiple layers, each corresponding to one instruction in the Dockerfile, and layers are identified by content addressing (SHA256 hash). When
docker pullis executed, the Docker client sends a request to the image registry (Registry) to download the compressed packages of each layer. Docker Hub's servers are located overseas, so pulling from within China is limited by international bandwidth, making it extremely slow or even timing out. A mirror accelerator works as follows: a reverse proxy node is deployed within China. When you request a certain image from the acceleration address, if the node has already cached the image, it returns it directly; otherwise, it pulls the image from Docker Hub, caches it, and forwards it. Alibaba Cloud, Tencent Cloud, and Huawei Cloud all provide such services, among which Alibaba Cloud's acceleration address requires logging in to your account to obtain a personal dedicated address. After configuring an accelerator, the speed ofdocker pullcan usually increase from tens of KB/s to several MB/s or even higher.
Completing Deployment and Accessing Dify
When Dify's status changes to "Running," copy its access address and make two adjustments:
- Change
httpstohttp - Change the port to
8088, and append/installafter it
For example, accessing http://intranet-IP:8088/install will take you to Dify's initialization installation interface. After setting up the administrator email and username, Dify's local deployment is complete.
Summary
This article has thoroughly outlined the entire process of deploying Dify locally via the BT Panel: from understanding the positioning and model support of this open-source LLM application development platform, to setting up a VMware virtual machine and Ubuntu system, then installing the BT Panel and Docker, and finally completing Dify's local deployment.
The core advantage of this entire approach is replacing complex command-line operations with a graphical panel, allowing even beginners with no operations experience to smoothly complete the process. The image pull failures encountered during deployment can, in the vast majority of cases, be resolved by changing the DNS or configuring image acceleration.
Completing the local deployment is just the first step. Going forward, you can build intelligent chatbots on Dify, configure Agent toolboxes, design automated workflows, mount knowledge bases (RAG), and ultimately publish your own AI applications in the form of public sites or APIs.
Key Takeaways
Related articles
Altman: Taking OpenAI Public This Year Would Be 'Ill-Advised'
OpenAI CEO Sam Altman says going public this year would be 'ill-advised,' even as the company has confidentially filed IPO paperwork. Here's what it means for AI.

An Open Letter to Dario: If AI Safety Is Real, Open the Model Weights
Developer Jacob's open letter to Anthropic CEO Dario Amodei went viral on Hacker News, challenging the contradiction between AI safety rhetoric and closed-source models: if safety truly matters, why not open the weights?
Ludwig: Building Custom LLMs and Neural Networks with Declarative Low-Code Configuration
Ludwig is an open-source low-code ML framework that builds custom LLMs and neural networks via declarative YAML config — no boilerplate training code required.