How to Use Codex in China Without a ChatGPT Account: A Complete Guide with DeepSeek

Use Codex in China without a ChatGPT account by connecting DeepSeek via Codex++ in a few simple steps.
This guide shows Chinese users how to bypass ChatGPT account and network restrictions to use OpenAI's Codex coding assistant. By installing the Codex++ management tool and configuring DeepSeek's OpenAI-compatible API, you can run Codex with a domestic LLM backend — starting for as little as ¥10, no VPN or ChatGPT Plus subscription required.
Why Chinese Users Need to Work Around ChatGPT Restrictions
Codex, OpenAI's AI-powered coding assistant, is becoming an essential tool for more and more developers. OpenAI Codex is a large language model fine-tuned specifically for code generation tasks based on the GPT architecture — first released in 2021 and used to power GitHub Copilot.
To understand the technology more deeply: Codex's underlying architecture traces back to GPT-3, trained on billions of lines of public GitHub code. The core of the GPT (Generative Pre-trained Transformer) architecture is the self-attention mechanism, whose theoretical foundation comes from Google's landmark 2017 paper Attention Is All You Need — which introduced the Transformer architecture built entirely on attention mechanisms, replacing the previously dominant RNN/LSTM sequential models.
Self-attention allows the model to simultaneously compute the relevance weight between each token in a sequence and every other token, rather than linearly passing context step by step as early RNNs did. Mathematically, the mechanism projects the input sequence into three matrices — Query (Q), Key (K), and Value (V) — computes attention weights via the dot-product similarity between Q and K, then produces a weighted sum of V. The entire operation is highly parallelizable. This fundamentally overcomes the "forgetting" problem caused by vanishing gradients in RNNs over long sequences — while RNN hidden states dilute early information after hundreds of steps, any two positions in a Transformer have an information path length of exactly 1, regardless of distance. For code generation, this is critical: it allows Codex to recall variable types defined hundreds of lines earlier, interface signatures, and cross-file module dependencies while processing the current function name — generating semantically coherent code blocks, not just syntactically correct text.
The current version integrates the capabilities of the newer GPT-4 series and no longer exists as a standalone model — it functions as a feature module within ChatGPT, which explains why using it requires a ChatGPT Plus subscription. Codex can interpret natural language instructions and generate code in multiple programming languages, combining code completion, debugging, and refactoring capabilities. But it comes with a clear barrier: as an OpenAI product, Chinese users who want to use it directly must satisfy three conditions simultaneously — having a ChatGPT account, an active ChatGPT Plus membership, and access to overseas networks.
For most users in China, all three conditions are nearly impossible to meet: registration is difficult, payment is difficult, and network access is even harder. The good news is that we can bypass these restrictions entirely by using domestic large language models (such as DeepSeekAd or Doubao) as the underlying engine for Codex. This guide walks through a complete local configuration process, so users without a ChatGPT account can get up and running smoothly.
There are two broad approaches: if you already have a ChatGPT Plus account, simply download the official Codex and log in; if you have no account, no membership, and no suitable network access, you'll need a third-party management tool to configure DeepSeek as the backend model. This guide focuses on the latter.
Step 1: Download and Install Codex
The domestic solution requires downloading two tools: the official Codex installer, and a third-party management utility called Codex++ that modifies the login method.
Start by installing Codex itself. Windows users can click the Start button, search for and open the Microsoft Store, then search for "Codex". Mac users can find it in the App Store. Click "Get" and follow the prompts — it's no different from installing any regular app.
Here's a critical reminder: do not open Codex immediately after installation. Launching it directly will default to requiring a ChatGPT account login, which we don't have. The correct approach is to first install the Codex++ management tool, then use it to switch the login method.
Step 2: Install the Codex++ Management Tool
Codex++'s purpose is straightforward: it doesn't modify any of Codex's core functionality — it only changes the login entry point, allowing us to connect to domestic large language models.
Since Codex natively only supports ChatGPT account login, the community has developed several third-party tools to extend login options, and Codex++ is the most widely used. The reason these tools can swap out the underlying model is that domestic models like DeepSeek and Doubao all implement interfaces compatible with the OpenAI API specification (i.e., an OpenAI-compatible API).
This standard has deep industry roots: when OpenAI launched its API service in 2020, it defined a clean HTTP REST interface — clients send a JSON request body containing the model name, conversation history, and parameters to the /v1/chat/completions endpoint, and the server responds in either streaming or non-streaming format. "Streaming" refers to the server using the Server-Sent Events (SSE) protocol to push generated tokens to the client one by one in real time, rather than waiting for full generation before returning — this is the technology behind the "text appearing character by character" effect in ChatGPT's interface, and it allows users to see partial results earlier with lower perceived latency. Because OpenAI has the largest developer ecosystem, tens of thousands of tools, plugins, and applications are built on this specification, making it a de facto standard in the LLM space.
Domestic providers like DeepSeek, Moonshot (Kimi), and Zhipu AI (GLM) have broadly chosen to be compatible with this standard when launching their API services — a pragmatic strategy to leverage an existing ecosystem. By staying compatible with the OpenAI interface, domestic providers can directly inherit the massive existing tooling ecosystem, allowing any client originally designed for OpenAI to connect without changing a single line of code. For developers, this means only replacing the base_url from api.openai.com to the domestic provider's address, plus swapping in the corresponding api_key, to complete a seamless migration. Codex++ exploits exactly this: it redirects Codex's API requests from OpenAI's servers to a domestic model endpoint, effectively replacing the login method.
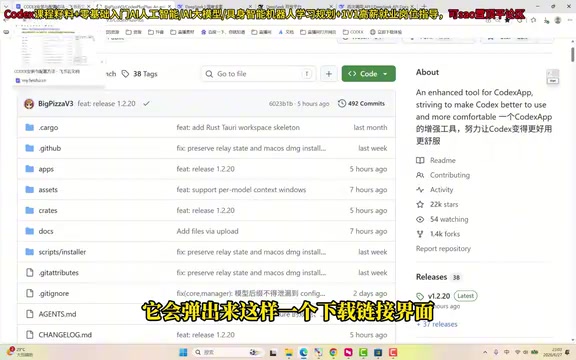
You can find the latest version on the Codex++ GitHub Releases page. If GitHub is inaccessible from your network, try refreshing a few times, or use the installation package the author has pre-uploaded to a cloud drive.
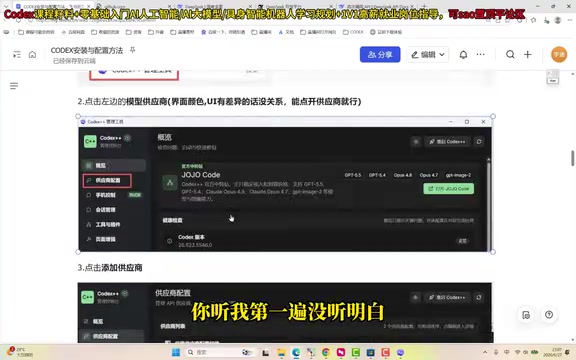
Install by clicking "Next" through all the defaults. After installation, three related programs will appear on your computer: Codex, Codex++, and Codex++ Key Tool. Look for and open the third one — "Codex++ Key Tool" — don't pick the wrong one.
Step 3: Configure DeepSeek API as the Backend Model
Once the Codex++ Key Tool is open, you'll see many options — but we only need to focus on the Model Provider configuration on the left side. Click into it; it will be empty by default, and you'll need to manually add a domestic model.
Filling in Provider Information
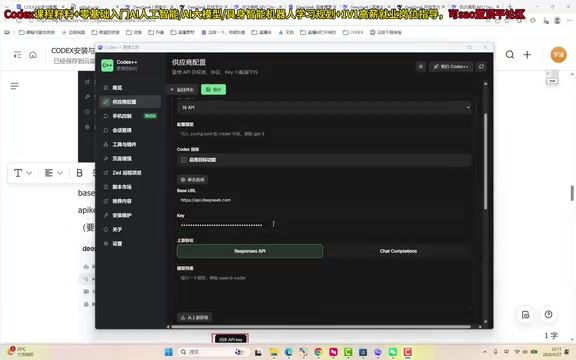
Click "Add Provider" and fill in the following:
- Name: Enter anything for personal identification, e.g., "DeepSeek".
- Access Mode: Make sure to select Pure API mode, since we're calling DeepSeek via API.
- Base URL: Enter DeepSeek's API address:
api.deepseek.com. The Base URL is the root address of the API service — all specific endpoint calls are appended to this (e.g., the full chat endpoint isapi.deepseek.com/v1/chat/completions). Copy and paste to avoid typos.
Obtaining and Entering Your DeepSeek API Key
The Base URL tells Codex "where to find DeepSeek," while the API Key is the credential that "proves your identity." API Keys are authentication strings used by LLM providers for identity verification and usage tracking, typically beginning with sk-.
Technically, every HTTP request includes an Authorization: Bearer <your_api_key> header. The server verifies the key's validity and associated account via cryptographic hashing, then processes the request, meters token usage, and bills the corresponding account. This authentication mechanism is essentially a simplified version of the OAuth 2.0 Bearer Token model, omitting the complex handshake steps like authorization code exchange and token refresh — making it particularly suited for high-frequency, stateless API calls.
For this reason, API Key security is critical — if leaked, anyone holding it can consume your account credits, and providers generally cannot distinguish legitimate requests from unauthorized ones. Key risk scenarios to watch out for include: pushing code containing an API Key to a public GitHub repository (GitHub's Secret Scanning feature may detect and alert you, but the leak has usually already occurred); accidentally exposing the key in screenshots or screen recordings; and entering your key into untrusted third-party tools. It's recommended to store your API Key in your OS keychain or a professional password manager (such as 1Password or Bitwarden) rather than in a plain text file or screenshot. If you suspect a key has been compromised, immediately revoke it in the dashboard and generate a new one.
To obtain your key:
- Go to the DeepSeek official website and navigate to the API Open Platform.
- Find API Keys in the left sidebar and click Create to generate a new key.
- Important: The key is only shown once upon creation. Copy it immediately and save it to a local file or notepad. After closing the dialog, you cannot view it again — you'd have to create a new one.
Paste the copied API Key into the corresponding field in Codex++, and leave the protocol option at its default on the right.
Fetching the Model List and Saving
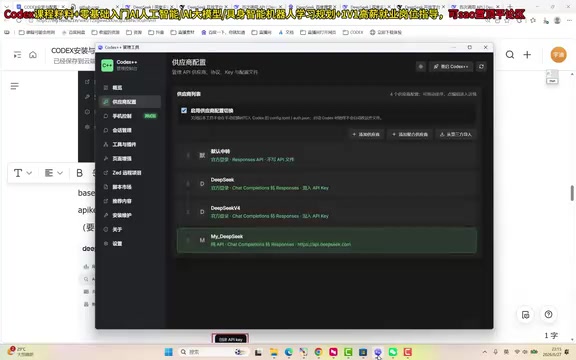
Once filled in, click "Fetch from Upstream". The tool will test whether the current URL and API Key can successfully retrieve the model list. If DeepSeek's available models (such as DeepSeek Pro) are returned, the connection is working. No need to manually select a model — just scroll up to find the Save button and click it.
After saving, a new configuration entry will appear. Hover over the right side and click "Use". When it shows "In Use", the configuration is complete.
Step 4: Top Up Credits and Launch Codex
There's one more step after configuration: make sure your DeepSeek account has a balance. Codex is just the interface — the actual task processing is done by the underlying LLM, and you need to top up with whichever provider you're using.
Tokens are the basic unit of measurement for how LLMs process text — understanding them helps you manage costs effectively. Before processing text, LLMs first pass it through a tokenizer that splits the raw string into tokens. Chinese characters, being denser, average about 1.5 characters per token; English words are typically split by morpheme, averaging about 4 characters per token; code elements like indentation and brackets also each consume tokens. Current mainstream models widely use the Byte Pair Encoding (BPE) algorithm for tokenization: starting from individual bytes, it iteratively merges the most frequently occurring adjacent byte pairs in the training corpus to build a vocabulary covering common roots, affixes, and complete words — balancing compression ratio and generalization. This is also why the same text may yield different token counts across different models.
In practice, trimming redundant context from your prompts (e.g., avoiding repeatedly pasting an entire code file) is an effective way to reduce token usage — the more precise your input, the lower the cost and the more focused the model's attention. The computational cost of model inference is determined by: input tokens × input price + output tokens × output price. Output tokens are typically 2–4× more expensive than input tokens, because the generation phase requires autoregressive sampling token by token, running a full forward pass at each step — far more computationally intensive than the parallelized input encoding phase. DeepSeek V3 is priced at approximately ¥0.27 per million input tokens and ¥1.1 per million output tokens — about 90% cheaper than the equivalent pricing for OpenAI GPT-4o — making daily usage costs extremely low for domestic users.
Head to the DeepSeek official website's top-up page. Starting with just ¥10 is enough. Even with heavy daily use (including background tasks running after shutdown), a month's cost is around ¥100 — far below ChatGPT Plus's fixed subscription of approximately ¥140/month. For casual learning purposes, ¥10 will last a surprisingly long time.
Launching Codex Correctly Through the Management Tool
After topping up, return to the Codex++ Key Tool and click the "Restart Codex++" button in the top-right corner. Important: you must launch Codex through this management tool — do not double-click the Codex app directly — otherwise the login method override won't take effect.
The tool will automatically launch the installed Codex application. When the login screen appears, do not select the first option "Sign in with ChatGPT" — instead, click the second option: "Sign in with another method".
The system will prompt you to enter an "OpenAI API Key" — simply paste the DeepSeek API Key you saved earlier, then click "Continue". The first login may take a moment.
Verification: Confirming the Model Switch Was Successful
Once inside the Codex main interface, check the model selector in the bottom-right corner and confirm that you can select the "DeepSeek V4 Pro" you just configured. If you can, the entire setup is complete and you're ready to use it.
It's recommended to manually switch to the Pro version — DeepSeek offers both a standard and a Pro model, with Pro delivering better results at similarly affordable pricing. For daily use, Pro is the recommended choice.
It's worth noting that the official Codex team has publicly stated that future versions will natively support third-party LLM integration, at which point tools like Codex++ may no longer be needed to configure DeepSeek, Doubao, or other domestic models directly. Until that feature officially launches, the management tool approach remains the most stable option for users in China.
Summary: One Framework, Works for Any Model
The core logic behind this configuration is simple: Codex is the tool, the LLM is the engine, and Codex++ merely changes the login entry point to allow domestic models to connect. The technical feasibility rests entirely on the fact that domestic LLMs broadly implement the OpenAI API specification — this HTTP REST-based standard interface format has become the industry's de facto standard thanks to OpenAI's first-mover advantage in the developer ecosystem. Domestic providers, by adopting this standard, allow any compatible model to be swapped in as a replacement engine seamlessly; developers only need to change two parameters — base_url and api_key — to complete the migration.
Once you've mastered this workflow, switching between DeepSeek, Doubao, or any other model in the future follows the exact same steps: fill in the Base URL, fill in the API Key, fetch the model list, save, and activate.
For developers in China, this solution completely bypasses the three major barriers of account registration, paid membership, and network access — delivering the full Codex coding assistant experience at minimal cost (starting from just ¥10). It's currently the most practical direct-access solution available domestically.
Related articles

Apple HomeView Hands-On Review: Is the $300 Smart Home Hub Worth It?
Apple HomeView hands-on: a $300 smart home hub with facial recognition for quick account switching, but no App Store or voice recognition. Is the wall-mounted version worth it? Should you buy the first generation?

Meta Muse Wonder Launch: What It Means for Meta's Return to the Frontier AI Race
Meta releases Muse Wonder and WonderFull, benchmarks reach the frontier, community feedback is polarized. An in-depth look at Meta's return to the frontier AI race, its personal agent strategy, and Zuckerberg's different path.

Apple Home Smart Home Lineup Leaked: LG and Schneider Team Up, UWB Door Lock on Board
Apple Home ecosystem gains new LG and Schneider devices: UWB smart lock with proximity unlock, 2.5K dual-camera doorbell, privacy indoor camera, and AirPods-like seamless pairing.