MiniCPM-2B Uncensored Local Deployment Guide: Integrating llama.cpp and Hermes End-to-End
Step-by-step guide to running MiniCPM-2B locally with llama.cpp and Hermes for offline, private AI.
This article provides a complete walkthrough for deploying the Chinese-developed MiniCPM-2B small model locally using llama.cpp. The four-step process covers downloading a GGUF quantized model, configuring llama.cpp with CUDA DLL dependencies, writing a batch launch script with key parameters, and connecting to third-party clients like Hermes via OpenAI-compatible API. The 2B model runs on modest hardware with 131K context support and speeds exceeding 100 tokens/second, making it ideal as a lightweight local assistant — though it has limits on complex reasoning tasks.
The MiniCPM series of Chinese-developed small models has attracted significant attention for its compact size and low hardware requirements. Based on a hands-on tutorial shared by Bilibili creator 超哥, this article compiles a complete local deployment solution — from model download and llama.cpp configuration to client integration — enabling an ordinary PC to run a local LLM with 131K context support.
It's worth noting that the tutorial covers what's referred to as an "uncensored" model variant. While local deployment does offer real advantages in terms of privacy control and offline availability, users must comply with all applicable laws, regulations, and platform guidelines. This article covers the deployment process from a purely technical perspective.
Why Run a Small Model Locally
The core value of local deployment lies in keeping data on-device, eliminating network dependencies, and enabling free integration with a wide range of client tools. Unlike large-parameter models that typically demand high-end GPUs, 2B-class models like MiniCPM are hardware-friendly. The creator uses an RTX 4080S (16GB VRAM) + 64GB RAM setup, achieving inference speeds of around 110 tokens/second in testing.
The tutorial also includes a side-by-side comparison video showing MiniCPM 2B completing the same task noticeably faster than two other models with roughly 4B and 2B parameters respectively. Of course, such demonstrations are for reference only — actual performance varies depending on quantization level, hardware, and task type. Small models are positioned as "fast and lightweight" rather than aiming for peak reasoning capability.
Step 1: Download the Model File
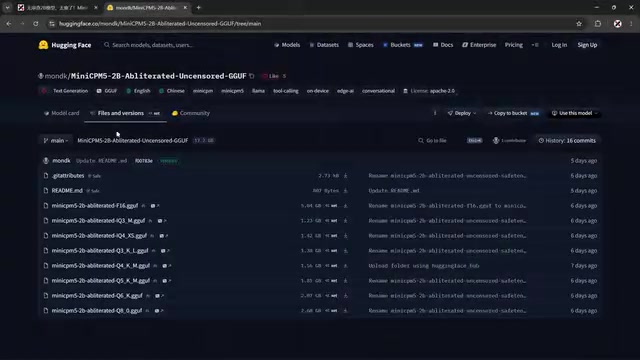
You'll first need to obtain the model file in GGUF format. The tutorial provides the official repository link along with domestic cloud storage alternatives (Quark, Thunder) for users with limited download speeds.
Once inside the model repository, click the "Files" tab to see multiple quantized versions. The core logic of quantization is: smaller files use fewer resources, but at the cost of some precision and output quality; larger files stay closer to the original model's performance. The tutorial recommends choosing based on your hardware — lower-end machines should go for the ~1.2GB smaller variant, while better-equipped setups can download the full-size version.
How to Choose a Quantization Level
For users with limited VRAM, Q4-level medium quantization offers a good balance between file size and output quality. While the full-precision version performs best, the 2B model isn't particularly large to begin with, so most modern computers can handle it.
Quantization refers to the process of compressing model weights from high-precision floating-point numbers (such as float32 or float16) to low-bit integers (such as int8 or int4), trading off file size and memory usage. In the GGUF format, common quantization naming follows the pattern Q + number + letter suffix — for example, Q4_K_M means 4-bit quantization, K indicates a grouped quantization strategy, and M denotes a medium-precision variant. Lower numbers (like Q2 or Q4) yield higher compression but greater precision loss; Q8 is near-lossless but correspondingly larger. For a 2B-parameter model, Q4_K_M is typically the best value: VRAM usage sits around 1.5–2GB, and output quality is barely distinguishable from the original. If you only have an integrated GPU or plan to run purely on CPU, Q4 or lower is recommended for smooth performance. If you have a dedicated GPU with ample VRAM, Q6 or Q8 will give you better output quality.
Step 2: Download and Configure llama.cpp
llama.cpp is the core inference engine for running GGUF models. The tutorial downloads the latest release from GitHub, with cloud storage mirrors provided as an alternative.
Pay attention to version compatibility when downloading: llama.cpp offers multiple builds targeting different CPU instruction sets and GPU types. Since the creator uses an NVIDIA GPU, the CUDA build was selected. One important detail — you need to download two archives: the main program, and a separate DLL dependency package (the one with "DLLs" in the filename).
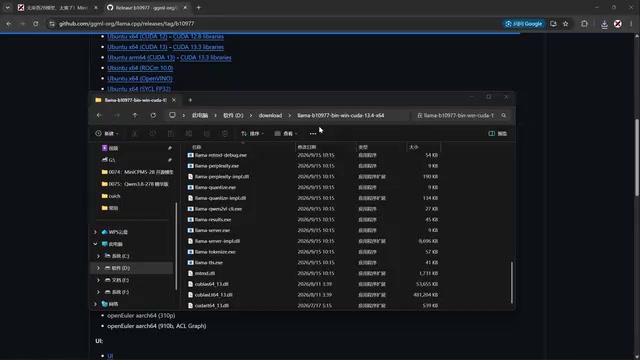
After extracting both, cut and merge the contents of the DLL folder into the main program directory so the dependencies can be loaded correctly at runtime. Skipping this step will likely cause "missing DLL" errors on startup.
Placing the Model File
Manually create a folder named models inside the llama.cpp main program directory, then place your downloaded GGUF model file inside it. The program directory can live on any drive partition — it's a portable, installation-free application.
llama.cpp is an open-source inference framework developed by Georgi Gerganov, written primarily in C/C++. It's designed to run large language models efficiently on consumer-grade hardware, including pure CPU environments. It natively supports the GGUF format and, through backend plugins, supports acceleration via CUDA (NVIDIA GPUs), Metal (Apple Silicon), OpenCL, and more. The CUDA build offloads model computation layers to the GPU, significantly boosting inference throughput. If the system doesn't have the corresponding CUDA runtime installed, the separate DLL package provides the necessary runtime libraries. llama.cpp also includes a built-in HTTP server (
llama-server) that's compatible with the OpenAI Chat Completions API — which is exactly why downstream clients can connect to it as if it were an "OpenAI API" endpoint. Requests use the exact same format as calls to OpenAI's cloud service; only the Base URL points to a local address.
Step 3: Configure the Launch Script
To make launching convenient each time, the tutorial uses a batch script. Create a new text file in the main program directory and rename its extension to .bat (e.g., start.bat), then fill in the launch command.
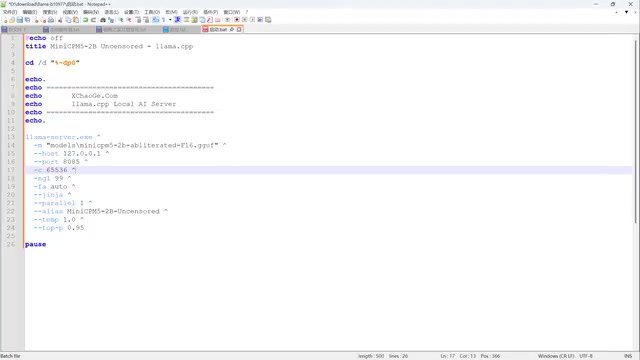
Several key parameters in the script deserve attention:
-m models\your-model-filename.gguf— specifies the model path; replace the filename with the actual file you downloaded (including the.ggufextension)- Port number — defaults to 8085; change it freely if that port is already in use
-c— context length; the tutorial defaults to 60000, which you can increase as needed
Save the script and double-click to run it. When the terminal displays a listening address (e.g., 127.0.0.1:8085), the server has started successfully. Ctrl+click the link or visit that address in your browser to open the built-in Web UI for chat testing.
Step 4: Connect to the Hermes Client
Beyond the built-in Web interface, the model can be integrated with third-party clients for richer functionality (such as tool calling). The tutorial demonstrates connecting to the Hermes client, which works by leveraging the OpenAI-compatible API interface.
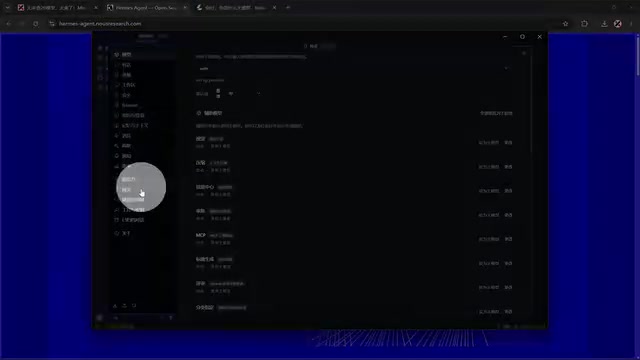
Configuration steps:
- Open the client settings and navigate to Provider → API Key
- Select OpenAI API; the key can be anything (local models don't validate it — e.g.,
12345) - In the Base URL field, enter the local service address with the port number matching what you set in the script (e.g., 8085)
- Save and select the corresponding model from the model list, then apply
Once configured, send a test message — if you get a normal response, the integration is successful. This "OpenAI-compatible + custom Base URL" approach works with virtually any client that supports custom API endpoints, making it highly versatile.
The OpenAI-compatible API refers to an HTTP service that follows the OpenAI Chat Completions interface specification (
POST /v1/chat/completions). Since OpenAI's interface format has become the de facto industry standard, the vast majority of AI clients (such as Open WebUI, NextChat, Chatbox, LobeChat, etc.) support forwarding requests to any compatible service via a custom Base URL, rather than being locked to the official endpoint. The reason you can enter any string as the local API key is that llama.cpp's server doesn't enable authentication by default — the non-empty string is simply there to satisfy the client form's validation requirement. If you plan to expose the service over a public network or in a shared environment, it's strongly recommended to add--api-keyto the startup parameters with a real key to prevent unauthorized access.
Important Notes
A few common pitfalls worth highlighting:
Don't close the terminal window — the terminal running the launch script is the host process for the model service. Closing it disconnects all sessions. To resume, simply double-click the launch script again.
Service doesn't start on boot — the local service won't auto-start after a system reboot. You must run the .bat script again each time to restore access.
Responsible use — the so-called "uncensored" variant means the model lacks safety alignment. While local deployment offers technical freedom, users are solely responsible for any content generated. Do not use it for illegal or policy-violating purposes.
Summary
The entire workflow can be summarized as: download the GGUF model → configure llama.cpp and its DLL dependencies → write a launch script → connect a client. For users who want to experiment with Chinese-developed small models locally, this is a low-cost, reproducible path. The advantage of 2B-class models lies in their speed and low barrier to entry — they're well-suited as lightweight assistants or tool-calling engines. That said, they do have a ceiling when it comes to complex reasoning tasks, so your actual model selection should be based on your specific use case.
Related articles

LynnReal-Omni: 32B Unified Video Diffusion Model Goes Open Source with Multi-Task Coverage in Four Steps
LynnReal-Omni is a 32B unified video diffusion model on MiniMax H3, covering text-to-video, pose guidance, style transfer, restoration in 4 steps. Flash version generates 540p video in 377ms on one H100.

Anthropic Co-Founder: AI 'Kill Switch' May Need to Be Mandatory by Law
Anthropic's co-founder tells the BBC that AI 'kill switches' may need to be legally mandated. We analyze the industry logic, technical challenges, and the tension between regulation and innovation.

The AI Data Center Boom Is Colliding With Cities Scarred by Heavy Industry
The AI data center boom is clashing with post-industrial communities. Philadelphia's case reveals structural conflicts between AI growth, energy use, water, and environmental justice.