Build a Professional Website with Claude Code in Minutes: A Five-Step Practical Guide
A five-step Claude Code workflow that turns an AI-flavored website into designer-grade work.
The article presents a creator's complete method for transforming a website that "looks obviously AI-made" into designer-grade work using Claude Code. The core point: AI websites look cheap mainly because there's no business planning before building and prompts lack detail and constraints. The five steps: install and configure the model, effort level, and permissions; generate the first version with a prompt covering business positioning, section lists, design constraints, and "what you don't need"; iterate in small steps with precise instructions; connect Artlist via MCP to generate and compress images; and trigger a design redo with Dribbble reference images. Publishing uses Hostinger's MCP, with emphasis on replacing sample content and mobile optimization.
Many people use AI to generate websites, and the result is often instantly recognizable as AI-made—rigid layouts, hollow copy, and cheap-looking images. A YouTube creator spent a week of trial and error to distill a method for turning "AI-flavored" websites into designer-grade work using Claude Code, all in just a few minutes. The value of this workflow isn't in the tools themselves—it's in revealing exactly what separates a "usable" AI-built site from a "professional" one.
Why Most AI Websites Look AI-Made
At the start of the video, the creator shows his early work: the page structure is complete, the functionality works, but it just reeks of "template." He attributes this to a step most beginners skip—not planning before building.
Claude Code can only build from the information you give it. If you just type "make me a restaurant website," it can only fill in generic content and generic design. What really determines website quality is how much business detail you inject into the prompt: who you are, who your clients are, what visitors should do, and what vibe you want the site to convey.
The planning checklist given in the video includes: business name and location, a one- or two-sentence business description, which sections the homepage needs, which content needs its own page, desired colors and mood words, and most importantly, one conversion action (book, call, or request a quote). This step takes only a few minutes but directly sets the quality ceiling of the first version.
Breaking Down the Five-Step Process
Step 1: Installation and Key Settings
Using Claude Code requires a paid Pro plan; the free version doesn't include the feature. After downloading the desktop app, switch to Code mode and create a dedicated folder for your project—Claude Code can only see and modify files within the folder you specify, and all output is saved there.
Three settings deserve special attention. Choose the Opus series for the model (Opus 5.5 in the video), as it's better at handling design and large tasks; set the effort level to high so the model thinks more carefully before acting; and set the permission mode to auto—otherwise you'll have to manually approve almost every step, which becomes very sluggish when building a full site.
Claude Code is Anthropic's command-line/desktop AI coding agent tool. Its difference from the web version of Claude is that it can directly read, create, and modify files within a folder you specify, and execute terminal commands, making it suitable for multi-file, multi-step tasks like "building a website from scratch." It requires a paid subscription (Pro or above); free accounts can't use it.
Effort level is a parameter in Claude Code that controls how much reasoning the model invests. When raised, the model does more analysis and planning before acting, which is especially effective for design and long-workflow tasks; the trade-off is slower responses and more quota consumption. Permission mode determines whether Claude needs your line-by-line confirmation before performing file writes, command execution, and other operations. Auto mode lets routine operations through, which suits operation-intensive scenarios like site building—but it also means you need to trust its behavior and keep version backups.
Step 2: Build the First Version with One Prompt
The author recommends building the site without any images first, so that even if you don't have a logo or photos, you can still launch a decent website the same day.
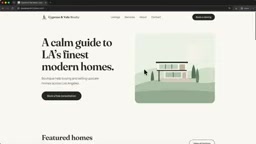
The prompt structure is worth copying: first state what to build ("Build a website for Cypress and Vale Realty, a boutique real estate agency in Los Angeles"), then describe the business positioning in one or two sentences, then list the homepage sections one by one, and then explicitly state what you don't want ("Only featured listings, no search function")—this sentence prevents the AI from piling on unnecessary features.
Design constraints are the most easily overlooked part. The author's exact words were: "At the top of each page, use one large bold headline, one line of short copy, and one clear button. No small labels, badges, or extra annotations. Keep paragraphs to one or two lines." Without this constraint, Claude habitually stuffs the hero section with small text and badges, and the page immediately looks cluttered.
The last two sentences are key to wrapping up: "Make it a simple static website with HTML and CSS so it's easy to publish," and "Ask me any questions you need before you start building." The latter makes Claude stop and confirm details instead of making assumptions.
Step 3: Iterate with Precise Instructions, Not Vague "Make It Look Better"
After the first version goes live, it still clearly feels "AI," and the content needs to be replaced step by step. The author emphasizes changing only one or two things at a time, because "if you mention ten changes in one message, some will get missed, and if something goes wrong it's hard to tell which edit caused it."
An effective instruction format is: point to the location + explain what to change + describe the desired effect. For example, "In the hero section at the top of the homepage, make the house illustration richer, with warm light glowing through the windows, and add a pool and a few trees, keeping the same style" is far more effective than "make it look better."
If you're not sure what to change, you can ask Claude directly: "List three changes that would increase viewing appointment bookings, explain each option, then wait for me to choose." This borrows the model's judgment while keeping you in control. When you can't articulate a problem, pasting a screenshot into the conversation is also a proven-effective approach.
Step 4: Use MCP to Connect External Tools to Generate and Integrate Images
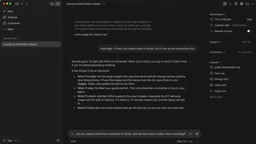
Images are a key part of closing the gap. The author's approach is to have Claude first review the site, list which images are needed, each image's purpose and aspect ratio, and output image prompts—then generate after confirmation.
Generation is done by connecting Artlist through MCP (Model Context Protocol, the protocol connecting models with external tools). Once configured, Claude can directly call Artlist to generate images and place them into the project folder, with no need to manually copy prompts. The video mentions a practical detail: after generation, Claude automatically does a round of quality judgment, pointing out which image works best and which is weakest and may need regenerating.
Before images go into the site, there's one more step: images from cameras or AI generation are often very large and will slow down the site, so you need to have Claude compress copies that look the same but load faster.
MCP (Model Context Protocol) is a protocol proposed and open-sourced by Anthropic in late 2024 to standardize how AI models connect with external tools and data sources. Think of it as the "USB-C port for AI": as long as a service provides an MCP Server, Claude can call its capabilities in a unified way without writing separate integration code for each tool.
In this workflow, Artlist and Hostinger each provide an MCP Server. Once registered via configuration files, Claude can directly call their image generation and site deployment interfaces, with results landing directly in the project folder—eliminating the need to copy prompts and manually download and upload. The MCP ecosystem now has a large number of community and official servers covering databases, design tools, cloud platforms, and more—which is why the article emphasizes that "protocolized collaboration" is changing AI workflows.
Step 5: Trigger a Design Redo with Reference Images—This Is the Step That Changes Everything
The author considers this the watershed that makes a website "look like a designer made it." The approach: search Dribbble and similar platforms for designs in the same industry, save screenshots to the project folder's references directory, then tell Claude what you like about each reference image—explicitly limiting it to borrowing the layout only, not copying the design—and citing the filenames directly.
After the redo, the page had a floating menu, large modern display headlines, and rounded elements echoing the reference images—the content was unchanged, but the visuals were completely swapped out. The author says this redesign took only about ten minutes.
Publishing and Ongoing Maintenance
Going live requires two things: a hosting server and a domain name. The video does this through Hostinger's MCP connection—Claude can directly create the site, upload files, check loading page by page, first publishing to a free temporary address, then binding the official domain after confirming everything is fine. After registering a domain you need to verify your email, and new domains sometimes take a few minutes to take effect.
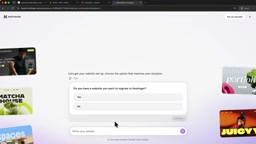
Before publishing, be sure to replace the sample content: contact information, avatar, and use only real customer reviews. Also check that button links work, and have Claude do a round of mobile optimization—many visitors come from phones, and crowded or undersized tap targets directly hurt conversion.
The process for later edits is the same as building: open the project folder, request changes, confirm in preview, then have Claude publish to the domain. The author reminds you to keep the project folder safe—it's the complete copy of your website.
What This Method Really Teaches Us
The barrier to tools is dropping fast, but three things determine output quality: planning granularity, instruction precision, and reference quality. AI doesn't automatically know your business details, and it doesn't automatically judge what "professional" means—it needs you to define it first. The pattern that recurs throughout the video is that every effective prompt includes constraints: what not to do, limit to how many lines, borrow layout only. This ability to apply "negative constraints" may matter more than which model you learn to use when it comes to closing the gap in AI site building.
Also worth noting is the value of the MCP ecosystem. Artlist handles images and Hostinger handles hosting, and both plug into Claude Code through the same connection mechanism, stringing "generate content—process assets—deploy live" into an assembly line that doesn't require manually moving files. This kind of protocolized collaboration between tools is pushing AI from the chat window into actual production workflows.
One-line Summary
A five-step Claude Code workflow that turns an AI-flavored website into designer-grade work.
Paragraph Summary
The article presents a complete method from one creator for transforming a website that "looks obviously AI-made" into designer-grade work using Claude Code. The core idea: AI websites look cheap mainly not because the model lacks capability, but because there's no business planning before building and the prompts lack detail and constraints. The process has five steps: install and configure the model, effort level, and permissions; generate the first version with a prompt containing business positioning, section list, design constraints, and "what you don't need"; iterate in small steps with precise instructions in the form of "location + change + desired effect"; connect Artlist via MCP to generate and compress images; and finally trigger a design redo with Dribbble reference images. Publishing is done through Hostinger's MCP, with emphasis on replacing sample content and mobile optimization.
Related articles

The Safety Blind Spot in Multimodal Image Editing: Text-Sensitive, Visually Blind
EditSafetyBench benchmarks image editing systems like Gemini, GPT, and Qwen, revealing a text-visual safety mismatch: high rejection of unsafe prompts but lax handling of unsafe images, calling for joint multimodal safety guardrails.

GLiDE: Fast, Calibrated Decision Models Distilled from Reasoning Teachers
GLiDE is a family of decision models distilled from reasoning teachers, ranging from 0.4B to 27B, achieving fast calibrated decisions in a single forward pass by removing causal masks and using soft-target distillation. The 27B model scores 71.52 on the hidden set with 2.0% calibration error and 92.9ms latency.
Cursor vs Claude Code: Which Writes Better Code? The Real Difference Is Architecture
The difference between Cursor and Claude Code isn't the model but the architecture: editor-first Cursor suits deep focus and code review, terminal-agent-first Claude Code suits batch refactoring and CI/CD automation.